Mice are often not picky, but they are predictable. If you pick bait that matches what they already eat in your home, and you place it where they actually travel, you can go from weeks of “I saw one!” to catches within 1 to 3 nights.
This guide breaks down the best baits for common situations, how to bait traps so mice commit, what to do after you catch one, and how to stop the repeat infestation cycle.
What makes bait work
A good mouse bait does three things:
- Smells tempting from a short distance, especially along walls and in dark corners.
- Sticks to the trap so the mouse has to work at it, not just grab and run.
- Matches local food like what is in your pantry, pet area, garage, or bird seed storage.
One more truth that surprises people: trap placement often beats bait choice. Mice usually move along edges, not across open rooms. If your trap is sitting out in the middle, the “best bait” in the world often will not matter.
Also worth knowing: some mice can be cautious around new objects (neophobia). If you have activity but no trap visits, placement and a short “set but not armed” period can help.
Best baits for mice (ranked)
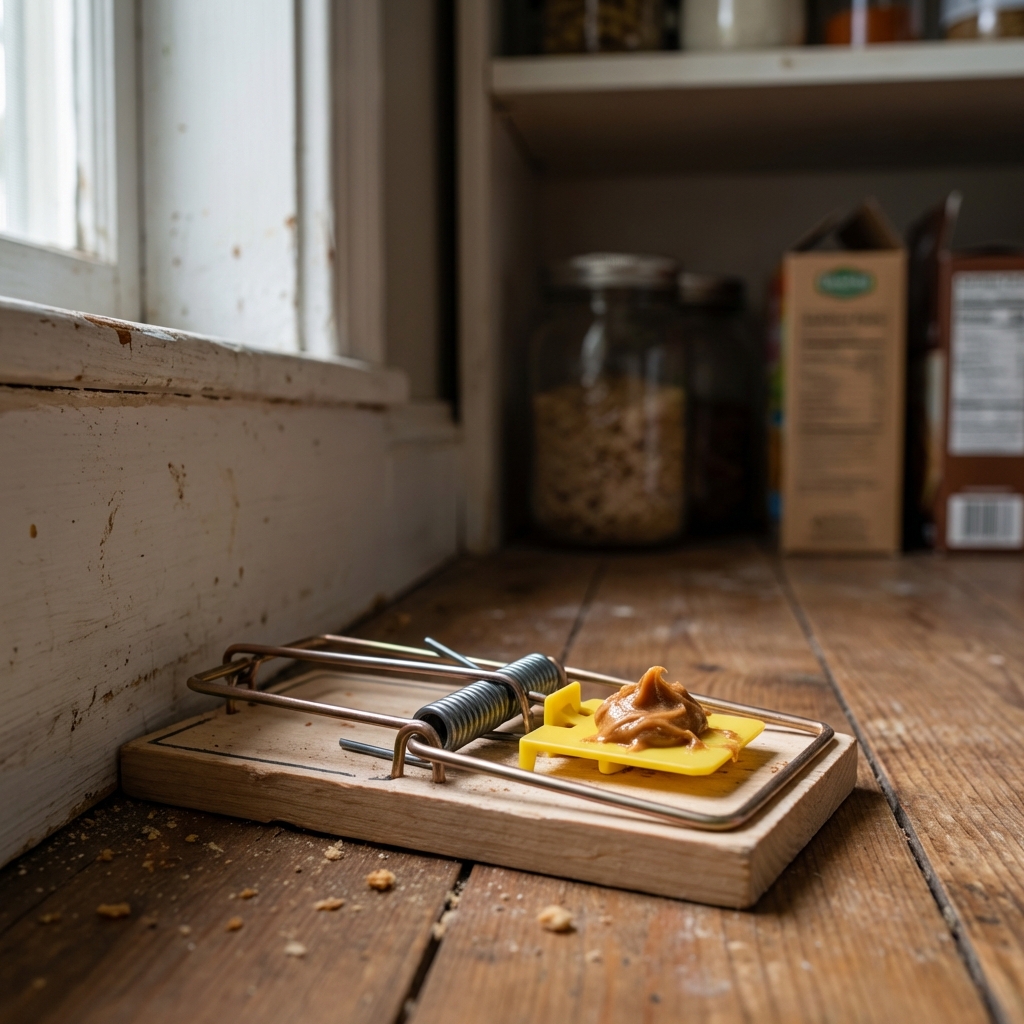
1) Peanut butter
This is the go-to for a reason. It is oily, aromatic, and it clings. Use a tiny smear, about the size of a pea, and press it in so they have to tug. Too much makes it easy to lick without triggering the trap.
- Best for: Most homes, garages, and sheds
- Pro tip: Press it into the bait cup or onto the trigger so it stays put
2) Chocolate spread (cocoa or hazelnut)
Chocolate has a strong smell and high calorie appeal. A small dab of chocolate spread can work when peanut butter is not getting attention.
- Best for: Mice that ignore nut-based baits
- Pro tip: Use a tiny amount so the mouse has to pull, not just lick
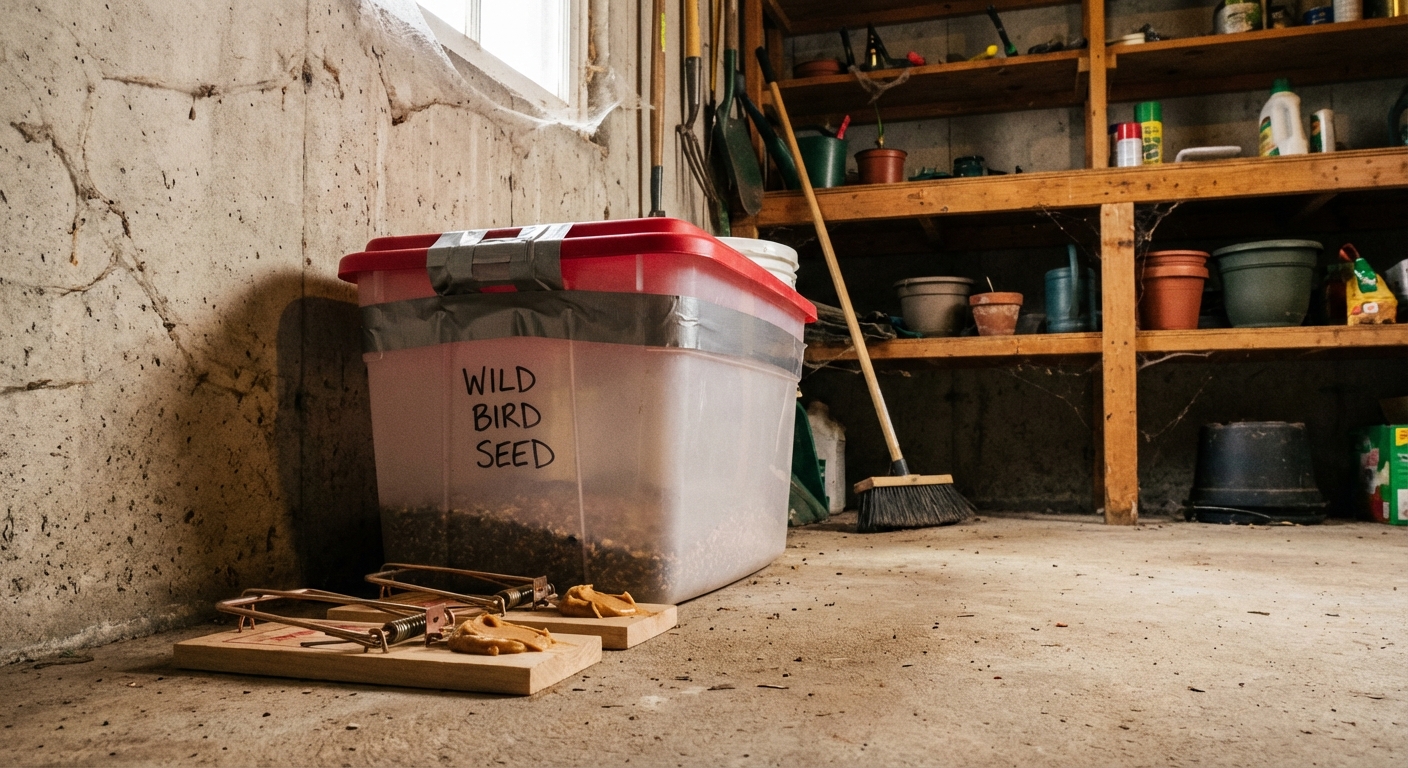
3) Seeds and nuts (sunflower, pumpkin, mixed bird seed)
If you store bird seed, chicken feed, or bulk grains, mice may be keyed in on that. Seeds can be excellent, but they are easy to steal unless you anchor them.
- Best for: Garages, barns, sheds, and around bird feeders
- Pro tip: Push a few seeds into a dab of peanut butter to make a “sticky cluster”
4) Oats or granola
Oats are common in pantries and are familiar to mice. They are not as smelly as peanut butter, but they work well when combined with something sticky.
- Best for: Pantry and cabinet activity
- Pro tip: Mix oats into a small smear of peanut butter for texture and scent
5) Pet food (especially cat food)
If you have pets, mice often visit the bowl area at night. Use pet food only if you can keep pets away from the traps.
- Best for: Utility rooms, garages, and pet feeding corners
- Pro tip: Use one kibble anchored in place with a small dab of peanut butter
6) Bacon or meat scraps (situational)
This can work in cold garages or areas where mice are scavenging. It is not my first pick indoors because it can spoil and attract other pests.
- Best for: Outbuildings and cold spaces
- Pro tip: Use a very small piece and replace frequently
How to bait a trap so they cannot steal it
If mice are licking bait off without getting caught, it is usually one of these issues: too much bait, bait not anchored, or the trap is not stable.
- Use less bait: a pea-sized dab is plenty.
- Make them work: press bait into the trigger cup or smear under the lip of the trigger so they have to pull.
- Add texture: embed a few oats or seeds into peanut butter so the mouse has to tug and trigger the mechanism.
- Stabilize the trap: set it flat, not rocking on clutter or thick carpet.
For reusable plastic snap traps, follow the same rule: a small smear, pressed firmly into the bait well.
Where to place traps for fast catches
Mice run edges. Your job is to set traps where they already travel.
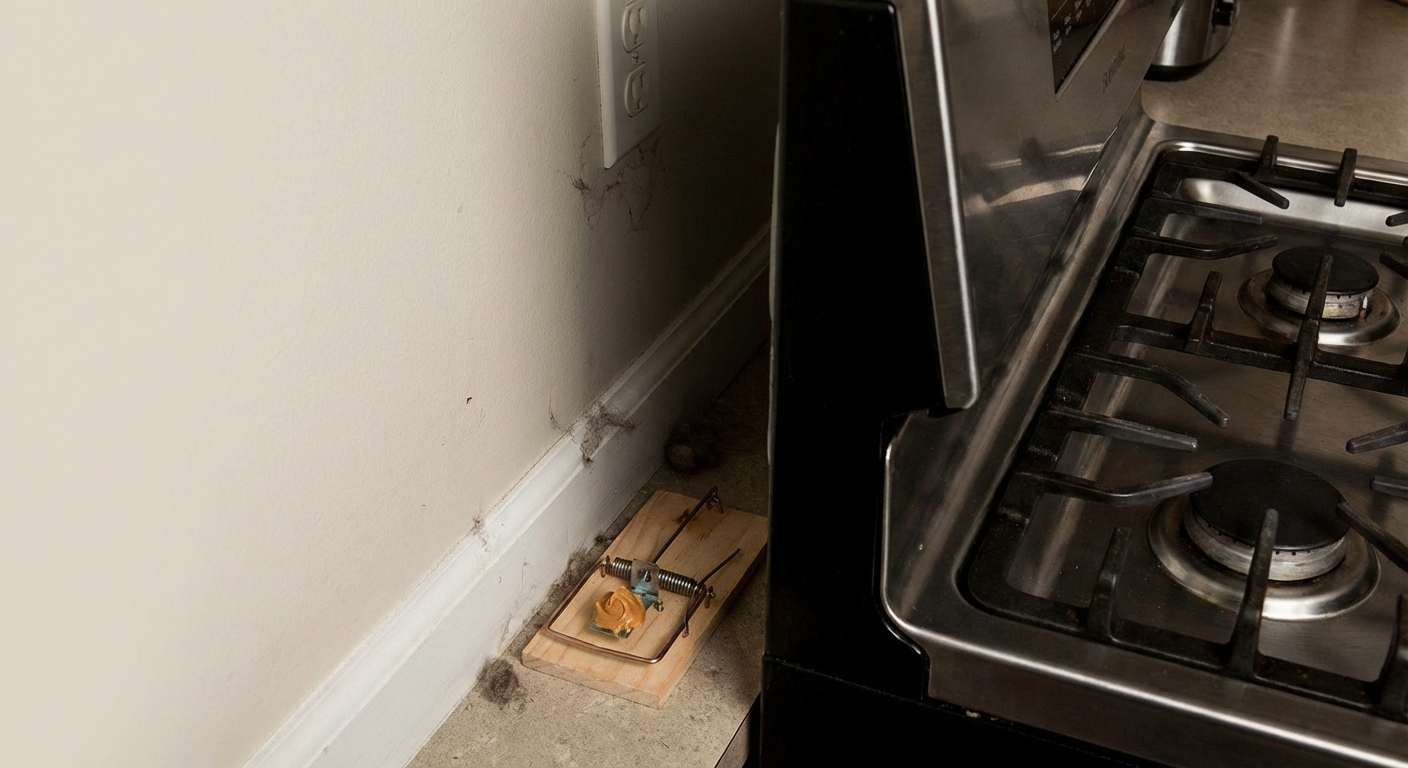
- Along walls and baseboards, not in open floor space.
- Behind appliances like the fridge and stove, especially near the compressor area where it is warm.
- Inside cabinets under sinks or where you have droppings or gnaw marks.
- In the garage near stored seed, pet food, cardboard piles, and the garage door corners.
Trap orientation: two common setups work. The most widely used is perpendicular to the wall with the trigger closest to the wall, so the mouse hits it as it hugs the edge. Some traps and tight spots work better parallel to the wall with the trigger end tight to the baseboard. If you are not getting action, try the other orientation and keep the trigger end as close to the wall as possible.
How many traps: If you have signs of activity, set several. One or two traps can turn into one or two clever mice learning to avoid them.
Optional if they are trap-shy: place traps in the right spots for 1 to 2 nights unset with bait, then set them.
Match bait to the situation
If mice are in the pantry
- Peanut butter with oats
- Chocolate spread
- Granola pressed into a sticky bait
If mice are in the garage or shed
- Bird seed cluster in peanut butter
- Sunflower seeds
- Small piece of bacon in cold months
If mice are visiting pet bowls
- One kibble anchored with peanut butter
- Peanut butter alone near the feeding area (only if pets cannot reach traps)
If you keep missing or bait gets stolen
- Switch to a stickier bait (peanut butter or chocolate spread)
- Use less bait and press it in firmly
- Add more traps and tighten placement along walls
Trap types and bait tips
Snap traps
Fast and effective. Best with sticky baits like peanut butter or chocolate spread. Use small amounts and place along walls.
Electric traps
Usually baited inside a chamber. Peanut butter, chocolate spread, or a small bit of nut works well. Keep them dry and follow the manufacturer instructions.
Live traps
Use higher-value foods since the mouse has to enter fully: peanut butter on bread, chocolate, or seed clusters. Check often. If you choose live trapping, be aware relocation is restricted in some areas and mice can return if released nearby. Check local wildlife and pest regulations before relocating any animal.
Glue boards (not recommended)
They can cause prolonged suffering and can trap non-target animals. If you have kids, pets, or wildlife around, avoid them.
Mouse or rat
Before you buy a stack of traps, make sure you are solving the right problem. Bait can overlap, but trap size and placement often differ.
- Droppings: mouse droppings are small and rice-like. Rat droppings are larger and thicker.
- Sounds: mice tend to be light, quick scratching. Rats are louder and heavier, often in walls or ceilings.
- Gnaw marks: rats leave bigger, rougher gnawing and can damage tougher materials.
If you suspect rats, use traps designed for rats and consider professional help sooner.
After you catch one
This is where a lot of people accidentally reset the cycle. Do these steps right away.
- Ventilate if needed: crack a window if you are cleaning in a small space and using disinfectant.
- Wear gloves: avoid direct contact with the trap, mouse, and droppings.
- Bag and seal: place the mouse and any disposable trap materials into a plastic bag, seal it, then bag it again if you want extra odor control.
- Disinfect the area: lightly spray where the trap sat and any nearby droppings or urine spots, let it sit, then wipe up.
- Reset and rebait: refresh bait and put the trap right back in place. If you caught one, there is often more than one.
Safety and cleanup
Mice can carry pathogens, and droppings can be risky when disturbed. Keep it simple and careful.
- Keep traps away from kids and pets: place them in protected corners, behind appliances, inside cabinets, or in tamper-resistant bait stations designed for traps.
- Wear gloves when handling traps or cleaning droppings.
- Do not sweep or vacuum dry droppings. Lightly spray with disinfectant, let sit, then wipe up.
- Bag and seal dead mice and used gloves in a plastic bag before disposing.
- Wash hands well afterward.
Stop them from coming back
Catching the mouse is step one. Keeping the next one out is what makes it stick.
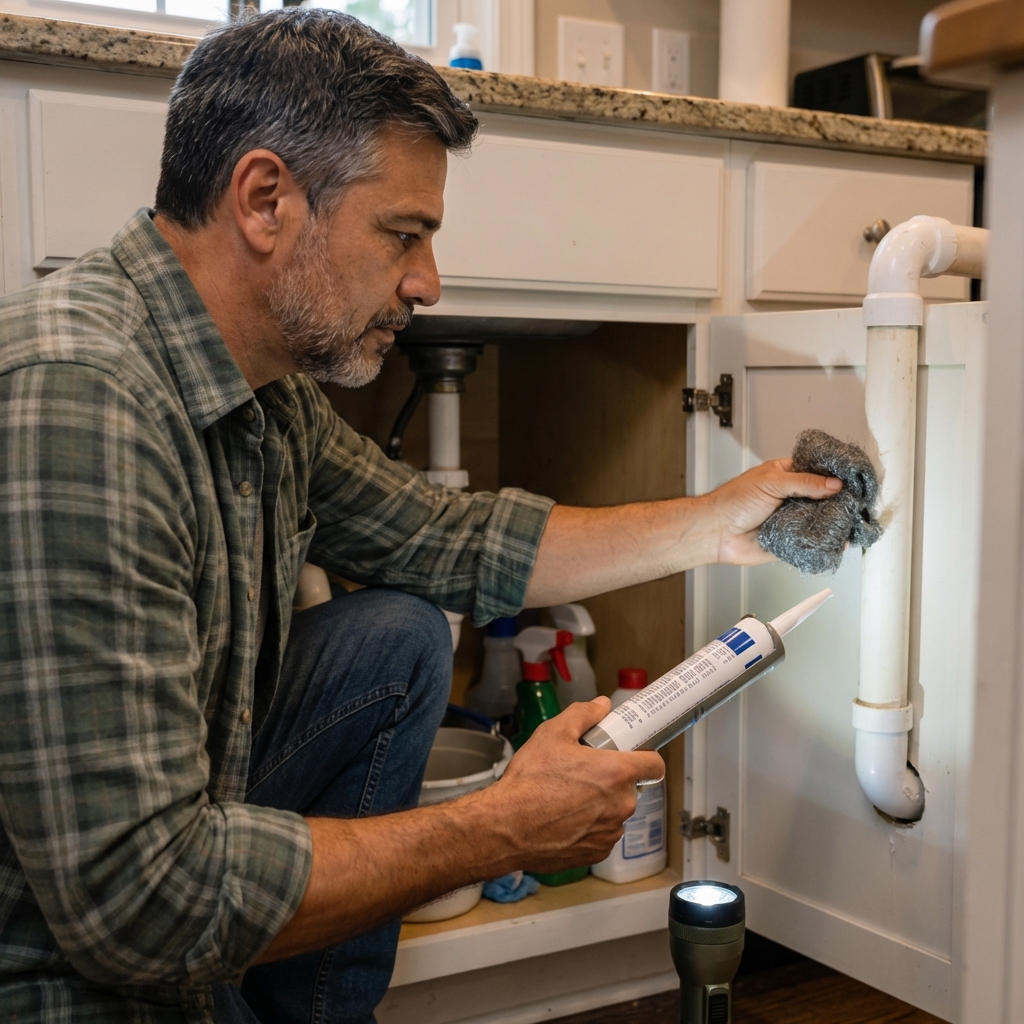
1) Seal entry points
Mice can squeeze through very small gaps. Focus on the lowest parts of the house first.
- Gaps around pipes under sinks and behind appliances
- Garage door corners and weather stripping
- Foundation cracks and utility line entry points
- Door sweeps and torn screens
Use materials that hold up: steel wool plus sealant, metal flashing, or hardware cloth for larger openings.
2) Remove food access
- Move pet food into sealed containers, not bags
- Store bird seed and bulk grains in lidded bins
- Clean under the stove and fridge where crumbs collect
- Keep counters clear at night, especially in older homes
3) Reduce nesting spots
- Get cardboard off the floor in garages and sheds
- Keep stored items a few inches off the ground
- Trim dense vegetation near the foundation
When to call a pro
- You still see fresh droppings or hear activity after 7 to 10 days of consistent trapping
- You find widespread droppings in multiple rooms, or activity in walls and ceilings
- You cannot find or seal likely entry points, especially in garages, crawlspaces, and older foundations
- You suspect rats instead of mice
Quick troubleshooting
“They are not taking the bait.”
- Move traps to walls and tight corners
- Try peanut butter or chocolate spread
- Add more traps in multiple locations
- Pre-bait with traps unset for 1 to 2 nights, then set them
“Bait is gone, trap did not go off.”
- Use less bait and press it into the trigger
- Anchor seeds inside a sticky bait
- Make sure the trap is stable and level
“I caught one, then nothing.”
- Keep traps out for at least 7 to 10 more days
- Reset and refresh bait every couple of days
- Start sealing entry points immediately
Bottom line
If you want the simplest answer, start with peanut butter in a tiny smear on a snap trap, placed tight to a wall along the path where you see droppings or rub marks. If that does not work, switch to chocolate spread or a seed cluster that matches what is stored nearby.
Then do the unglamorous part: seal gaps, store food in hard containers, and cut down nesting clutter. That is how you turn a one-time catch into a real fix.

Jose Brito
I’m Jose Britto, the writer behind The Country Store Farm Website. I share practical, down-to-earth gardening advice for home growers—whether you’re starting your first raised bed, troubleshooting pests, improving soil, or figuring out what to plant next. My focus is simple: clear tips you can actually use, realistic expectations, and methods that work in real backyards (not just in perfect conditions). If you like straightforward guidance and learning as you go, you’re in the right place.