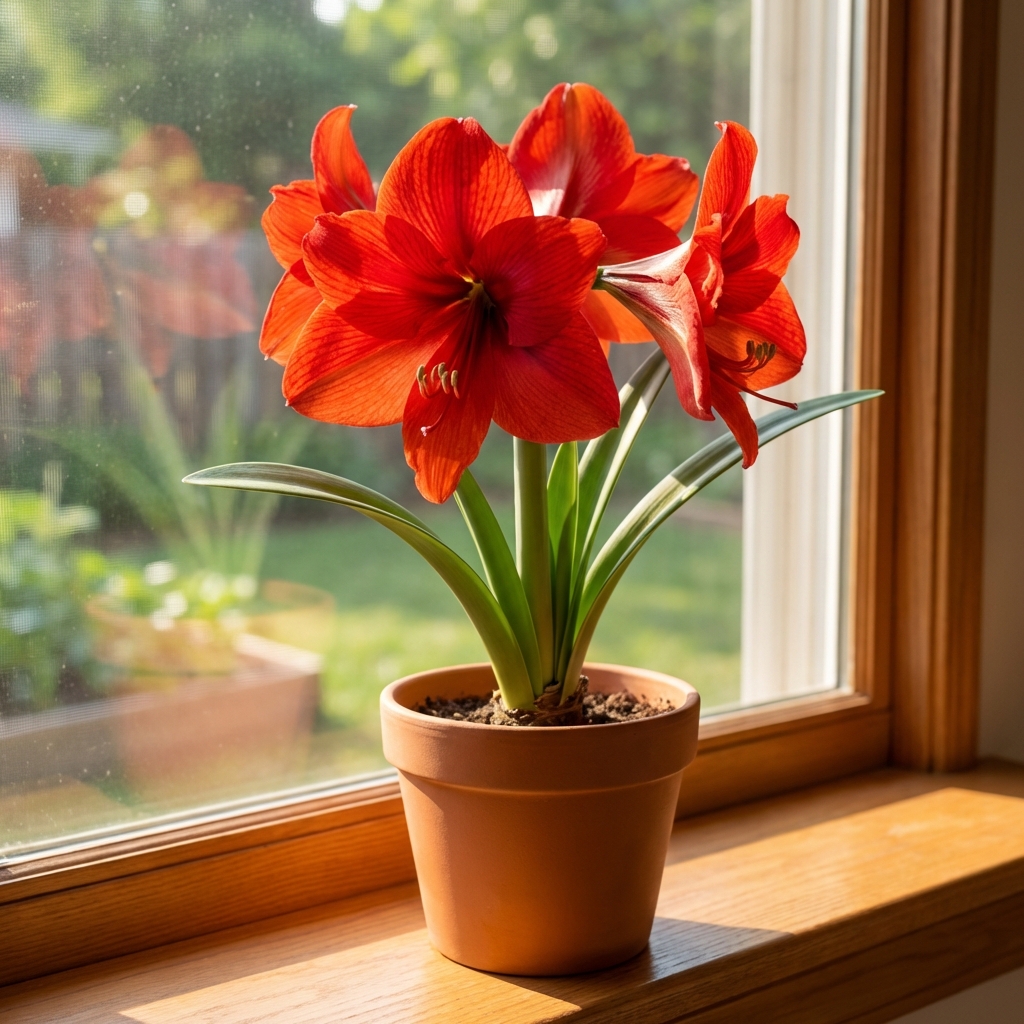
Amaryllis is one of those plants that makes you feel like a gardening pro, even if you are still learning. A big bulb, a thick flower stalk, and trumpet blooms that look like they belong in a florist shop. The trick is that the “easy bloom” is only half the story. The real win is getting that bulb healthy enough to bloom again next season.
Quick note for the plant nerds (and anyone who has been corrected at a dinner party): the holiday “amaryllis” sold in stores is usually Hippeastrum, not true Amaryllis. Care is basically the same for the bulbs most of us grow indoors.
This how-to walks you through the full cycle: planting, growing, blooming, after-bloom care, and dormancy. Follow the rhythm and your amaryllis can become a long-term, repeat performer.
Timing reality check: from planting a fresh bulb to flowers is often 6 to 10 weeks (sometimes a bit longer in cooler homes). For planned reblooms, see the timeline in the rebloom section.
Quick basics: what amaryllis needs
- Light: bright light indoors, or sun to part sun outdoors.
- Water: water well, then let the top of the soil dry a bit before watering again. Early on, err on the dry side until you see active growth.
- Soil: fast-draining mix. Bulbs hate sitting in soggy soil.
- Temperature: warm while growing, cooler during dormancy. Do not let the bulb freeze.
- Feeding: light, steady fertilizer once leaves are growing.
Safety note: amaryllis (Hippeastrum) bulbs are toxic if eaten. Keep bulbs and cut pieces away from pets and small kids.
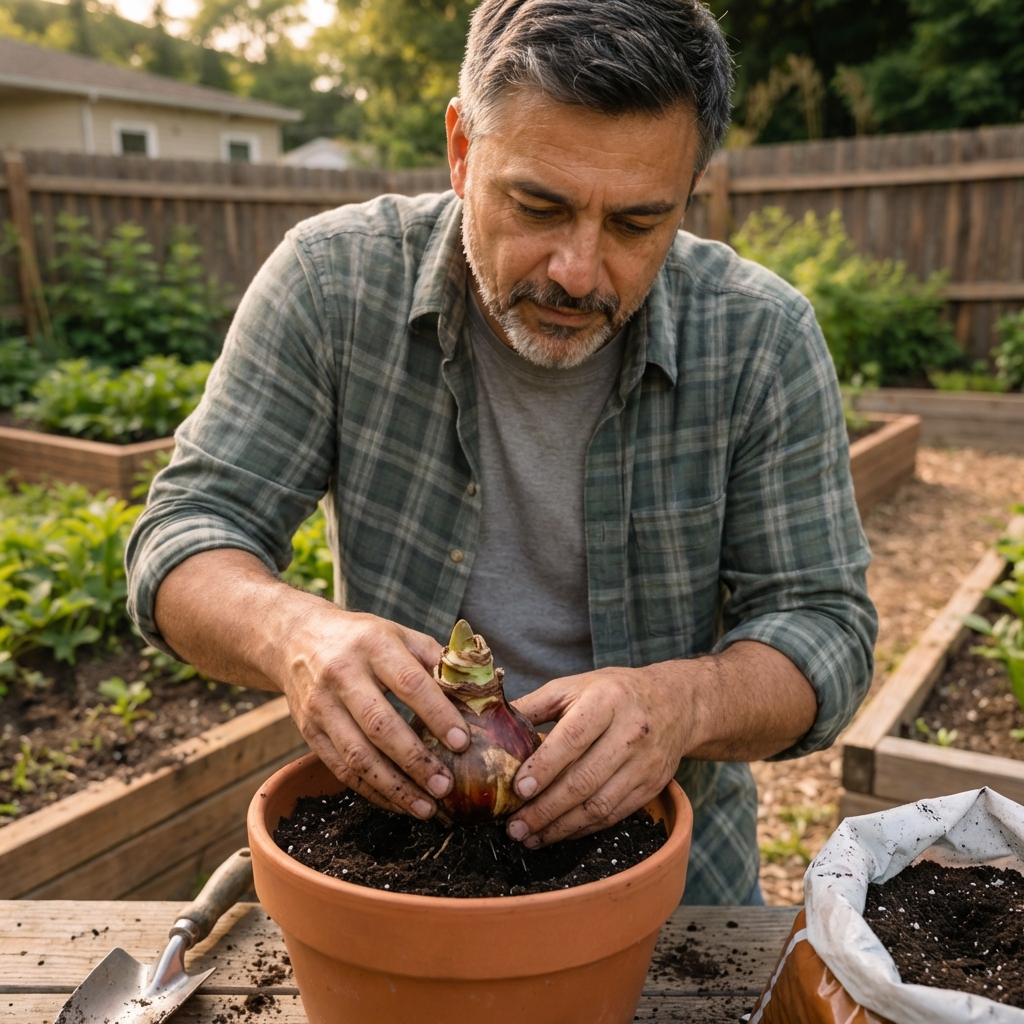
Choosing a bulb and setting it up for success
Pick a bulb that is worth your time
When you buy bulbs, size and firmness matter. A bigger, heavier bulb usually means a stronger bloom show. Avoid bulbs that feel soft, smell bad, or have dark mushy spots near the base.
- Good signs: firm bulb, dry papery outer layers, healthy roots (if present).
- Skip: moldy neck, oozing spots, severe bruising, or a squishy base plate.
Pot size and drainage (a common mistake)
Amaryllis likes to be slightly snug in its pot. Too large a pot holds extra wet soil and increases rot risk.
- Choose a pot that leaves about 1 to 2 inches of space around the bulb.
- Make sure the pot has a real drainage hole.
- If your variety gets tall, use a heavier pot (terra cotta or ceramic) so it does not tip.
How to plant amaryllis (indoors or container garden)
Use a fast-draining mix
A standard indoor potting mix works, but I like to lighten it for bulbs so water does not linger.
- Option A: regular potting mix plus perlite (about 2 parts mix to 1 part perlite).
- Option B: cactus or succulent mix, especially if your home is cool or humid.
Planting depth
The most reliable rule: leave the top third of the bulb above the soil line. Burying the whole bulb increases rot risk and can slow growth.
- Add soil to the pot so the bulb will sit high, not deep.
- Set the bulb in place and spread roots gently (do not force them).
- Backfill soil and press lightly to remove big air pockets.
- Water once to settle the mix, then keep it on the dry side until you see new growth.
Where to place it after planting
Warmth encourages the first push of growth. Put the pot in a bright spot with average indoor warmth.
- Best: bright window with strong daylight.
- Avoid: cold drafts and heat vents that dry the pot fast.
Light, watering, and turning the pot
Light
Indoors, aim for the brightest light you have. Outdoors (in suitable climates), amaryllis does well with morning sun and light afternoon shade. Too little light gives you floppy leaves and a leaning stalk.
Watering without rotting the bulb
Amaryllis bulbs are tough, but they are not forgiving about soggy soil. Here is a simple pattern that works in real homes:
- After planting, water once to settle soil.
- Then water sparingly until you see active growth.
- Once growth is underway, water when the top 1 inch feels dry.
- Water thoroughly until excess drains out. Empty the saucer.
- Avoid pouring water directly into the bulb neck if you can.
Rotate your pot
Flower stalks lean toward light. Give the pot a quarter turn every few days so the stalk grows straighter and the plant looks balanced.
Staking and bloom care
Some varieties get top-heavy. If the stalk starts to lean or the pot wants to tip, stake it early rather than waiting for a near-disaster.
- Use a bamboo stake or thin garden stake.
- Tie loosely with soft plant ties, not wire.
- Keep the plant in bright light to reduce stretching.
To extend bloom life, keep the plant out of direct hot sun indoors and away from heaters. Cooler indoor temperatures at night can help blooms last longer.

After the flowers fade: the step that determines next year
Deadhead correctly
When each bloom fades, snip it off so the plant does not waste energy making seeds.
- Cut off the spent flower (or the whole flower cluster) but keep the stalk until it starts to yellow.
- Once the stalk yellows, cut it down to about 1 to 2 inches above the bulb.
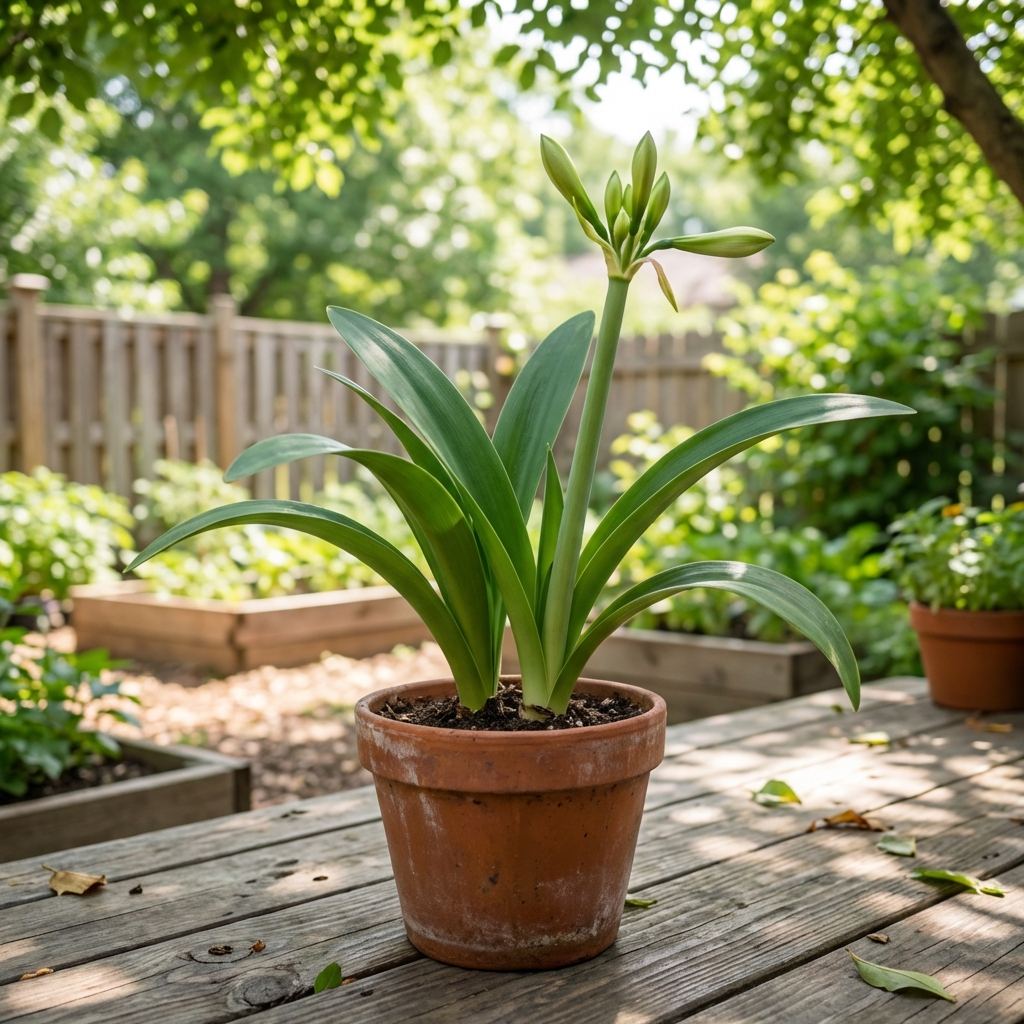
Keep the leaves growing
The leaves are not decoration. They are your bulb’s solar panels. The stronger the leaf growth, the better the chance of a solid rebloom.
- Give bright light.
- Water when the top inch dries (and empty the saucer).
- Do not braid or tie leaves. Let them do their job.
Fertilizer plan (simple and effective)
Start feeding once you have active leaf growth. Use a balanced houseplant fertilizer or a bulb fertilizer at half strength.
- Feed every 2 to 4 weeks during spring and summer.
- Stop feeding when you begin the dormancy process.
Moving amaryllis outdoors (optional but helpful)
If your weather allows, summering amaryllis outdoors can build a bigger bulb. Transition it slowly so the leaves do not burn.
- Start in bright shade for about a week.
- Move to morning sun, afternoon shade.
- Protect from heavy rain that can keep the pot too wet.
If you plant amaryllis in the ground, it needs excellent drainage. In warm regions (often around USDA zones 8 to 11, depending on cultivar and local winter lows), it can be grown outdoors long-term. In colder areas, treat it as a container plant and bring it in before frost. As a simple rule, bring pots indoors before nights regularly dip below about 50°F.
How to get amaryllis to rebloom
Reblooming is about timing and a proper rest. Many people keep watering and feeding year-round, then wonder why they get leaves but no flowers.
Plan the timeline first
To hit a target bloom date, start this process about 3 to 4 months (12 to 16 weeks) ahead. The rest period is usually 8 to 10 weeks, and then it often takes another 4 to 6 weeks to see growth and buds after you wake it up (temperature and bulb size can shift this a bit).
Step 1: Trigger dormancy
- Stop fertilizing.
- Gradually reduce watering until you stop completely.
- Let the leaves yellow and die back naturally.
- Move the pot to a cool spot. Aim for about 45 to 60°F. Many people store bulbs in darkness, but a cool, low-light place can also work. Either way, do not freeze the bulb.
Step 2: Let it rest
Keep it dry during dormancy. Check occasionally to make sure the bulb is firm and there is no mold. A little shriveling is normal. Soft, smelly bulbs are not.
Step 3: Wake it up
After 8 to 10 weeks of rest:
- Bring the pot back into bright light and warmth.
- Remove dead leaf material.
- Top-dress with fresh mix or repot if needed (see below).
- Water lightly at first, then more normally once growth starts.
If all goes well, you will see a flower stalk or new leaves within a few weeks. A stalk is thicker and more blunt-tipped than a leaf.
Repotting and dividing offsets
When to repot
Amaryllis does not need frequent repotting. Every 2 to 3 years is usually enough, or when roots are packed and the pot dries out very fast.
The easiest time to repot is after dormancy, right before you begin watering again.
Offsets (baby bulbs)
Healthy bulbs often make offsets. You can leave them for a fuller clump or separate them.
- Separate only offsets that have their own roots and are at least a decent size.
- Expect small offsets to take a couple years to bloom.
Common problems and fixes
No blooms, only leaves
- Not enough light: move to brighter light or add a grow light.
- No dormancy: give a real 8 to 10 week rest period.
- Bulb is small or weak: feed during the leafy season and avoid overwatering.
Yellow leaves while it is actively growing
- Overwatering: let the mix dry more between waterings.
- Low light: brighter location.
- Natural timing: yellowing is normal when entering dormancy.
Floppy flower stalk
- More light and slightly cooler temperatures help reduce stretching.
- Stake early, and rotate the pot.
Pests
Indoors, watch for spider mites, mealybugs, and aphids. Outdoors, slugs and snails may chew leaves.
- Wipe leaves with a damp cloth and inspect the leaf bases.
- For mealybugs, dab with isopropyl alcohol on a cotton swab.
- For spider mites, rinse the plant and increase humidity slightly, then treat if needed.
Red blotch (red streaks on leaves or stalks)
This issue is often linked to Stagonospora (also called red blotch or leaf scorch). It can come in on infected bulbs and may flare up under stress. Improve airflow, avoid wetting the foliage, keep the potting mix from staying damp, and clean tools between plants. If it keeps returning, isolate the plant and consider a bulb-safe fungicide labeled for ornamentals.
Outdoor amaryllis garden notes (warm climates)
If you are growing amaryllis outdoors year-round, treat it like a perennial bulb that still appreciates a seasonal rhythm. Hardiness varies by cultivar and local winter lows, so check local guidance if you are on the edge of its comfort zone.
- Site: well-drained soil, sun to part sun.
- Water: regular water during active growth, less during rest periods.
- Mulch: light mulch helps even out moisture, but keep mulch off the bulb neck.
- Feeding: slow-release bulb fertilizer in spring can help build bulbs.
Seasonal checklist
During bloom
- Bright light
- Water when top inch dries
- Rotate pot
- Stake if needed
After bloom (leaf-building season)
- Remove spent flowers
- Keep leaves in strong light
- Fertilize every 2 to 4 weeks
Dormancy and rebloom
- Reduce then stop watering
- Cool rest for 8 to 10 weeks (do not freeze)
- Restart with warmth, light, and light watering
Final tip: treat it like a battery
Amaryllis blooms are what you get to enjoy, but the leaves are where the bulb “charges up” for next time. If you give it bright light, sensible watering, and a real rest, reblooming becomes the rule instead of a lucky surprise.

Jose Brito
I’m Jose Britto, the writer behind The Country Store Farm Website. I share practical, down-to-earth gardening advice for home growers—whether you’re starting your first raised bed, troubleshooting pests, improving soil, or figuring out what to plant next. My focus is simple: clear tips you can actually use, realistic expectations, and methods that work in real backyards (not just in perfect conditions). If you like straightforward guidance and learning as you go, you’re in the right place.