Fleas and ticks love the same things gardeners tend to create without realizing it: shade, moisture, and protected edges where wildlife can pass through. The good news is you can push back with a simple DIY spray and a few yard tweaks that make your space less inviting.
Below are a couple of DIY spray recipes I use as a starting point, plus when to spray, where to spray, and what not to do if you want results without hurting plants or beneficial insects.
Quick reality check: yard sprays are only one piece of the puzzle. If pets or wildlife are bringing fleas and ticks in, you will get the best results with a simple IPM approach: habitat cleanup, targeted perimeter treatments, and veterinarian-recommended prevention for pets.

Where fleas and ticks actually hang out
If you spray the middle of the lawn and call it done, you will waste time and product. Most activity happens in cooler, protected zones.
High risk spots to target
- Shady lawn edges along fences, hedges, woodlines, and sheds
- Under decks, porches, and low shrubs where it stays humid
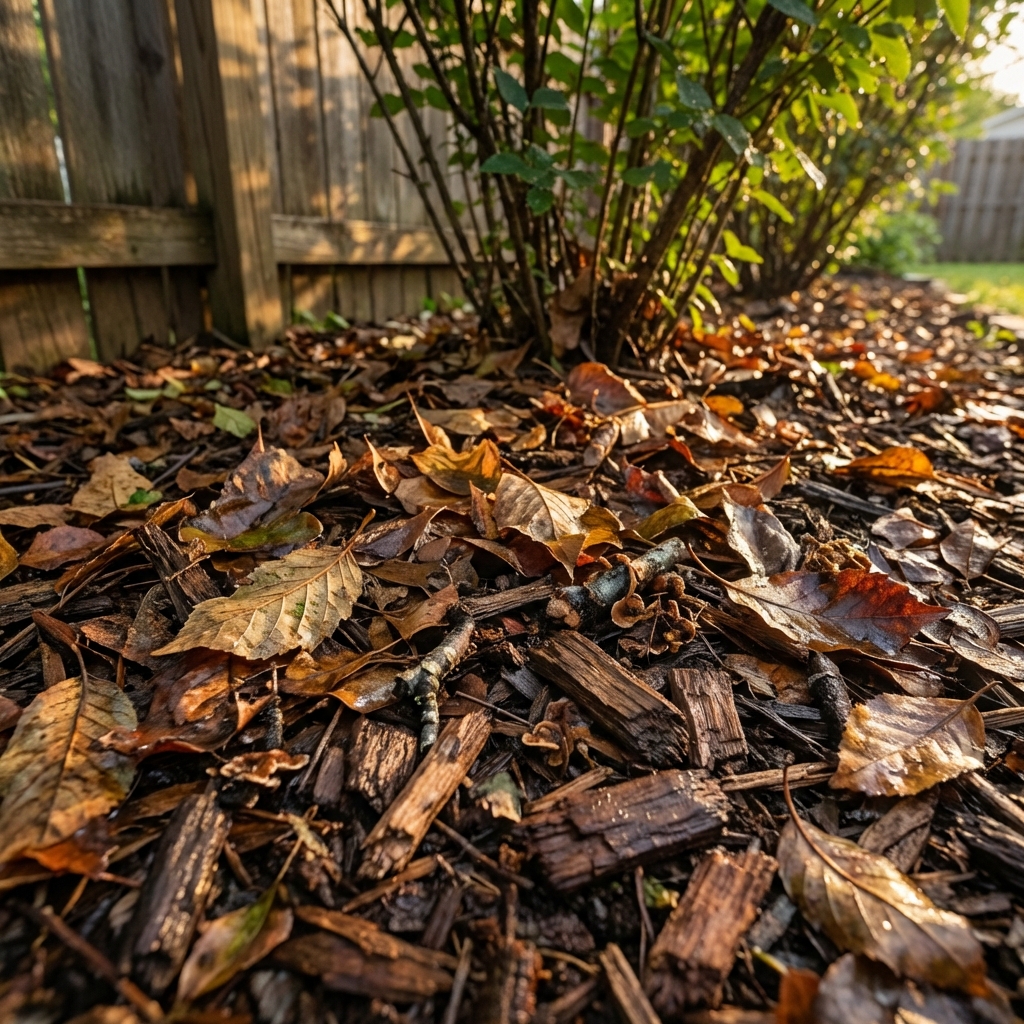
- Leaf litter and mulch that stays damp
- Animal paths where raccoons, stray cats, deer, and rodents travel
- Dog zones like under a favorite tree or around a run
Think of it like watering. You water the root zone, not the driveway. Same idea here.
When I say “treated zones,” I mean those edges, shaded pockets, and leaf-litter areas where pests actually rest and wait.
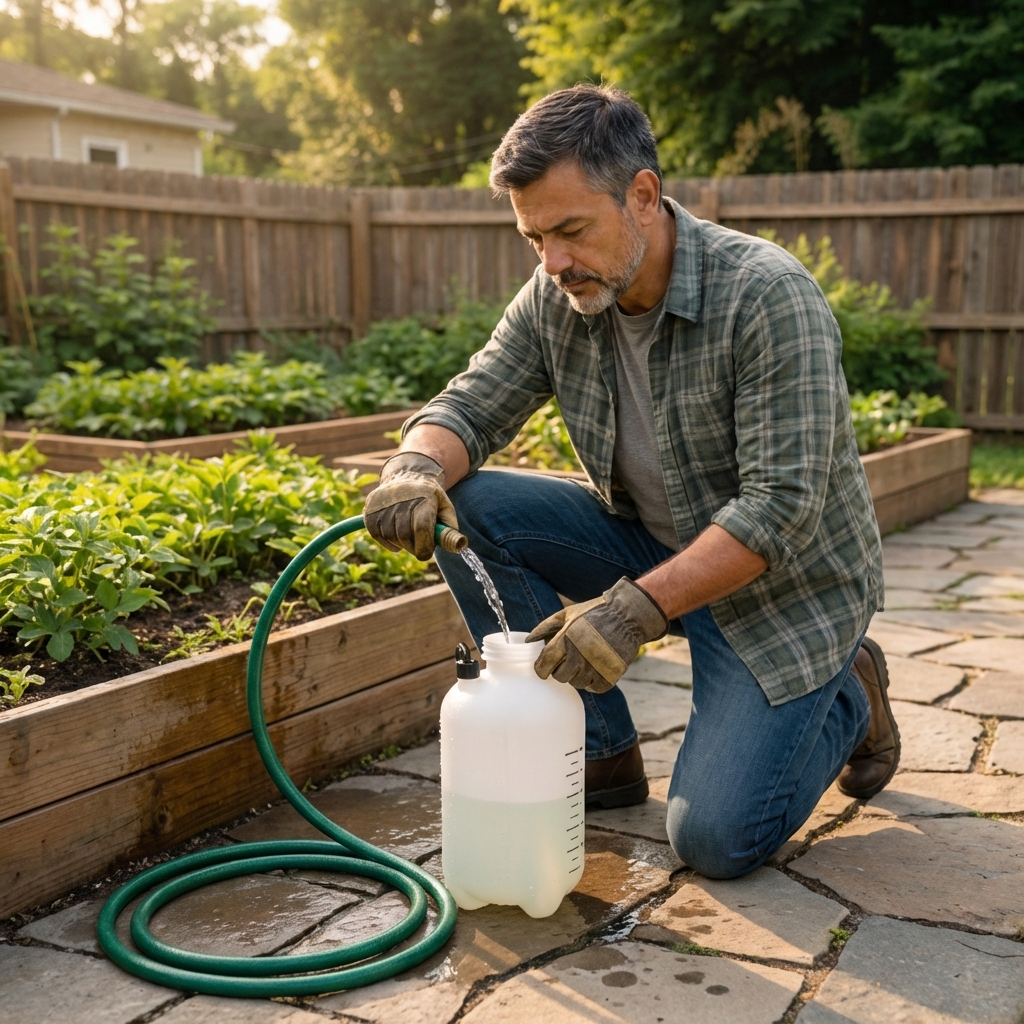
DIY spray option 1: Cedar and soap yard spray
Cedar-based products are commonly used in natural pest control. In real yards, results vary by concentration, formulation, and the species you are dealing with, but a properly mixed cedar spray may help repel and reduce activity in treated zones. I treat it as a short-lived, reapply-as-needed perimeter tool.
Important distinction: cedarwood essential oil is not the same thing as a cedar oil yard concentrate labeled for outdoor pest control. Do not assume they are interchangeable or equivalent. Essential oils can vary a lot in strength and additives, so start low and keep it targeted.
What you need
- 1 gallon water
- Choose one:
- Commercial cedar oil concentrate labeled for yard use (follow label directions exactly)
- Cedarwood essential oil (use lower amounts and spot test)
- 1 teaspoon mild liquid soap to help oils disperse (unscented castile soap is the gentlest option)
- Pump sprayer
How much to use
- If using a labeled concentrate: do not improvise. Mix at the label rate for outdoor yard application.
- If using cedarwood essential oil: start with 1 teaspoon per gallon. If plants tolerate it well and you see no spotting after a test, you can try up to 2 teaspoons per gallon. Avoid “more must be better” here.
How to mix
- Add water to the sprayer first.
- In a small jar, mix the oil with the soap, then pour into the sprayer. This helps the oil disperse.
- Shake well.
Where to apply
- Grass edges and shady zones
- Mulch perimeters and leaf litter areas
- Under shrubs, especially where animals pass through
How to spray
- Shake again right before spraying and every few minutes while you work.
- Spray until surfaces are lightly damp, not dripping or running off.
- Coverage varies widely based on your sprayer, plant density, and how narrow your perimeter band is. Use the “lightly damp” rule instead of chasing a square-foot number.
Plant note: Avoid spraying directly on tender vegetable leaves during hot sun. Stick to the ground, edges, and lower stems. Test a small area first on ornamentals.
DIY spray option 2: Neem perimeter spray
Neem is a general garden tool that can help with a range of pests, but DIY neem mixes are not a slam-dunk yard solution for ticks and fleas. Evidence for yard-level tick and flea suppression with neem is limited and mixed, so I only use it as a supporting step in a bigger plan. I also keep it to edges and sheltered foliage near the ground, not a broadcast treatment.
What you need
- 1 gallon water
- 1 to 2 tablespoons cold-pressed neem oil
- 1 teaspoon mild liquid soap (emulsifier, castile is preferred)
- Pump sprayer
How to mix
- Add water to the sprayer first.
- In a small jar, mix neem oil with the soap, then add to the sprayer.
- Shake well.
How to apply safely
- Spray early morning or near dusk, when bees are not active.
- Focus on perimeters, leaf litter, under shrubs, and shady lawn edges.
- If you spray plants, aim for the lower foliage and undersides of shrubs or groundcover near edges, where pests and wildlife traffic overlap.
- Shake again right before spraying and every few minutes while you work.
- Avoid open blooms and avoid spraying directly on herbs you plan to harvest that day.
Important: Neem can burn leaves in heat. If daytime temps are high, wait for a cooler day and always spot test. Like other oils, it can also affect non-target insects, so keep it targeted and out of pollinator zones.
What not to use in a DIY yard spray
Some popular online recipes can cause more trouble than the pests.
- Garlic or hot pepper sprays as a yard-wide treatment: fine for some garden pests, but inconsistent for ticks and can irritate eyes and noses for people and pets.
- Undiluted vinegar on lawn: it can scorch grass and does not solve the underlying habitat issue.
- Essential oils without a dispersant: oil beads up, sprays unevenly, and can cause plant spotting.
- Bleach or harsh disinfectants: unsafe for soil life and can damage plants.
- Random dish soaps at high strength: some can be harsh on leaves and soil life. If you need a dispersant, stick with a small amount of castile soap or a product labeled for plants.
Garden fixes that make sprays work better
Sprays help, but habitat control is what keeps the problem from bouncing back every week.
1) Dry out the edges
- Rake and remove thick leaf layers where they stay wet.
- Thin dense groundcovers near paths and play areas.
- Fix leaky spigots and overwatering that keeps shade areas soggy.
2) Add a buffer strip
If your yard borders woods, a dry barrier helps reduce tick travel.
- Add a 3 to 6+ foot strip of wood chips or gravel between the lawn and the woodline, where possible. Wider is often better if you have space.
- Keep that strip raked and relatively dry.
3) Keep lawn height reasonable
- Aim for a consistent mow and avoid letting grass get tall around fence lines.
- Trim weedy edges where ticks climb and wait for a host.
4) Reduce wildlife traffic
- Secure trash and compost.
- Pick up fallen fruit.
- Block access under sheds and decks if animals are nesting there.
When and how often to spray
DIY sprays are usually contact and short-lived. Plan on consistency, and adjust based on weather and pressure.
- Best timing: early morning or late afternoon
- Reapply: about every 5 to 10 days during peak season, and again after heavy rain
- Focus zones: shady edges, under shrubs, along paths, and dog areas
If you want the biggest improvement, do a one-two routine: clean up leaf litter first, then spray the following day once things are drier.
Label note: If you use any commercial cedar or neem concentrate, follow the product label and local guidance. The label wins over any DIY recipe.
Pet and kid safety basics
Even “natural” ingredients can irritate skin or cause stomach upset if licked. Use common sense and treat the yard like you just watered with fertilizer.
- Keep pets and kids out of sprayed areas until fully dry.
- Do not spray pet toys, water bowls, sandboxes, or edible garden beds.
- Do not use these mixes on pets. Yard sprays are not a substitute for veterinarian-recommended flea and tick prevention.
- Be extra cautious with cats. Essential oils can be risky for cats in particular. Avoid spraying areas where cats roll, lounge, or hunt, and talk with a vet if you are unsure.
- Store concentrates and essential oils up high and tightly closed.
Water note: Avoid spraying near ponds, streams, or drains. Oils and soaps can stress aquatic life, and runoff is never your friend.
Personal protection basics
You can do everything right in the yard and still pick up a hitchhiker during peak season. Simple habits help a lot.
- Wear long pants and closed shoes when working in brushy edges.
- Do a tick check after yard work, especially behind knees, around socks, and along waistbands.
- Consider using repellents labeled for skin or clothing if ticks are common where you live, and follow local health guidance on tick-borne disease.
Quick troubleshooting
I sprayed but I am still seeing ticks
- You probably sprayed the wrong places. Hit edges, shade, and leaf litter, not the center of the lawn.
- Reapply after rain. Most DIY mixes do not persist long in sun and weather.
- Check wildlife pressure. If deer are bedding nearby, you will be fighting uphill without a barrier and cleanup.
- Make sure pets are protected. Fleas especially can keep cycling if animals are unprotected.
My plants spotted after spraying
- Sprayed in heat or full sun.
- Too much oil or not enough mixing.
- Rinse affected leaves with plain water and switch to perimeter-only treatments.
Fleas keep coming back
- If pets have been exposed, you may also need an indoor reset: vacuum high-traffic areas, wash pet bedding, and keep up with vet-recommended prevention so the life cycle does not keep looping.
My realistic take on DIY flea and tick sprays
A DIY spray can help, especially when you apply it where fleas and ticks live and you keep up with it. But the real win comes from making your yard less comfortable for them. If you do cleanup plus targeted spraying for a few weeks, you may notice a drop in bites and hitchhikers, especially in those shady edge zones.
If you want to start simple, use the cedar and soap mix at a conservative rate, spray the shaded edges, and do one solid leaf-litter cleanup. That combo is usually the quickest “I can actually do this today” improvement.

Jose Brito
I’m Jose Britto, the writer behind The Country Store Farm Website. I share practical, down-to-earth gardening advice for home growers—whether you’re starting your first raised bed, troubleshooting pests, improving soil, or figuring out what to plant next. My focus is simple: clear tips you can actually use, realistic expectations, and methods that work in real backyards (not just in perfect conditions). If you like straightforward guidance and learning as you go, you’re in the right place.