
Fleas are stubborn because you are rarely dealing with just the adults you can see. In many infestations, much of the flea population is eggs, larvae, and pupae tucked into carpet, pet bedding, cracks in floors, and shaded spots outdoors. The good news is you can handle many mild-to-moderate infestations with a natural, DIY approach if you hit the whole life cycle and stay consistent for several weeks.
This guide focuses on methods that are practical in real homes: cleaning that actually targets fleas, safer topical options, and yard steps that reduce reinfestation. If anyone in your household is pregnant, immunocompromised, or you have cats, puppies, kittens, or small pets, stick to the gentlest options and check with a vet before using essential oils, powders, or concentrated products.
First, confirm it is fleas
It sounds obvious, but it saves time. Flea bites are often small, itchy bumps and commonly show up around ankles and lower legs. Pets may scratch, chew their tail base, or have tiny scabs. That said, bites and rashes can look like other insect bites or dermatitis, so it helps to verify.
Quick checks
- Flea comb test: Comb your pet over a white paper towel. If you see black specks, dab them with a wet tissue. If they turn reddish-brown, that is “flea dirt” (digested blood).
- White sock test: Walk across carpet in white socks. Adult fleas may jump onto them.
- Flashlight at night: In heavier infestations, you may spot fleas moving in pet bedding areas.
Know the flea life cycle
Adult fleas are the tip of the iceberg. Eggs fall off pets into your home. Larvae hide deep in fibers and feed on flea dirt. Pupae can wait in a protective cocoon for weeks and sometimes longer, then hatch when they sense movement, heat, and carbon dioxide.
What this means: You can kill adults today and still see new fleas hatching for several weeks (sometimes longer). Your plan needs repeated cleaning and follow-up, not a one-time “big clean.”
The simple DIY plan
Step 1: Treat the pet safely
If you only treat the house, your pet keeps dropping eggs. If you only treat the pet, the house keeps reloading them. Start here.
Also worth knowing: If you are seeing fleas on your pet, consistent vet-approved flea prevention is often the fastest and most reliable way to stop egg-laying. You can still keep the rest of this plan “low-tox” by pairing prevention with cleaning.
- Use a flea comb daily: Comb slowly around neck, back, and tail base. Drop fleas into a cup of warm soapy water.
- Bath if appropriate: A bath with a gentle pet shampoo can knock down some adult fleas. For some dogs, a small amount of mild dish soap used carefully can help in a pinch, but it is not a complete flea treatment and it can dry or irritate skin. Avoid eyes and sensitive areas, do not overdo it, and stop if skin looks red or flaky. Cats are usually not good bath candidates, so stick to combing and vet guidance.
- Wash pet bedding: Hot wash and hot dry the same day you treat your pet.
Important: Essential oils can be toxic to cats and irritating to dogs. Do not apply essential oils directly to pets unless a veterinarian specifically recommends a product and dose.
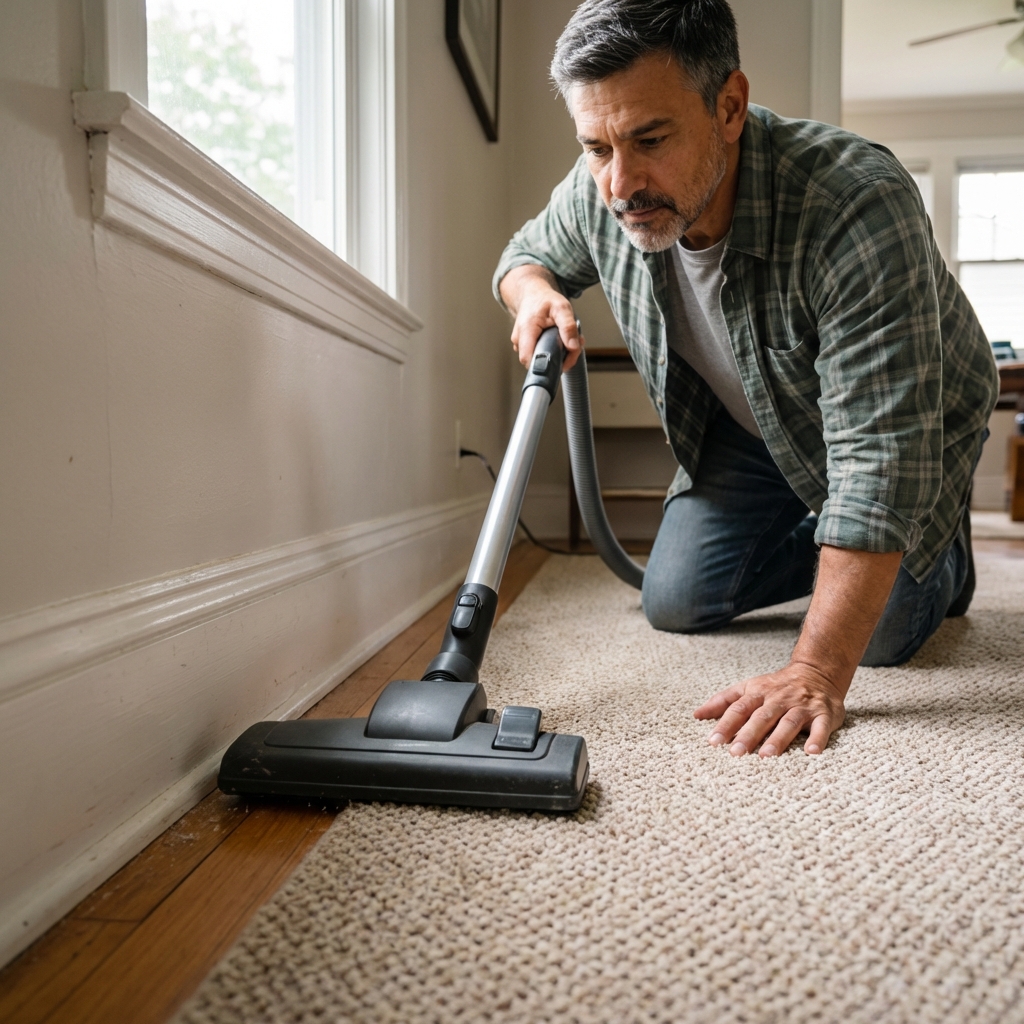
Step 2: Vacuum like you mean it
Vacuuming is one of the most effective natural tools because it removes eggs and larvae and can stimulate pupae to hatch, which makes them easier to eliminate during your follow-up days.
- Vacuum carpets, rugs, baseboards, and under furniture.
- Use the crevice tool along edges and in cracks.
- Vacuum upholstered furniture where pets rest.
- Frequency: Daily for 7 to 10 days, then every other day for another 2 to 3 weeks.
- After every session: Empty the canister outside immediately, or remove the bag, seal it in a plastic bag, and take it out.
- Quick maintenance: Pull pet hair and lint from the brush roll and check attachments, since eggs and debris collect there too.
Step 3: Wash textiles on hot
Anything your pet touches often becomes a flea nursery.
- Wash pet bedding, throws, and removable couch covers.
- Wash your bedding if pets sleep with you.
- Use the hottest water the fabric allows, then dry on high heat.
Step 4: Use powders only where they make sense
For natural DIY control, two options come up a lot: baking soda and diatomaceous earth. Baking soda is popular, but evidence for flea control is weak. Food-grade diatomaceous earth (DE) can help in dry indoor areas by damaging the waxy coating on insects. It is not an instant kill, and it is messy if you overapply.
If you use food-grade diatomaceous earth (DE)
- Choose food-grade only, never pool-grade.
- Use a very light dusting in cracks, along baseboards, under appliances, and under rugs.
- Keep it dry. DE does not work well when wet.
- Avoid creating airborne dust. Wear a mask during application and keep kids and pets away until dust settles.
- Be extra cautious if anyone has asthma or other respiratory issues. “Food-grade” does not mean “safe to breathe.”
- Vacuum it up after 24 to 48 hours, then repeat as needed.
Do not rub DE into your pet’s coat. Inhaled dust can irritate lungs for humans and animals.
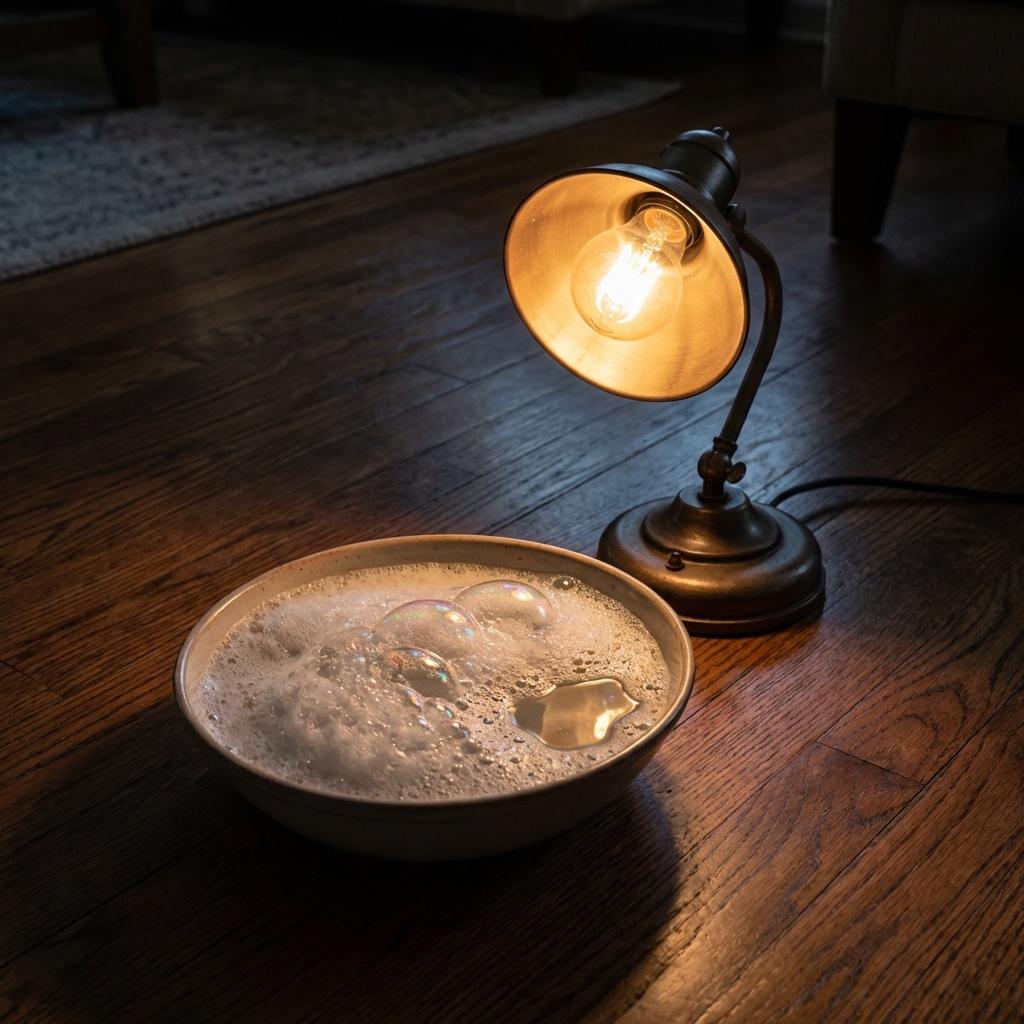
DIY flea trap
A simple light trap can help you confirm activity and catch some adults. It will not solve an infestation by itself, but it is useful.
What to do
- Set a shallow dish of warm water with a drop of dish soap on the floor.
- Shine a small lamp toward it at night (or place it near a night light).
- Put it near where your pet sleeps or where bites are happening.
Safety note: Use a stable LED lamp or night light when possible, keep cords out of walkways, and place the trap where kids and pets cannot tip it over.
Check the dish in the morning. Any fleas caught are proof you need to keep going with the main plan.
Natural yard steps
If pets go outdoors, the yard matters. Fleas love shaded, humid areas and spots where animals rest.
Do this first
- Mow and trim: Shorter grass and fewer dense hiding spots reduce humidity at ground level.
- Rake debris: Remove leaf piles and clutter near fences and sheds.
- Focus on pet zones: Under decks, along shaded foundations, dog runs, and around outdoor beds.
Helpful natural options
- Beneficial nematodes: These microscopic organisms can reduce flea larvae in soil. Apply when the soil is moist and temperatures are suitable for the product you buy. Water in as directed.
- Encourage sun and airflow: Prune low branches and thin dense shrubs where pets rest.
Skip risky shortcuts: Strong essential oil yard sprays can harm pollinators and pets. Also, “natural” does not always mean safe for cats.

How long it takes
Most DIY natural plans take 2 to 4 weeks to break the cycle, and stubborn cases can take longer depending on conditions and how long pupae have been waiting. You should notice fewer bites and less pet scratching within the first week if you are vacuuming and washing consistently.
A simple schedule
- Days 1 to 3: Treat pet, wash bedding, vacuum daily, set a trap at night.
- Days 4 to 10: Keep vacuuming daily, comb pet daily, wash pet bedding again mid-week.
- Weeks 2 to 4+: Vacuum every other day, continue combing, repeat hot laundry weekly.
Common mistakes
- Only treating adults: Eggs and pupae survive and restart the problem.
- Not vacuuming edges and furniture: Larvae hide where lint and pet hair collect.
- Leaving vacuum contents indoors: Fleas can crawl out of bags or canisters.
- Overusing powders: Thick layers of DE do not work better and create more dust.
- Ignoring outdoor shade: One shady resting spot can keep reinfesting your pet.
When to call a vet or pro
Natural DIY methods can handle mild to moderate problems, but there are times to get help.
- Your pet has hair loss, open sores, or signs of skin infection.
- You have a young puppy or kitten, or a senior pet with health issues.
- Someone in the home is having strong allergic reactions.
- You see tapeworm segments (often like tiny grains of rice) in your pet’s stool or around the rear.
- Your pet is small or young and seems weak, lethargic, or has pale gums (possible anemia).
- You still find active fleas after 3 to 4 weeks of consistent cleaning and pet treatment.
A veterinarian can recommend safer, proven flea control options that still fit a “low-tox” approach, including monthly preventives and products that stop eggs from developing. Sometimes the most natural outcome is using the right product once, then relying on cleaning and prevention afterward.
Quick prevention checklist
- Comb pets weekly during warm months.
- Wash pet bedding weekly.
- Vacuum high-traffic pet areas regularly.
- Keep yard shaded zones trimmed and dry when possible.
- Watch for wildlife visitors (stray cats, raccoons) that can drop fleas into your yard.
If you stick with the routine for a few weeks, you can usually get flea numbers down to zero, or close enough that they stop being a problem. The key is not a fancy spray. It is consistency across pet, house, and yard.

Jose Brito
I’m Jose Britto, the writer behind The Country Store Farm Website. I share practical, down-to-earth gardening advice for home growers—whether you’re starting your first raised bed, troubleshooting pests, improving soil, or figuring out what to plant next. My focus is simple: clear tips you can actually use, realistic expectations, and methods that work in real backyards (not just in perfect conditions). If you like straightforward guidance and learning as you go, you’re in the right place.