Rats in the garage are not just a nuisance. They chew wiring, shred insulation, contaminate surfaces with droppings and urine, and they can move from the garage into wall voids and the home. The fastest way to get rid of them is to do four things in the right order: confirm activity, remove what is attracting them, trap aggressively for a short window, and seal every entry point.
This guide walks you through that plan with practical steps you can do in a normal weekend.
First, confirm it is rats (not mice)
It matters because rat-proofing gaps and trap choices are different.
- Droppings: Rat droppings are typically about 1/2 to 3/4 inch long. Mouse droppings are usually about 1/8 to 1/4 inch. Shape varies too: Norway rat droppings are often more blunt-ended, while roof rat droppings tend to be more pointed.
- Noise: Rats tend to make heavier thumping and scratching sounds, especially at night.
- Rub marks: Greasy smudges along walls, pipes, and door edges are common where rats run repeatedly.
- Gnawing: Larger chew marks on wood, plastic storage bins, and wiring.
If you see a lot of droppings or a strong ammonia-like odor, treat it like an active infestation and move quickly.
Safety first: protect yourself before you clean
Rats can carry bacteria and parasites, and sweeping dry droppings can kick particles into the air. (Hantavirus risk is more commonly associated with deer mice, but the safe cleanup approach is the same.)
- Wear disposable gloves and a well-fitting mask (an N95 is ideal).
- Keep kids and pets out of the garage during cleanup and trapping.
- Ventilate the space by opening the garage door and a side door or window if you have one.
How to clean droppings the right way
- Do not sweep or vacuum dry droppings.
- Spray droppings and nesting material with an EPA-registered disinfectant and follow label directions. If you do not have one, a common DIY option is a bleach solution (about 1 part bleach to 10 parts water) on non-porous surfaces. Let it soak for about 5 minutes.
- Wipe up with paper towels, bag everything, and seal it in a second bag.
- Disinfect the area again, then wash hands thoroughly.
Quick win: remove the food, water, and hiding spots
Traps work much faster when rats are not living comfortably. Most garages offer three things rats love: easy meals, reliable water, and cozy cover.
1) Lock down food and pet supplies
- Move bird seed, grass seed, bulbs, pet food, and chicken feed into sealed metal containers with tight lids.
- Do not store food in paper bags or thin plastic bins. Rats chew through them.
- Clean up spilled seed and sweep under shelves.
2) Remove easy water sources
- Fix drips at hose bibs, utility sinks, and any supply lines.
- Do not leave pet water bowls out in the garage overnight.
- Check for standing water under fridges or freezers, and around condensate drains if you have them.
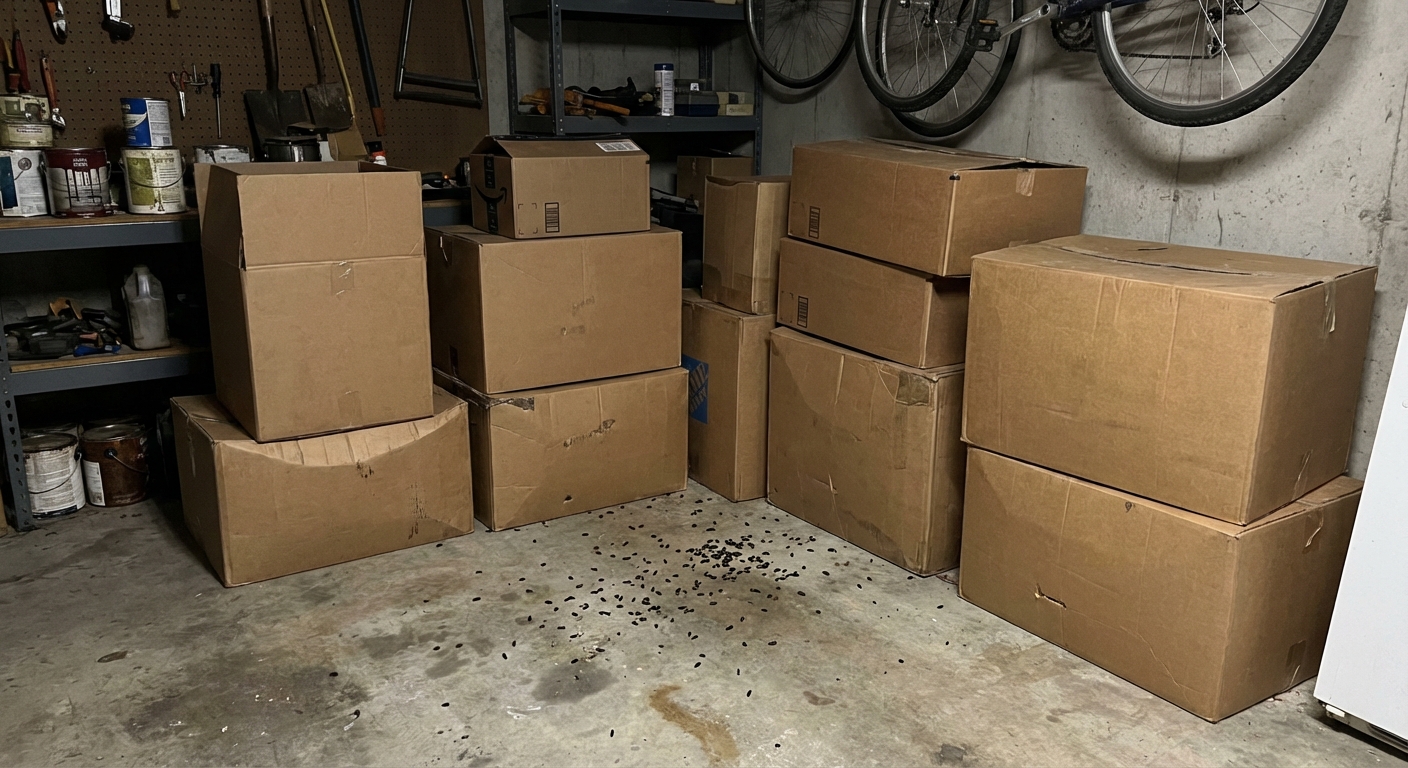
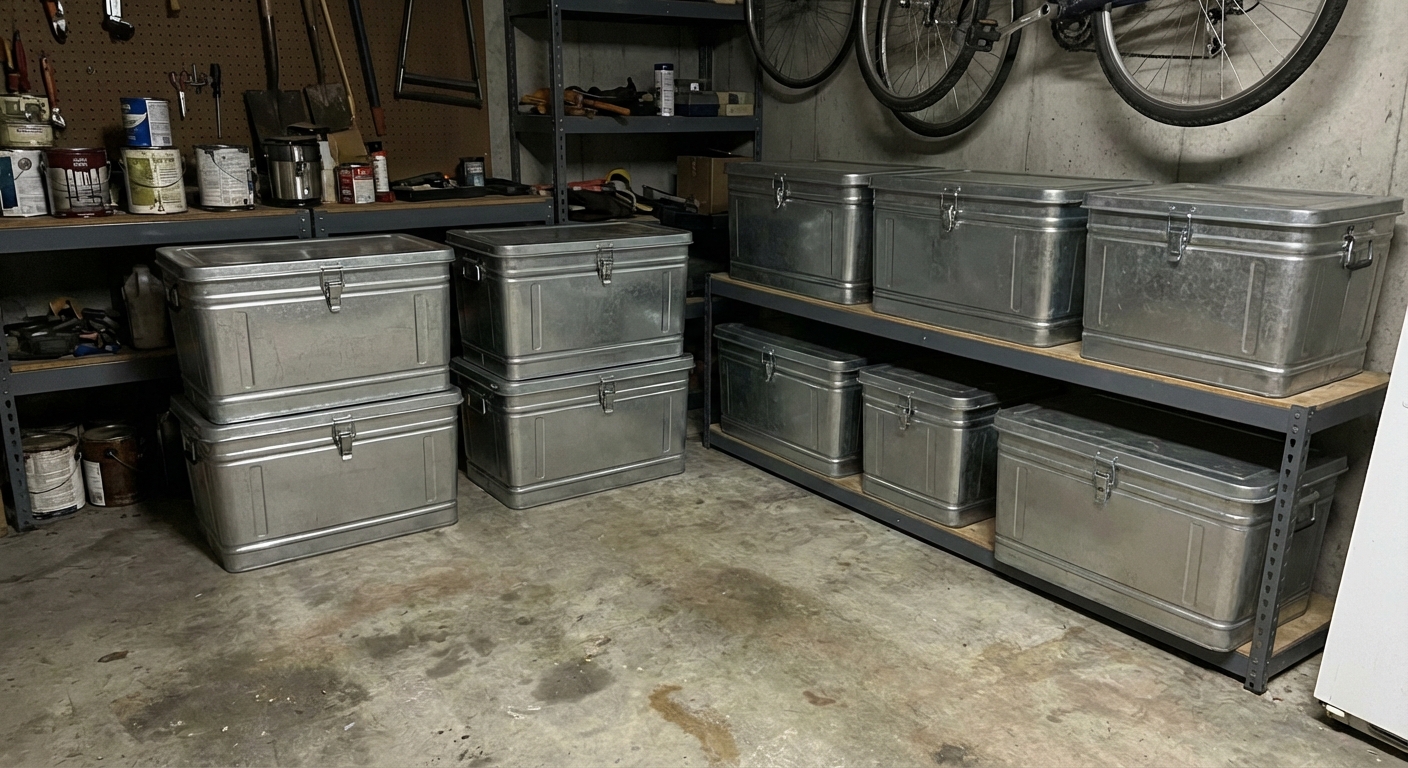
3) Reduce clutter (especially along walls)
Rats travel tight to edges. If the perimeter is packed with boxes, you are giving them a highway and a hiding place.
- Pull stored items 12 inches away from walls where possible.
- Replace cardboard boxes with hard plastic totes or, better, metal cabinets.
- Store items on shelves at least 6 inches off the floor.
4) Remove nesting material
- Bag up shredded paper, insulation scraps, and rags from corners.
- Check behind freezers, near water heaters, and around workbenches.
Find how they are getting in (this is where most people miss the fix)
If you only trap, you often remove the current rats but keep the open door for the next ones.
Common garage entry points
- Gaps at the bottom and sides of the garage door
- Door corner gaps where weatherstripping is worn
- Holes around pipes, conduit, and wires entering through walls
- Openings at the foundation sill or where siding meets concrete
- Vents with broken screens
- Gaps where drywall meets the slab inside the garage
Roof rat vs Norway rat (quick clues)
- Roof rats: More likely to climb. Look along rafters, shelves, attic access points, and high wall penetrations.
- Norway rats: More likely to stay low and burrow. Look at slab edges, door thresholds, foundation gaps, and ground-level openings outside.
Simple ways to track activity
- Flour test: Lightly dust flour near suspected routes. Look for tracks and tail drags the next morning.
- Talc or baby powder: Same idea, often shows prints more clearly.
- Phone camera at night: A cheap motion camera helps, but even a phone on a charger aimed at a corner can confirm patterns.
Trap first, then seal for best results
Here is the sequence that usually works fastest: set traps immediately, then seal after you have a day or two of strong trapping. If you seal too early with rats inside, they may chew new exit holes or end up dying in a wall void.
Best traps for a garage
- Snap traps (recommended): Fast, effective, and affordable. Use rat-sized traps, not mouse traps.
- Enclosed bait stations with snap traps inside: Great if you have pets or kids nearby.
- Electronic traps: Can work well, but they cost more and still need correct placement.
Avoid these if you can
- Glue boards: Inhumane and often ineffective for rats. They can escape or suffer for a long time.
- Loose poison bait in the open: Dangerous for pets, kids, and wildlife. Also risks dead rats in walls causing odor.
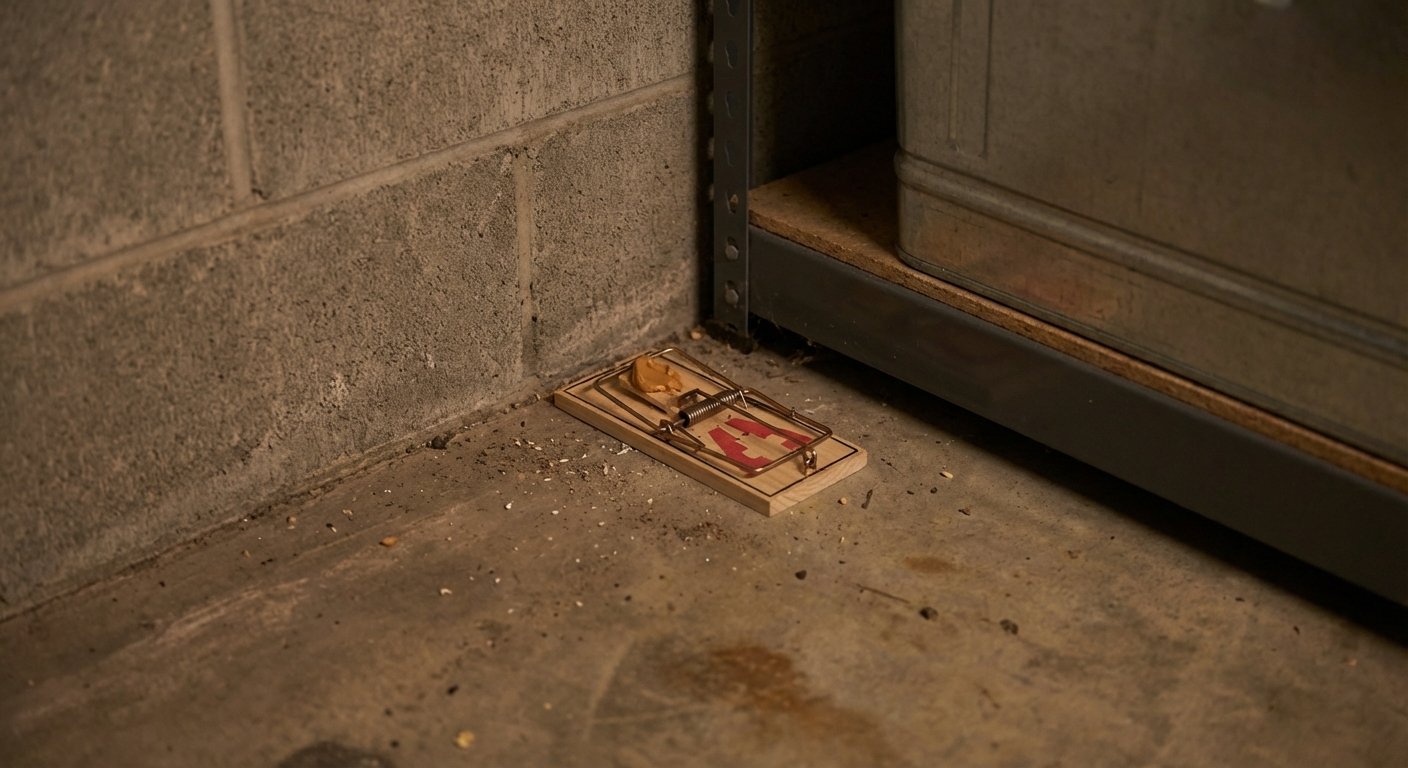
How to set snap traps so they actually work
- Place along walls with the trigger side toward the wall. Rats hug edges.
- Use more traps than you think. For clear activity, plan on about 1 trap every 8 to 12 feet along the perimeter, plus 2 traps per known hotspot (behind a fridge, under a workbench, near a door corner). In many garages, that ends up around 6 to 12 traps.
- Bait options: Peanut butter (tiny smear), chocolate spread, a small piece of dried fruit, or a bit of bacon tied on with thread.
- Pre-bait if needed: If rats are cautious, set traps baited but unset for 1 to 2 nights, then set them.
- Check traps daily. Remove catches promptly and reset.
If you use bait stations, do it safely
In some situations, bait stations are appropriate, especially if you cannot trap effectively due to layout or heavy activity. If you go this route, use tamper-resistant bait stations rated for rats and place them where pets and children cannot access.
Important cautions
- Always follow the label. By law, it governs proper use.
- Expect the possibility of odor if a rat dies in a wall or inaccessible void.
- Secondary poisoning can be a risk for predators and pets if they consume poisoned rodents, and risk varies by product. This is a major reason many homeowners prefer trapping or professional, targeted baiting.
If you are unsure, contact a licensed pest professional, especially when baiting near shared walls, apartments, or attached garages.
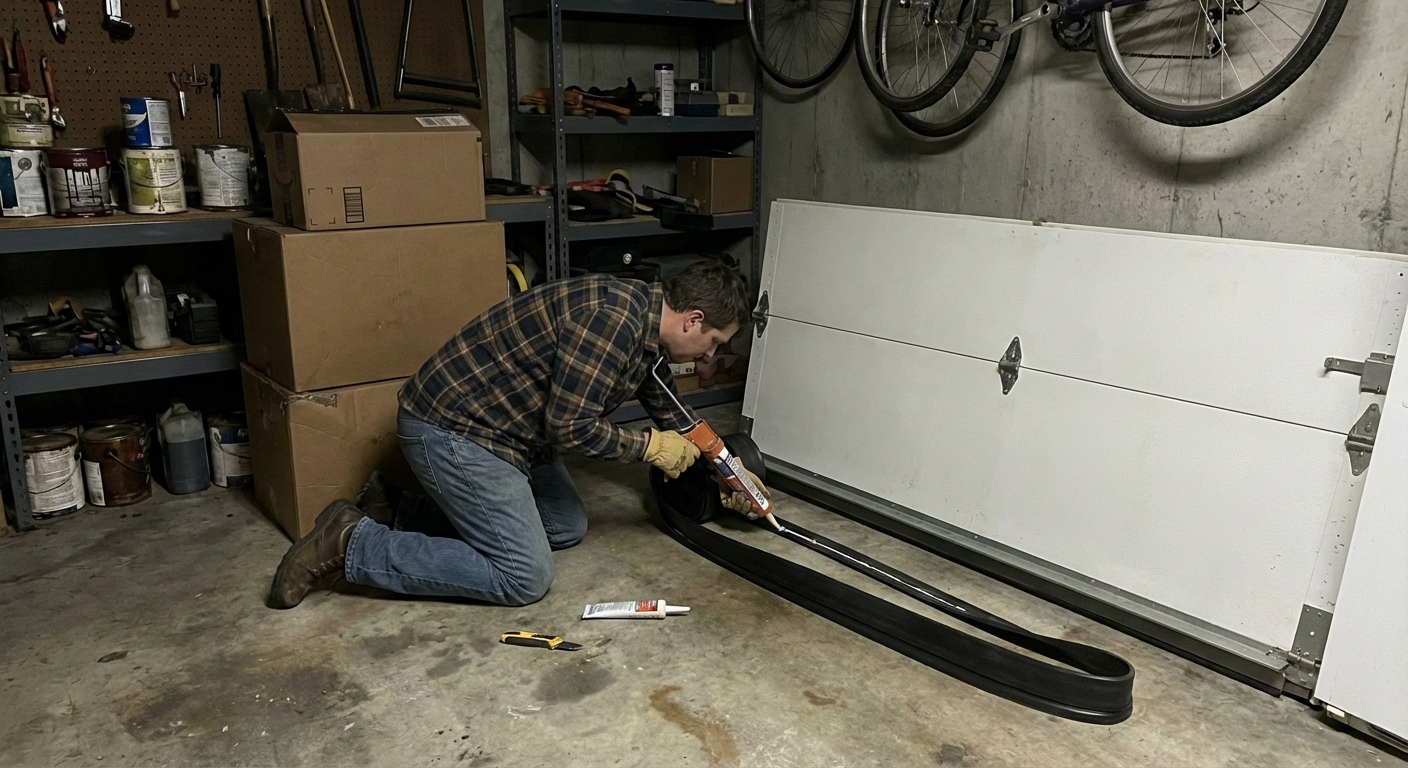
Seal the garage so they cannot return
Once trapping has slowed down, close every opening you can find. Rats can squeeze through surprisingly small gaps. Many pros use 1/2 inch as a practical rule of thumb for areas to address. Your goal is to block access with materials they cannot easily gnaw through.
What to use
- Steel wool + sealant: Good for small gaps around pipes and conduits. Pack tight, then seal over it.
- Hardware cloth (1/4 inch mesh): Great for vents and larger openings.
- Sheet metal: Best for areas they have already chewed.
- Concrete patch or mortar: For holes in foundation or masonry.
- New weatherstripping and a garage door threshold seal: Often the biggest improvement for garages.
Tip: Avoid relying on expanding foam alone. Rats can chew it. If you use foam to close an irregular gap, reinforce it with steel wool, mesh, or metal flashing.
Key spots to seal on most garages
- Bottom of the garage door and side seals
- Corners where the door meets the frame
- Gaps around hose bibs, AC lines, electrical conduit
- Dryer vent or exhaust vents (use proper rodent-proof covers)
- Cracks at the slab edge and foundation
Dead rat cleanup and disposal
Wear gloves and a mask. Spray the carcass and the surrounding area with disinfectant (follow the label), wait a few minutes, then pick it up with paper towels or a shovel.
- Double-bag it, seal the bags, and dispose of it according to local rules (many areas allow sealed trash disposal).
- Disinfect the area again and wash hands thoroughly.
If you suspect one died in a wall or ceiling void, odor usually peaks in a few days and fades over 1 to 2 weeks. Increase ventilation. If the smell is strong or persistent, a pest pro can help locate and remove it, which is often the only true fix.
Protect vehicles and wiring
Garages often lead to engine bay nesting and wire chewing.
- Pop the hood occasionally and look for nesting material.
- Keep food out of the car and remove bird seed or pet food stored nearby.
- Consider rodent-deterrent wraps or tapes for vulnerable wiring as a “may help” layer, not a substitute for trapping and sealing.
What about repellents like peppermint oil or ultrasonic devices?
I treat these as optional, not a main strategy. Strong-smelling repellents may cause short-term avoidance in a small area, but they rarely solve an active infestation. Ultrasonic devices can be hit or miss and rats often adjust to them.
If you want to try a repellent, use it after you have cleaned, trapped, and sealed as a minor extra layer, not as the plan.
How long does it take?
- Light activity: Often 3 to 7 days of concentrated trapping plus sealing.
- Heavier activity: 2 to 4 weeks, especially if there is a nearby food source outside or neighbors also have rats.
If you are still catching rats after two weeks and you have sealed carefully, it usually means one of two things: there is still an entry point you missed, or you have an outdoor source (woodpile, compost, chicken feed, open trash) constantly replenishing them.
Prevention checklist (keep your garage rat-free)
- Store seed and pet food in metal containers with tight lids
- Keep cardboard to a minimum and avoid floor-level storage
- Trim vegetation back from the garage exterior
- Secure trash and keep lids tight
- Fix garage door seals and replace worn weatherstripping
- Do a quick perimeter check every season for new gaps
When to call a professional
Bring in a licensed pest control pro if any of these are true:
- You see rats in daylight regularly (often signals a larger population)
- There is repeated activity despite trapping and sealing
- You have an attached garage and suspect rats in walls or attic
- You find extensive gnawing on wiring or a burned smell near outlets
- You are not comfortable handling traps, cleanup, or exclusion work
A good pro will focus on exclusion (sealing) and monitoring, not just repeated poison treatments.
Quick action plan you can follow today
- Tonight: Remove food and water sources, clear a few wall lines, set rat snap traps along edges (aim for 1 every 8 to 12 feet plus hotspots).
- Tomorrow: Check and reset traps, disinfect droppings properly, start identifying entry points with the flour test.
- This weekend: Install door seals, patch gaps with steel wool plus sealant or hardware cloth, and secure storage.
- Next 2 weeks: Keep traps active until you have at least 7 consecutive days with no signs.
Once you break the food and shelter cycle and close the entrances, rats stop treating your garage like real estate.

Jose Brito
I’m Jose Britto, the writer behind The Country Store Farm Website. I share practical, down-to-earth gardening advice for home growers—whether you’re starting your first raised bed, troubleshooting pests, improving soil, or figuring out what to plant next. My focus is simple: clear tips you can actually use, realistic expectations, and methods that work in real backyards (not just in perfect conditions). If you like straightforward guidance and learning as you go, you’re in the right place.