Black mold in the garden most often shows up for one reason: something is staying wet for too long. That can be mulch packed too thick, a shady corner with poor airflow, overwatering, or organic debris that never dries out. Sometimes what looks like “black mold” outdoors is actually algae or slime mold, which still points back to damp conditions.
The good news is you can usually get rid of it without harsh chemicals and without wrecking your soil. The key is treating what you see and fixing the conditions that caused it.
Quick note for anxious readers: When people say “black mold,” they are often thinking of indoor Stachybotrys. Outdoors, the look-alikes are usually different organisms and the fix is almost always moisture, airflow, and a little cleanup.
First: what “black mold” in the garden usually is
Outdoors, the term “black mold” gets used for a few different things. Some are true molds, and some are other dark growths that look similar. Most garden black mold complaints fall into these buckets:
- Sooty mold on leaves and stems: a black, powdery film that grows on sticky honeydew left by aphids, whiteflies, scale, or mealybugs.
- Surface mold or mildew on mulch, compost, or damp soil surface: often harmless decomposers, but it signals excess moisture and low airflow.
- Slime mold on mulch: weird, foamy or crusty blobs (often tan, orange, gray, or black). It can look alarming, but it is typically harmless and dries up on its own.
- Algae on constantly damp pots, soil, pavers, or irrigation parts: can look dark green to black and feels slick.
- Dark growth on hard surfaces (wood, concrete, greenhouse plastic, irrigation parts): common in shade and humidity, and worth cleaning to reduce buildup.
If you are seeing a black film on plant leaves, jump to the sooty mold section. If it is in mulch, beds, pots, or structures, keep reading.
Quick ID guide
- Sooty mold: black film on leaves that wipes off; sticky leaves; pests are usually present.
- Mulch surface mold: fuzzy or dusty growth on damp mulch; often patchy; shows up after heavy watering or rain.
- Slime mold: blob or crust on mulch, sometimes like scrambled eggs or foam; not fuzzy; harmless, temporary.
- Algae: slick, dark coating on constantly wet surfaces; often on pots, soil crust, pavers, or shady concrete.
Safety basics (do this before you scrub)
Outdoor mold is usually less of a concern than indoor mold, but you still do not want to inhale spores or rub them into your skin.
- Wear gloves and long sleeves.
- Wear a mask if you are disturbing dry, dusty growth (N95 is ideal).
- Work on a calm day so spores do not blow everywhere.
- Keep kids and pets away until surfaces are rinsed and dry.
If you have asthma, severe allergies, or are immunocompromised, consider having someone else do the cleanup or keep it minimal and focus on moisture control.
Quick diagnosis: where is it?
On mulch or soil surface
Usually caused by thick mulch, constant shade, overwatering, or poor drainage. Often not dangerous to plants, but it can invite fungus gnats and signals conditions that can lead to root problems.
On pots, trays, and seed-starting gear
Common in humid corners and with reused containers. Easy to clean and worth doing before replanting.
On wood beds, trellises, fences, or raised bed sides
Often appears where sprinklers hit daily or where wood never dries. Treatment helps, but long-term success depends on improving drying conditions.
On plant leaves (sooty mold)
This is the big one people mis-treat. If you clean the leaves but do not control the insects, it comes right back.
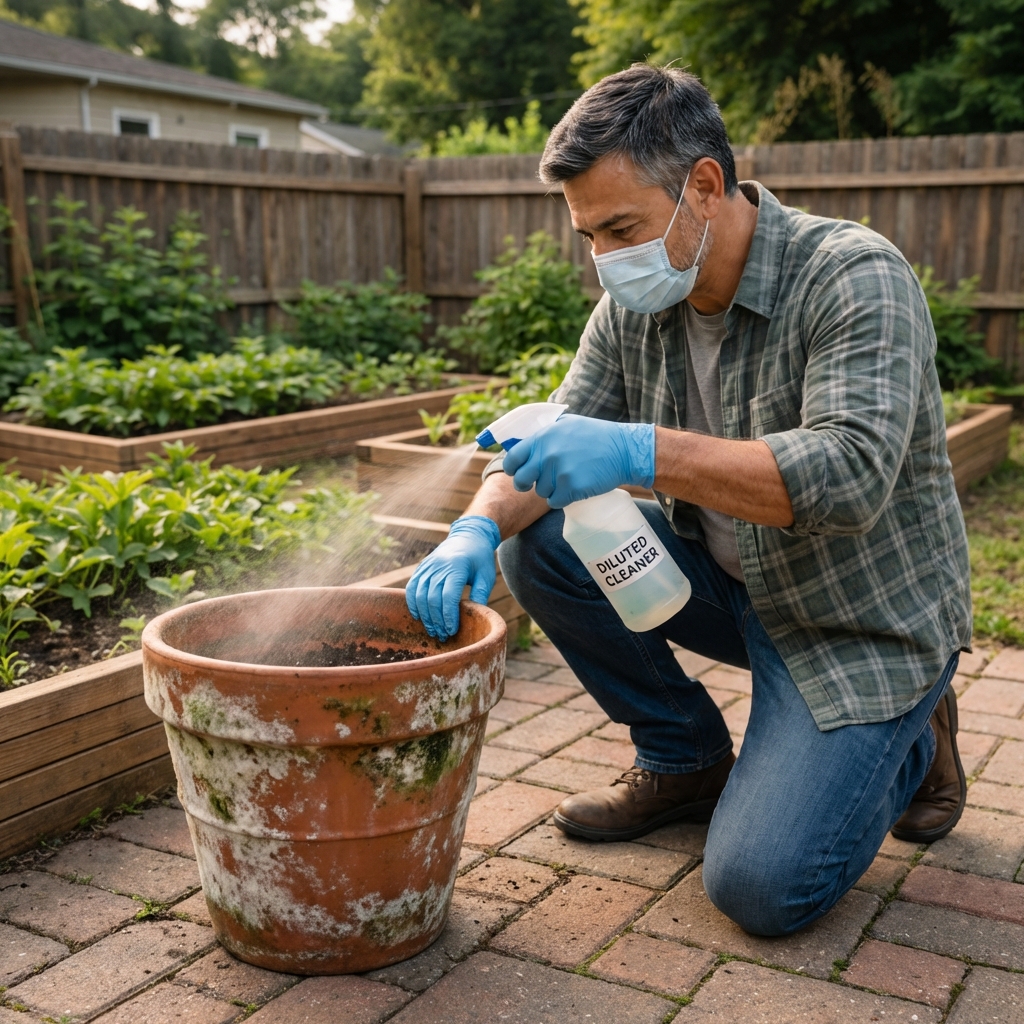
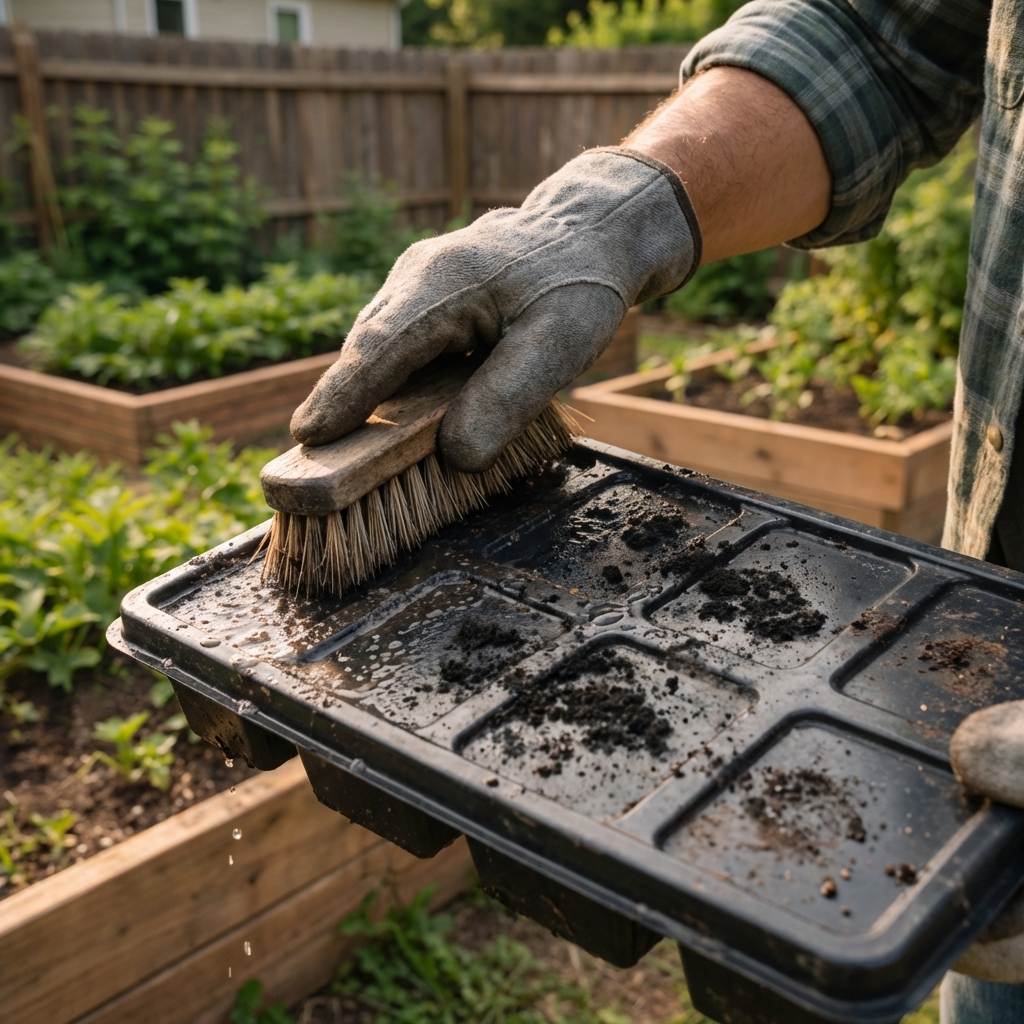
Remove it from pots, tools, and hard surfaces
This is the most straightforward scenario because you can physically remove the growth and then sanitize the surface.
What you need
- Bucket of warm water
- Dish soap
- Stiff brush or sponge
- Your chosen cleaner or sanitizer (see options below)
- Clean water for rinsing
Options that can help
For outdoor cleanup, the biggest wins are pre-washing, contact time, and drying. Different products work differently, and efficacy varies by organism and surface.
- White vinegar (often used undiluted): Can help with some surface mold and buildup. Let it sit 30 to 60 minutes before scrubbing. Caution: vinegar can etch some stone and concrete and can corrode some metals.
- Hydrogen peroxide (3%): Spray and let sit about 10 minutes, then scrub and rinse. Caution: can lighten some materials and fabrics.
- Bleach solution: Best reserved for heavy growth on non-porous surfaces when you need a stronger sanitizing step. A common mix is 1 cup bleach per 1 gallon water, but always follow your product label directions (concentrations vary). Keep it off plants and soil, and never mix bleach with vinegar or ammonia. Bleach is not ideal for porous wood because it does not penetrate well.
Step-by-step
Dry-brush outdoors (optional). If the growth is thick and dry, gently brush it off into a trash bag. Do not do this on a windy day.
Wash first. Scrub with warm soapy water to remove the grime layer. Mold and algae cling to dirt, so washing makes the next step work better.
Apply your cleaner or sanitizer. Soak or spray the surface, making sure it stays wet for the full contact time listed above.
Scrub and rinse. Rinse thoroughly. Leftover cleaner can damage roots if you reuse pots immediately.
Dry in sun if possible. Sunlight and airflow are your best free prevention tools.
Important: do not soak wooden tool handles
Wood handles absorb water and can stay damp, which encourages more growth. Wipe with vinegar or peroxide if you want, then dry thoroughly.
Seed-starting trays: a practical note
For trays and pots you are reusing indoors or in a humid greenhouse, sanitation matters more. Pre-wash, then use a labeled sanitizer or a correctly diluted bleach solution with proper contact time, rinse well, and dry completely.
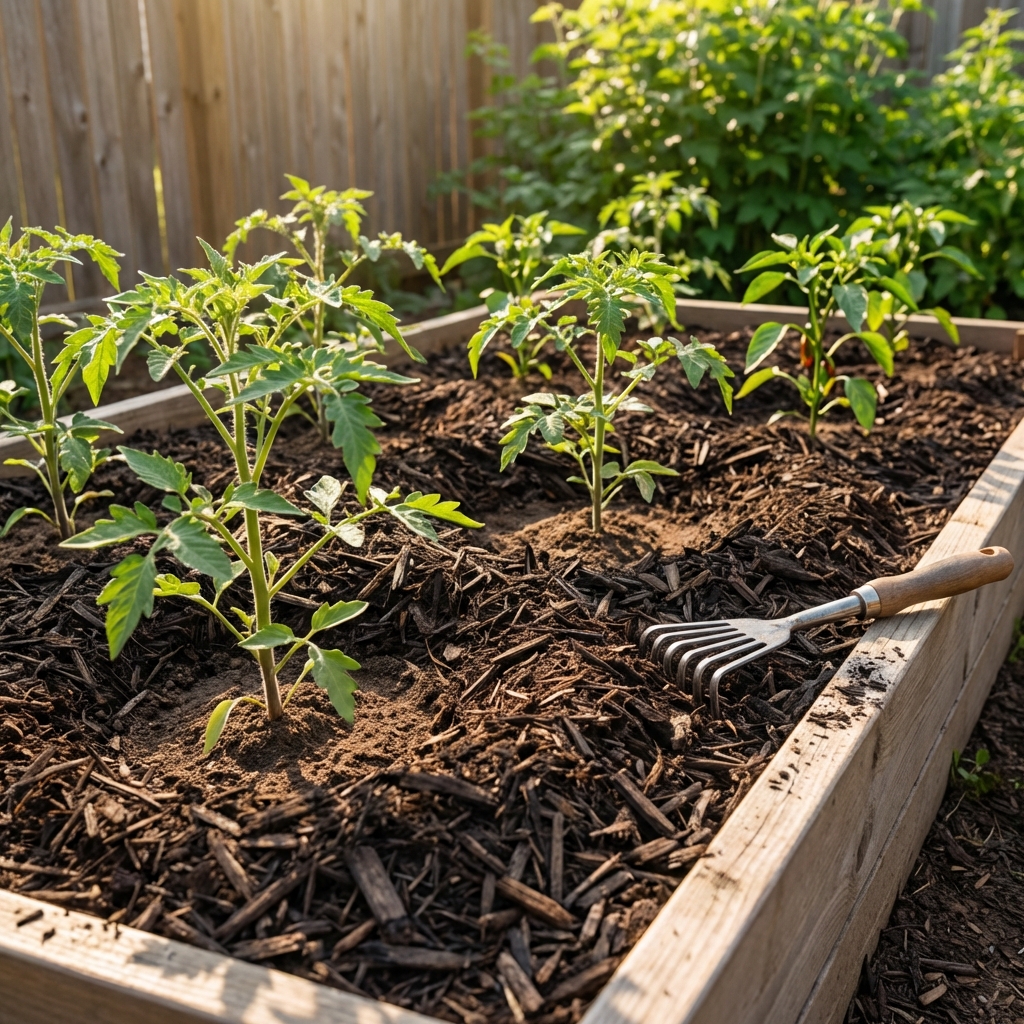
Remove it from mulch and soil surface
If the growth is in mulch or on the top layer of soil, think of this as a moisture and airflow problem first. Most outdoor molds on mulch are decomposers. You do not need to sterilize your bed. You need to dry it out and remove the worst patches.
Step-by-step
Stop overwatering. If the top 1 to 2 inches never dries, cut back. Water deeply, less often, and water in the morning.
Rake back the mulch. Pull mulch away from plant crowns and stems. Keep a small gap around stems to prevent rot and moldy buildup.
Remove the worst areas. If you have thick, slimy, heavily blackened patches, scoop them into a bag and trash them. Do not compost if you are unsure what it is or if it is full of pests.
Fluff and thin the mulch. Aim for about 2 to 3 inches of mulch in most beds. In hot, arid climates or with very coarse bark mulch, 3 to 4 inches can be reasonable. The goal is coverage without a wet, matted layer.
Increase airflow and light. Prune overcrowded plants, and consider switching to drip irrigation instead of sprinklers.
Top-dress with dry material if needed. A light layer of fresh, dry mulch can help the surface dry faster compared to old, matted mulch.
If your bed smells sour or swampy, that is a red flag for drainage. Mold is not the core problem, oxygen is. In that case, skip the sprays and fix the soil structure and water movement.
Should you spray vinegar, bleach, or fungicide on mulch?
- Bleach: Not recommended. It can damage beneficial soil life and nearby plant tissue, and it does not fix the moisture issue.
- Vinegar: Also not recommended across garden beds. It can harm plants and soil life if overused, and it is not a targeted soil treatment.
- Fungicides: Usually unnecessary for mulch surface mold. Save fungicides for true plant diseases where the product is labeled for that use.
For beds, your best “treatment” is removal + drying + better watering.
Remove it from plants (sooty mold)
Sooty mold is a black coating that grows on sticky honeydew. It is not usually infecting the plant tissue, but it blocks light and makes leaves look terrible. The real culprit is the insect making the honeydew.
Step-by-step
Find the pest. Check the undersides of leaves and stems for aphids, whiteflies, scale, or mealybugs.
Knock pests back. A strong spray of water in the morning can remove a lot of aphids and whiteflies.
Treat with insecticidal soap or horticultural oil. Follow the label. Spray in cooler parts of the day to avoid leaf burn, and hit leaf undersides.
Clean the leaves. After pest pressure drops, wipe leaves with a damp cloth or spray with water plus a few drops of mild soap, then rinse. New growth should come in clean once pests are controlled.
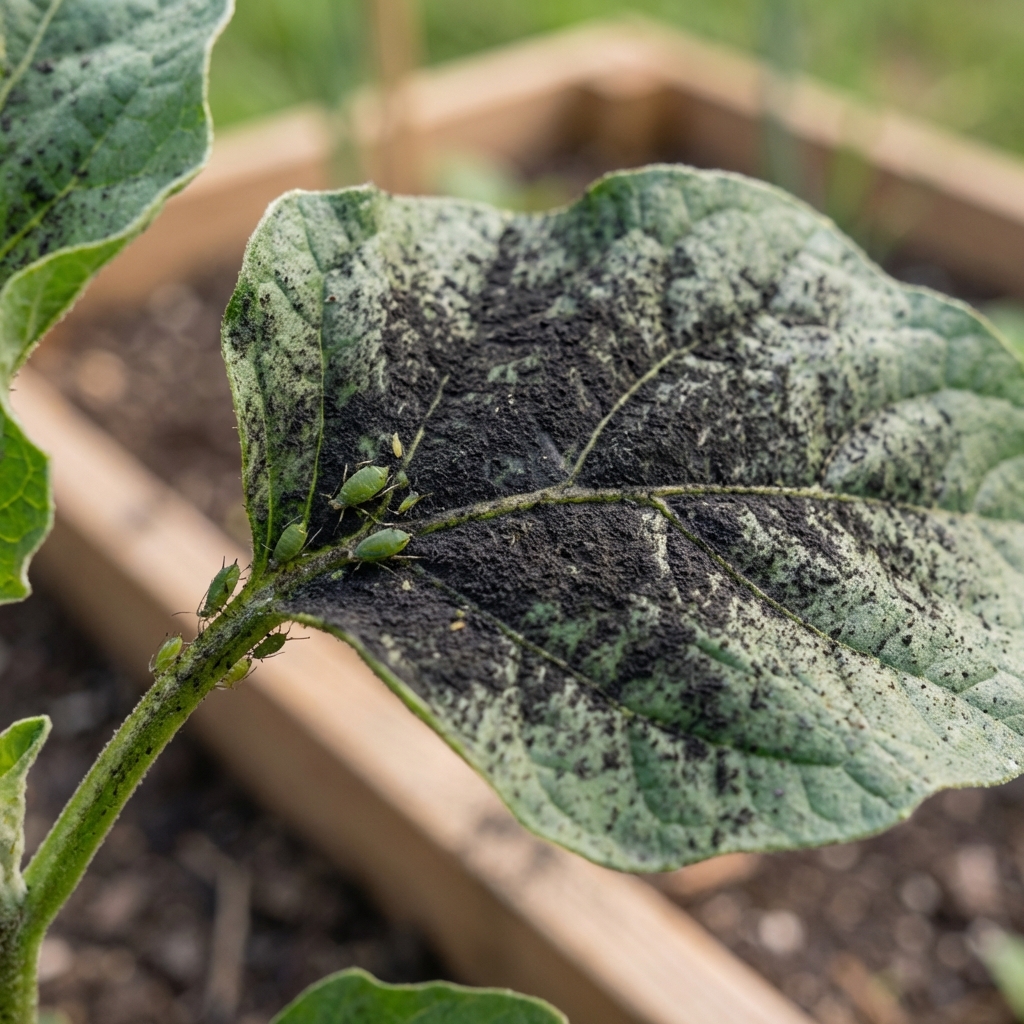
If you skip the pest step, you will be cleaning black leaves again and again.
Raised beds and wood structures
Wood that stays damp will keep growing dark buildup. Cleaning helps, but prevention is the win.
Cleaning method
Dry brush first. Scrub off loose growth with a stiff brush.
Spray with vinegar or peroxide. Let it sit, then scrub again and rinse.
Let it dry completely. A full dry-out matters more than the cleaner.
Prevention upgrades
- Redirect sprinklers so wood is not soaked daily.
- Improve airflow by trimming plants that press against bed sides.
- Keep mulch off the wood where possible.
- Use drip irrigation to reduce splash and constant surface moisture.
If the wood is soft, crumbly, or rotting, you are beyond mold cleanup. You are in replacement territory.
When it keeps coming back
If you remove the growth and it returns quickly, one of these is usually happening:
- Overwatering: especially daily light watering that keeps the surface damp.
- Poor drainage: compacted soil, clay pan, or beds without an exit for excess water.
- Too much mulch: thick, matted layers trap moisture.
- Too much shade and no airflow: dense plantings, tight corners, fences blocking wind.
- Organic buildup: dead leaves and plant debris decomposing in place.
Practical fixes
- Water in the morning and only when the top inch is dry (adjust for heat and plant needs).
- Thin mulch and fluff it occasionally.
- Switch from overhead watering to drip or soaker hoses.
- Remove fallen leaves and rotting fruit promptly.
- Open up crowded plants with light pruning.
When to worry
- Enclosed spaces: If you have heavy growth in a greenhouse, potting shed, or enclosed covered patio, treat it more seriously because you are breathing that air up close.
- Health symptoms: If you notice persistent breathing issues or worsening asthma when you work in the area, step back and get help.
- Unknown growth: If the surface is slimy, foul-smelling, or spreading unusually fast, focus on drainage and consider local extension advice for ID.
FAQ
Is black mold in the garden dangerous?
Most outdoor mold and look-alikes are more of an irritation than a serious hazard, but spores can trigger allergies and asthma. Wear gloves and a mask when disturbing it. In enclosed spaces (like a greenhouse or shed), take it more seriously because exposure is higher.
Can I compost moldy mulch or leaves?
Lightly moldy leaves are usually fine in a hot compost pile. But if the material is slimy, smelly, or full of pests, it is safer to bag it. Also, if you are dealing with sooty mold, composting the leaves is not the issue. You need to control the insects.
Will lime kill mold in soil?
Lime changes pH. That can affect fungi, but it is not a targeted mold treatment and it can throw your soil out of balance. Use lime only if a soil test shows you need it.
What is the fastest way to clean mold off pots?
Wash with warm soapy water, then spray 3% hydrogen peroxide, wait about 10 minutes, scrub, rinse, and dry in sun.
Simple checklist
- Remove thick growth and bag it
- Wash surfaces before using any cleaner
- Use vinegar or peroxide for most outdoor hard-surface cleanup
- Use bleach only on non-porous surfaces when needed, and follow the label
- Avoid bleach and vinegar across garden soil
- Thin mulch and stop constant surface-wet watering
- Fix airflow and drainage so it does not return
If you tell me where the growth is showing up (mulch, pots, greenhouse, or on leaves) and what your watering setup looks like, I can suggest the quickest fix for your exact situation.

Jose Brito
I’m Jose Britto, the writer behind The Country Store Farm Website. I share practical, down-to-earth gardening advice for home growers—whether you’re starting your first raised bed, troubleshooting pests, improving soil, or figuring out what to plant next. My focus is simple: clear tips you can actually use, realistic expectations, and methods that work in real backyards (not just in perfect conditions). If you like straightforward guidance and learning as you go, you’re in the right place.