Laying sod looks easy until you are halfway through and realize the ground is bumpy, the seams are drying out, and the sprinkler does not hit the corners. The good news is that sod is forgiving if you handle the two big priorities: solid soil prep and consistent moisture during rooting.
This guide walks you through the full process from planning to aftercare, with the realistic details that matter in an average backyard.

Before You Buy Sod
Pick the right time
The best windows are cool to mild weather when the sod can root without extreme heat stress.
- Cool-season grasses (Kentucky bluegrass, tall fescue, rye): early fall is ideal, spring is also good.
- Warm-season grasses (Bermuda, Zoysia, St. Augustine, centipede): late spring through summer when they are actively growing.
If you must lay sod during hot weather, you can still succeed, but you need more attentive watering and you must work fast.
Measure your lawn accurately
Multiply length by width for rectangles. Break irregular lawns into smaller rectangles or triangles and add them up. Most sod is sold by the square foot or square yard (9 sq ft).
- Order 5 to 10 percent extra for trimming and odd edges.
- For tight spaces or curves, consider adding a bit more so you are not short.
Choose sod that matches your conditions
Bring your basic info to the sod supplier: sun exposure, irrigation, foot traffic, and your climate zone.
- Full sun and heavy use: Bermuda (warm season) or tall fescue (cool season).
- Some shade: St. Augustine (warm season) or fine fescues (cool season), depending on region. Note that “shade-tolerant” still usually means several hours of sun. In deep shade, turf struggles no matter what you pick.
- Low water expectations: ask for drought-tolerant cultivars suited to your area, and plan on improving soil before installing.
Buy from a reputable farm that cuts fresh. Sod should look green, feel moist, and hold together when lifted.
Tools and Materials Checklist
- Soil test kit (optional but helpful)
- Shovel, steel rake, and leaf rake
- Wheelbarrow
- Garden hose and sprinklers, or irrigation system
- Utility knife with extra blades
- Lawn roller (filled with water)
- Starter fertilizer (or fertilizer recommended by soil test)
- Compost or screened topsoil (as needed)
- String line and stakes (for grading and edges)
- A few shallow cans (like tuna cans) to measure sprinkler output
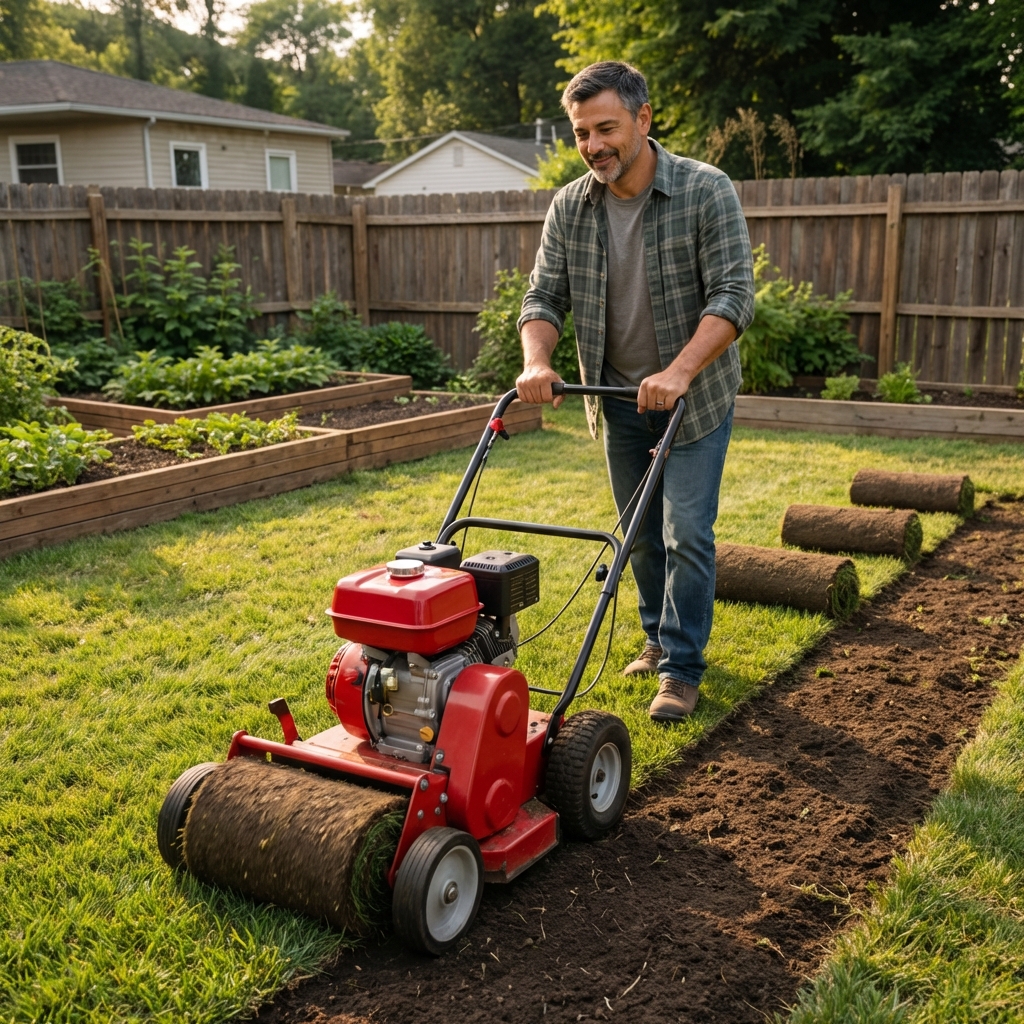
Step 1: Remove the Old Lawn and Weeds
Start with a clean slate. Anything living underneath will compete with the new sod.
Your options
- Sod cutter: fastest and gives you a clean removal. Great if you are replacing an existing lawn.
- Herbicide: can work for heavy weeds, but follow label directions and wait the required time before installing sod.
- Manual removal: works for small areas but is time-consuming.
Remove rocks, sticks, and construction debris. If your yard has buried gravel or lots of fill, plan on adding quality topsoil and grading carefully.
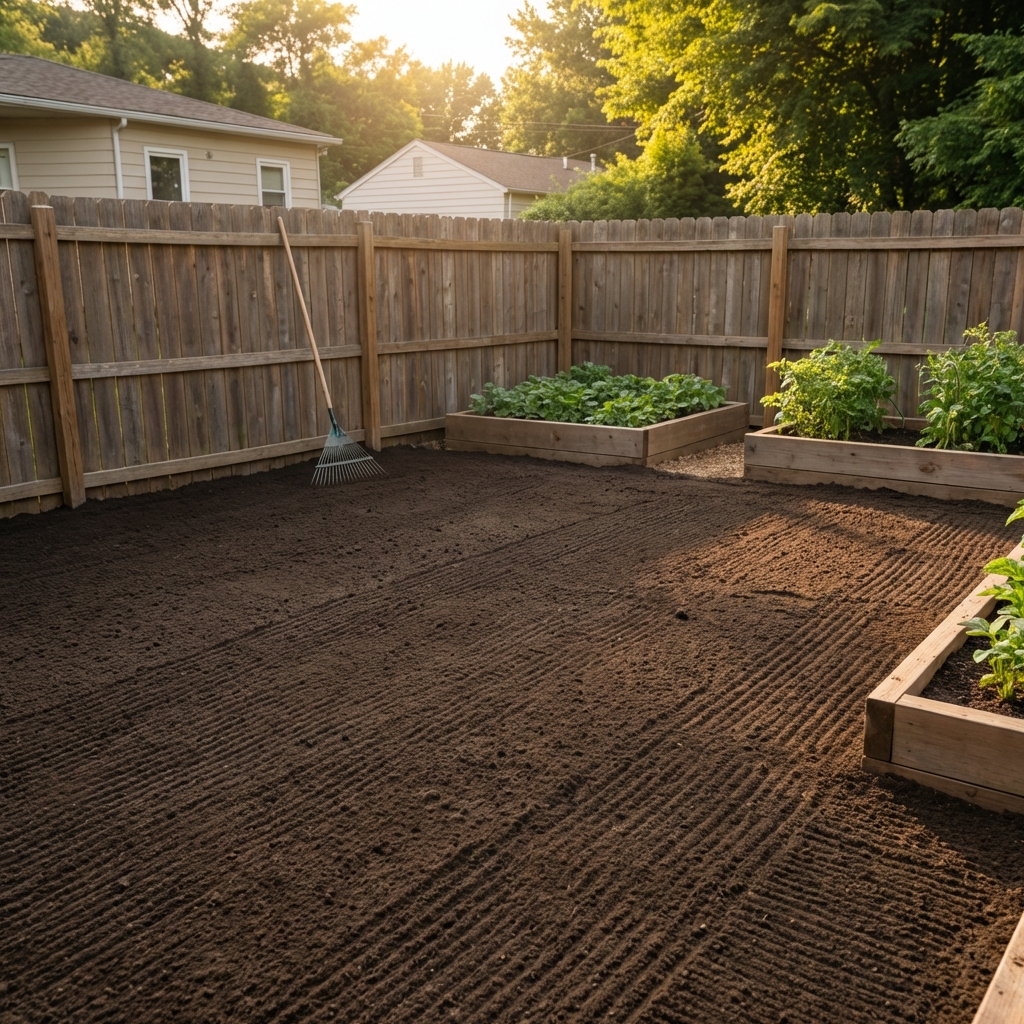
Step 2: Fix the Soil First
Test and adjust
If you can, do a soil test. It tells you pH and nutrient needs. Many turf grasses do best around about 6.0 to 7.0, but there are exceptions by species and region (for example, centipede often prefers more acidic soil). The soil test and local guidance win here.
Add organic matter if the soil is tough
If your soil is sandy and dries fast, or clay that stays sticky and compacted, adding organic matter improves rooting.
- Spread 1 to 2 inches of compost and incorporate it into the top 4 to 6 inches.
- Break up compacted soil. Roots will not push through concrete-like dirt.
Make sure you have enough good soil
In new-build yards or areas with lots of fill, you may not have much usable topsoil. If that is your situation, aim for roughly 4 to 6 inches of quality topsoil (or an amended soil layer) so roots can actually go somewhere.
Grade for drainage
You want a smooth surface that drains away from the house. Even a gentle slope helps prevent puddles.
- Fill low spots now. Dips can remain low and collect water.
- Avoid burying the soil against siding. Keep soil below the foundation line and away from weep holes.
Finish-grade and firm the base
Rake the area smooth, then lightly firm it. A simple test: walk across it. Your footprint should be shallow, not sinking deep.
Starter fertilizer timing: If your soil test or local recommendations call for a starter fertilizer, apply it now and rake it in lightly as part of your final smoothing. That way you keep your grade clean and you are not raking into damp soil later.
Tip: If you have sprinklers, run them briefly to audit coverage. Place a few tuna cans around the yard to see which areas are getting water and how evenly. Fix dry zones and overspray before sod goes down.
Step 3: Prep on Install Day
Water the soil lightly
Right before laying sod, lightly water the soil so it is damp a few inches down. You do not want mud. You want moisture that helps sod knit to the soil.
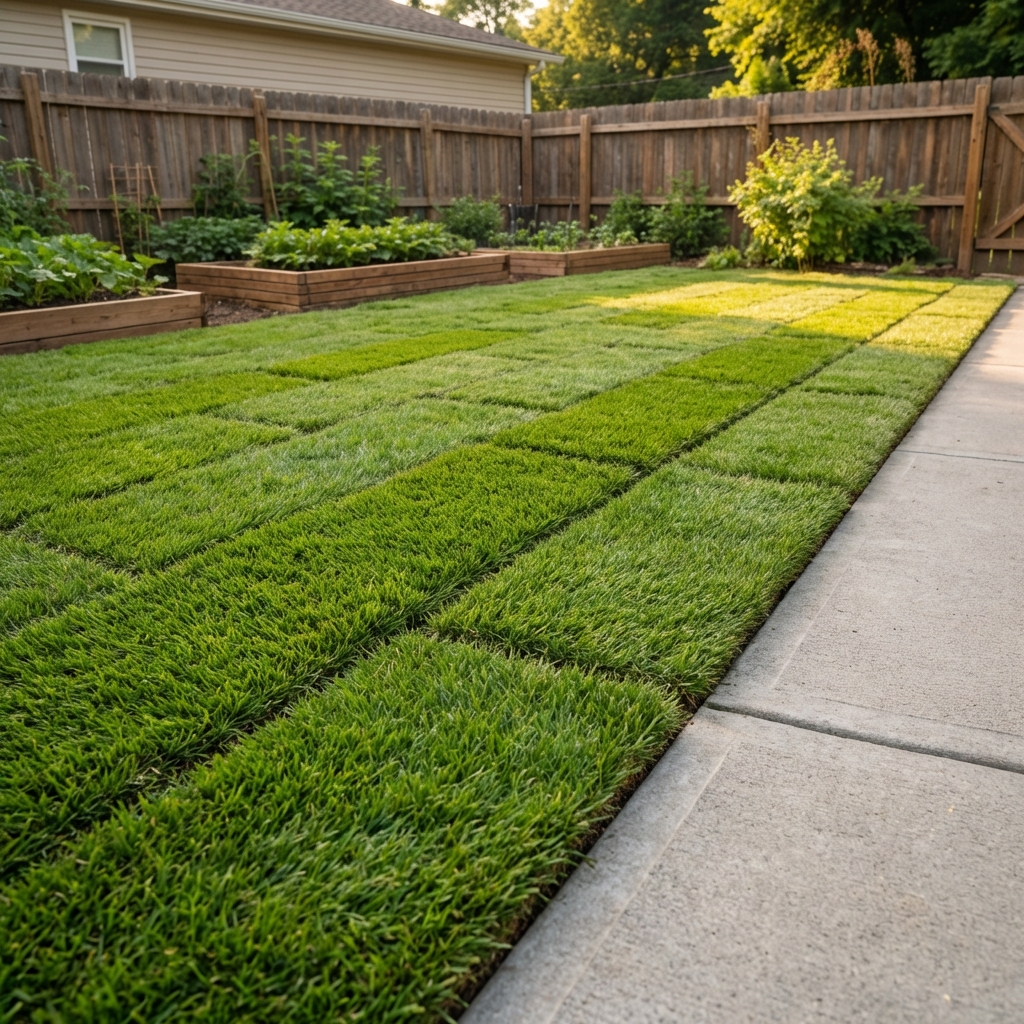
Step 4: Lay the Sod
Lay sod the same day it is delivered
Sod is perishable. It heats up in stacked pallets and can decline quickly, especially in warm weather. Plan to install within 24 hours, sooner if it is hot.
Start with a straight edge
Begin along a driveway, sidewalk, or the longest straight border. That first row sets the pattern for everything else.
Stagger seams like bricks
Lay the next row so the ends do not line up with the row before it. This reduces visible seams and helps prevent drying gaps.
Push seams tight, but do not overlap
- No gaps: gaps dry out and turn into weeds.
- No overlaps: overlapped sod dies underneath and creates bumps.
Cut to fit with a sharp knife
Use a utility knife and change blades often. Make clean cuts around beds, trees, and curves. For tight curves, smaller pieces can fit better than forcing a long strip.
On slopes, lay across the slope
Laying strips horizontally helps resist sliding. Pegging with sod staples can help on steeper areas. Keep staples flush so they do not snag mower blades later.
Water immediately
Do not wait until the end of the day if it is warm or windy. Water as you go (after each section) or water thoroughly right after the full area is laid. The goal is to soak the sod and the soil underneath so they make good contact.
Roll it in (only if needed)
If you see air pockets, uneven spots, or edges that are not snug to the soil, use a water-filled lawn roller to press sod into contact. Roll lightly and avoid rolling when the soil is very wet, since that can compact the base you just worked to improve.
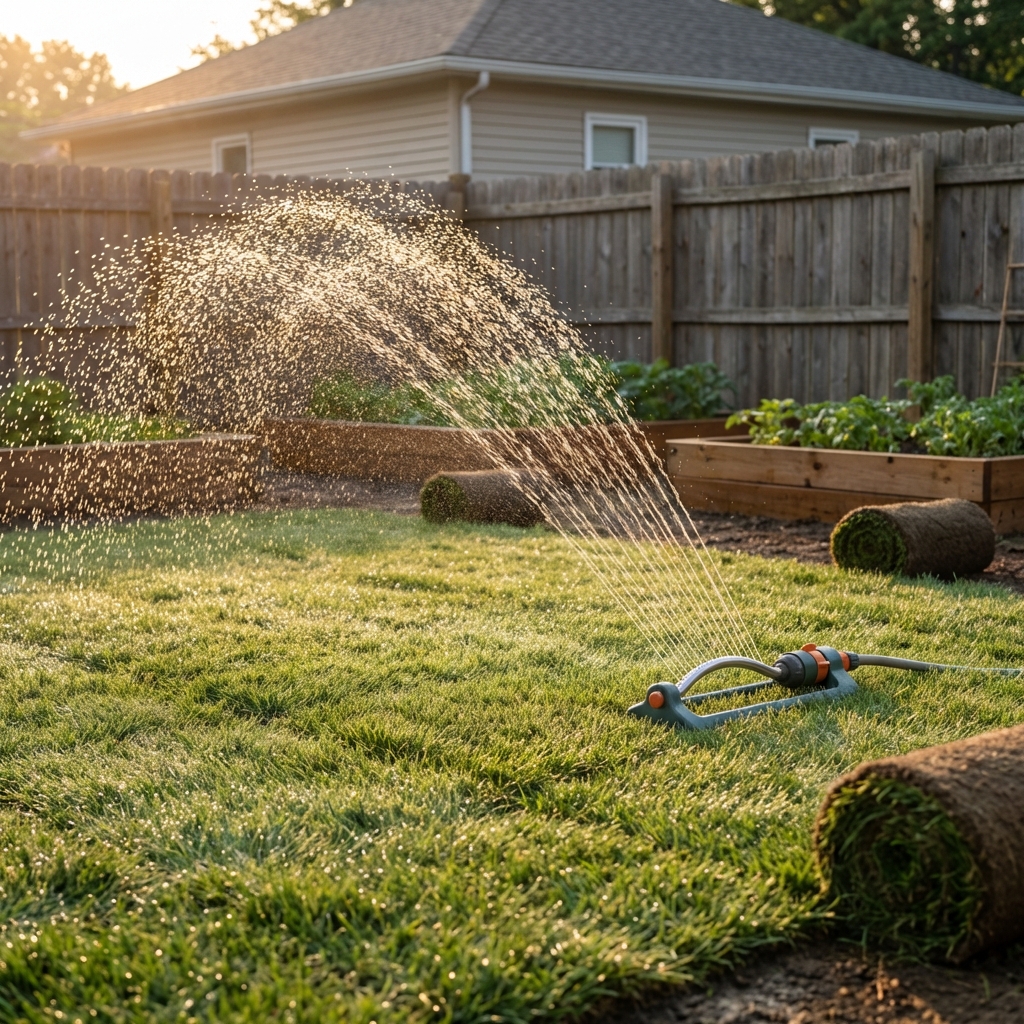
Step 5: Watering New Sod
Watering is what turns “green carpet” into a rooted lawn. The goal is to keep the sod and the top few inches of soil consistently moist until roots grab.
Days 1 to 14 (rooting phase)
- Water often enough to keep the sod and the top 1 to 2 inches of soil consistently moist. Frequency depends on temperature, wind, soil type, shade, and sprinkler output.
- In hot, dry, or windy weather, that may mean multiple short cycles per day. In cooler or humid weather, it may be once a day or even every other day.
- Focus on seams and edges. They dry out first.
- Check by lifting a corner carefully. Soil underneath should be damp, not dusty and not muddy.
Make it measurable: Put out a few tuna cans and run your sprinklers. If your system puts down about 1/4 inch in 10 to 20 minutes (varies a lot), you can use short cycles to maintain moisture without turning the yard into soup.
Days 15 to 28 (transition)
- Start spacing watering out. Water less often, but deeper each time to encourage roots to grow down.
- Keep an eye on the weather. A hot spell can push you back toward shorter, more frequent cycles for a few days.
After day 28 (normal pattern)
Move toward deep, infrequent watering that matches your climate and soil type. Many lawns do well with about 1 inch per week including rainfall, but adjust for your grass, temperatures, and restrictions.
Fast check: If footprints remain visible or the lawn looks dull bluish-green, it is often thirsty. If it feels squishy or smells sour, it is getting too much water.
Mowing, Traffic, and Fertilizer
When can you mow?
Usually when it reaches about 3 to 4 inches tall and the sod is rooted enough that it resists a gentle tug. For most yards, that is often around 2 to 3 weeks, but weather and grass type matter.
- Make sure the ground is not soggy before mowing.
- Use a sharp blade to avoid ripping edges and seams.
- Follow the “one-third rule” and do not cut more than a third of the blade height at once.
Keep traffic off early
Avoid heavy use for the first couple of weeks. Kids, pets, and moving furniture across the lawn can separate seams before roots knit in.
When to fertilize
If you applied starter fertilizer during soil prep, follow the label for timing. If you did not, many lawns benefit from a light feeding after rooting, but the best answer comes from a soil test and your grass type.
Hold off on weed killers
Avoid herbicides (including many pre-emergents) until the sod is established and you have mowed a few times, unless the product label specifically says it is safe for new sod. When in doubt, follow local extension guidance for your grass type.
Common Sod Mistakes
- Skipping grading: bumps and low spots become permanent annoyances. Spend extra time raking smooth.
- Letting pallets sit: sod can heat up and die in the stack. Schedule delivery when you can install immediately.
- Gaps in seams: they dry out and invite weeds. Push pieces snugly together.
- Watering by the clock instead of by conditions: the goal is consistent moisture near the surface early on. Adjust for weather, soil, and sprinkler output.
- Overwatering: constant saturation can cause shallow rooting and disease. Moist, not swampy.
- Mowing too soon: you can shift sod and tear seams. Wait until it is rooted and the soil is firm.
- Rolling wet soil: rolling can help contact, but rolling when things are soaked can compact the base.
Troubleshooting
Brown edges or dry seams
This is usually moisture loss. Edges dry out first.
- Hand-water edges and seams.
- Adjust sprinkler coverage and run a short extra cycle midday in hot weather.
Yellowing patches
Often related to uneven watering, poor drainage, or stress from heat.
- Check for soggy spots and reduce watering there.
- Make sure downspouts and runoff are not dumping onto the lawn.
Sod lifting easily after 2 to 3 weeks
Rooting is slow when soil is compacted, the soil is too dry, or the sod is poor quality.
- Increase consistency of watering.
- If you see air pockets, roll lightly when the soil is only slightly damp.
- For stubborn areas, topdress lightly with screened soil and keep moist.
Quick Timeline
- 1 to 2 weeks before: measure, choose sod type, plan irrigation.
- 1 to 3 days before: remove old lawn and weeds, add compost if needed, grade and smooth. Apply starter fertilizer during final smoothing if recommended.
- Install day: dampen soil, lay sod tight and staggered, water immediately.
- Days 1 to 14: keep sod consistently moist, especially edges.
- Days 15 to 28: water deeper and less often, first mow when rooted.
- Day 29+: transition to normal lawn care.
Final Tips
If you remember just three things, make them these:
- Prep the soil like you are preparing a garden bed. Smooth, amended, and well-draining wins every time.
- Work fast and keep seams tight. Sod is a living product and it dries quickly at the edges.
- Water like it is your job for the first two weeks. Rooting is the whole game. Use the “lift a corner” test and tuna cans to dial it in.
Once the roots take hold, maintenance gets much easier, and you will have a lawn that looks like it has been there for years, not days.

Jose Brito
I’m Jose Britto, the writer behind The Country Store Farm Website. I share practical, down-to-earth gardening advice for home growers—whether you’re starting your first raised bed, troubleshooting pests, improving soil, or figuring out what to plant next. My focus is simple: clear tips you can actually use, realistic expectations, and methods that work in real backyards (not just in perfect conditions). If you like straightforward guidance and learning as you go, you’re in the right place.