Hydrangeas are one of those shrubs that can look like a high-maintenance “fancy garden” plant, but they are pretty forgiving when you nail the basics. The biggest difference between a hydrangea that struggles and one that takes off is almost always where you plant it and how you care for it in the first few weeks.
This guide walks you through the full process, step by step, with realistic expectations and a few simple shortcuts that work in real yards.
Quick checklist before you dig
- Light: Morning sun, afternoon shade is the sweet spot for many types. In hot climates, even morning sun can be intense, and in cool climates some hydrangeas handle more sun.
- Soil: Moist but well-draining. Not swampy, not bone-dry.
- Planting depth: Top of root ball level with the soil surface.
- Water: Deep soak at planting, then keep evenly moist for 2 to 4 weeks.
- Mulch: 2 to 3 inches, kept a few inches away from the stems.
When to plant hydrangeas
The easiest times to plant are:
- Spring: After the danger of hard freezes has passed.
- Fall: When temperatures cool down but the ground is still workable. Aim for about 4 to 6 weeks before your first hard frost so roots can settle in.
You can plant in summer, but expect more babysitting. Heat stress is real, especially for new shrubs with limited roots.
Pick the right spot (this matters more than fertilizer)
Light needs by common types
If you know what you have, you can match it to the right light and avoid the classic “pretty plant, sad blooms” problem. Also note that your climate changes the rules a bit. In cooler regions, many hydrangeas tolerate more sun. In hot or humid regions, the safest setup is often bright shade or gentle morning sun only.
- Bigleaf hydrangea (Hydrangea macrophylla): Best with morning sun and afternoon shade. In hot zones, prioritize shade from midday through late afternoon. In cool zones, it can take more sun if soil stays evenly moist.
- Panicle hydrangea (Hydrangea paniculata): Handles more sun, often 6+ hours, especially where summers are not extreme. In very hot climates, some afternoon shade can still help.
- Smooth hydrangea (Hydrangea arborescens): Tolerant and adaptable. Part sun to part shade works well.
- Oakleaf hydrangea (Hydrangea quercifolia): Likes part shade, especially in hotter climates. Appreciates some shelter from harsh afternoon sun.
Aim for even moisture, not a low spot
Hydrangeas like consistent moisture, but they do not like sitting in water. Avoid low areas that stay soggy after rain. If you have heavy clay, you can still plant hydrangeas, but you will want to improve drainage and avoid overwatering.
Protect from wind, avoid heat traps
A spot with some protection from drying winds helps, but be careful with reflected heat. In warm climates, planting right next to a south or west-facing wall can turn into a heat trap that cooks the soil and increases wilting. If you are planting near a house, an east or north exposure is often kinder, or give the shrub a little breathing room away from the wall.
Soil prep: what hydrangeas actually need
Hydrangeas grow best in soil that holds moisture but drains well. Think of a wrung-out sponge, not a puddle.
Quick drainage check
Dig a test hole about 10 to 12 inches deep, fill it with water, and let it drain. Fill it again and time it.
- Drains in 1 to 2 hours: Generally fine for hydrangeas.
- Still draining at 3 to 4+ hours: Poor drainage. Improve the area (organic matter, raised bed, or a better site) before planting.
Amendments that help (and what to skip)
- Add: Compost or well-rotted leaf mold mixed into the native soil. This improves both moisture-holding and drainage.
- Use carefully: Peat moss can help in sandy soil, but it can also make heavy soil stay too wet if overused.
- Skip: A lot of fertilizer in the planting hole. It can push weak, fast growth before roots are established.
Soil pH note: Only certain bigleaf hydrangeas change flower color based on pH and available aluminum. That is a separate project. For planting day, focus on good soil structure and steady moisture first.
How far apart to plant hydrangeas
Spacing depends on the mature size of your variety. If you crowd them, you will fight mildew, poor airflow, and constant pruning.
Use these as center-to-center spacing guidelines, then check the plant tag for your cultivar (some panicles are compact).
- Small varieties: often 3 to 4 feet apart
- Medium shrubs: often 4 to 6 feet apart
- Large types (many panicles and oakleaf): often 6 to 10 feet apart
If you do not know the variety, give it a little extra space. It is easier to fill gaps later than to move an established shrub.
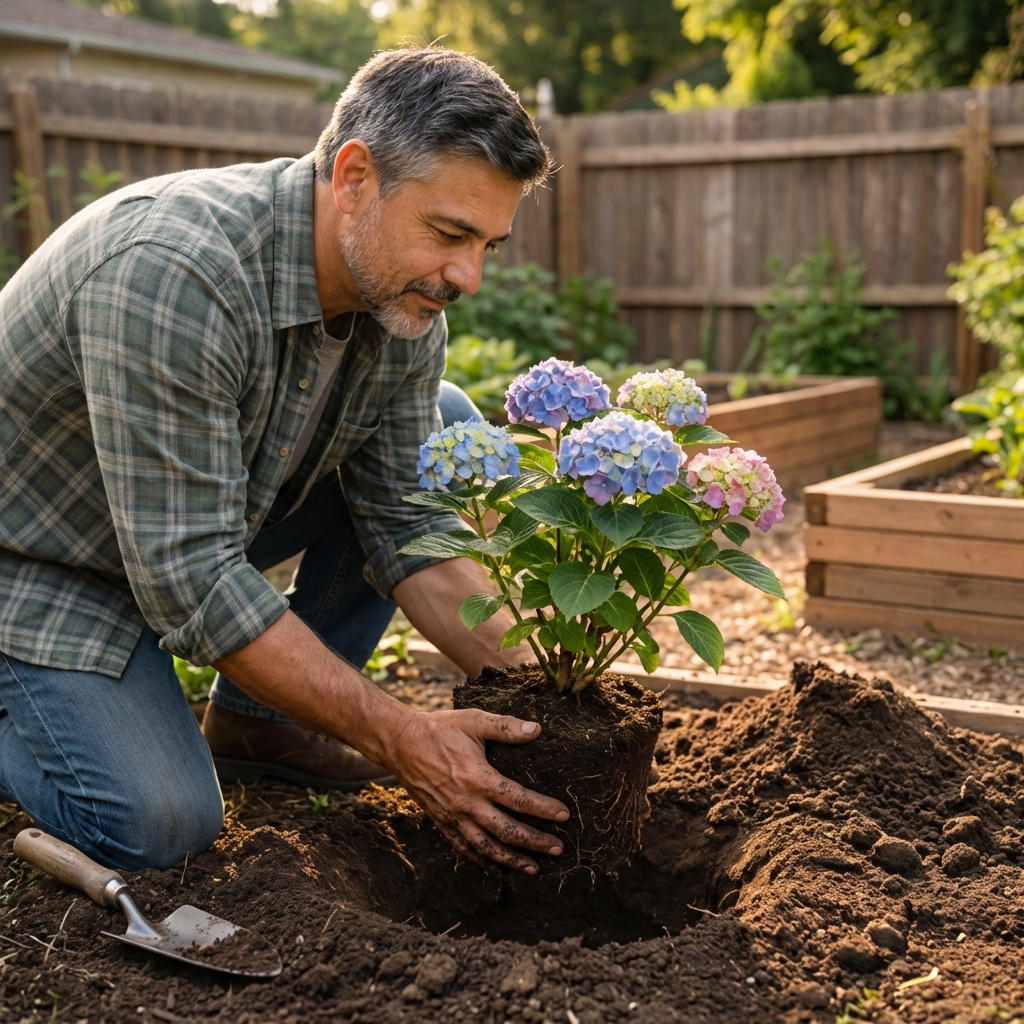
Step-by-step: planting hydrangeas in the ground
1) Water the plant before planting
Hydrangeas hate drying out. If the pot feels light or the soil is dry, water it well 30 to 60 minutes before planting.
2) Dig the hole wider than the root ball
Go about 2 to 3 times as wide as the root ball, and about the same depth. A wide hole encourages roots to spread into loosened soil.
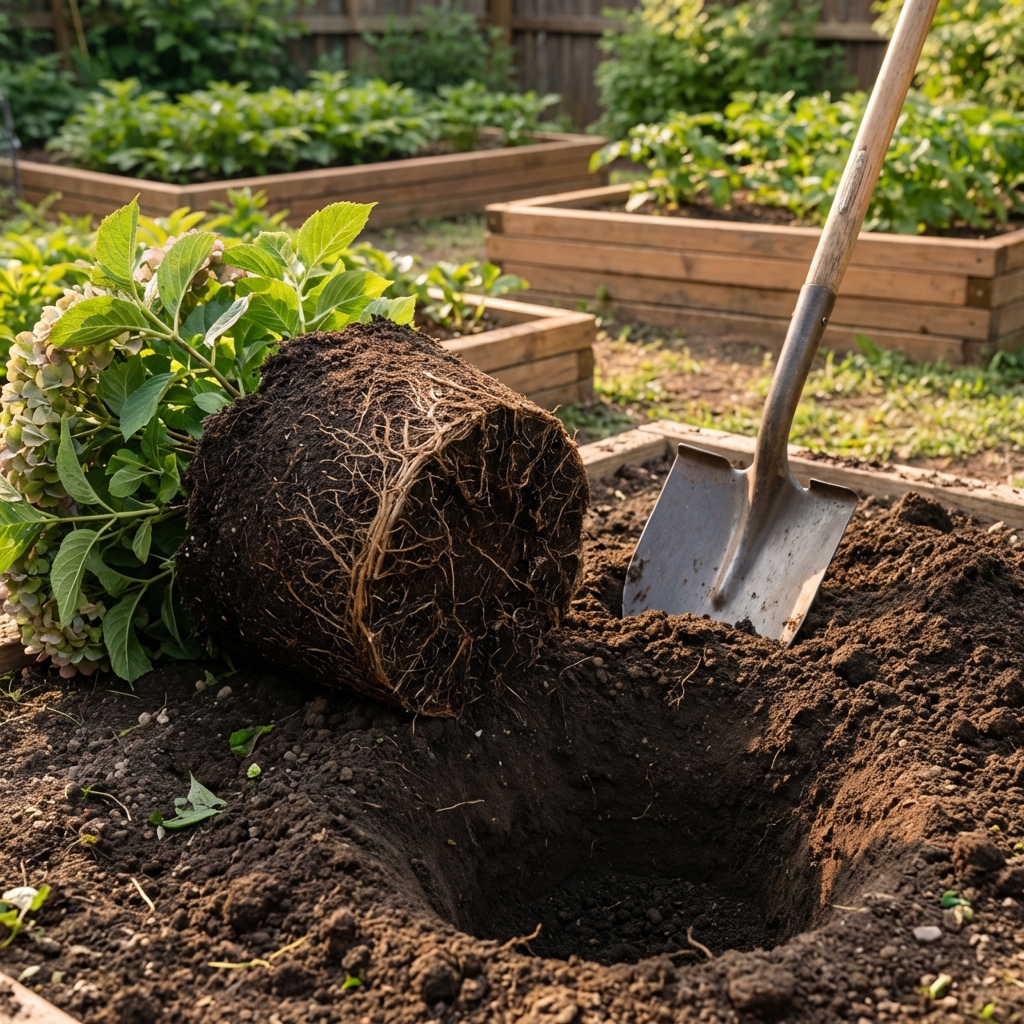
3) Loosen circling roots
If the plant is root-bound, gently tease out the outer roots with your fingers. If it is severely root-bound, make a few shallow vertical cuts around the outside of the root ball. This sounds harsh, but it helps roots grow outward instead of continuing to circle.
4) Set the plant at the right height
Place the hydrangea so the top of the root ball is level with the surrounding soil or just slightly high if your soil tends to stay wet. Planting too deep is a common reason hydrangeas struggle.
5) Backfill with native soil plus compost
Use the soil you dug out, mixed with compost. Pack lightly with your hands to remove big air pockets, but do not stomp it down hard.
6) Water deeply
Soak the area slowly so water reaches the full depth of the root ball and the surrounding soil.
7) Mulch to hold moisture
Add 2 to 3 inches of mulch (shredded bark, leaf mulch, or pine straw). Keep it 3 to 6 inches away from the base so the stems stay dry and less prone to rot.
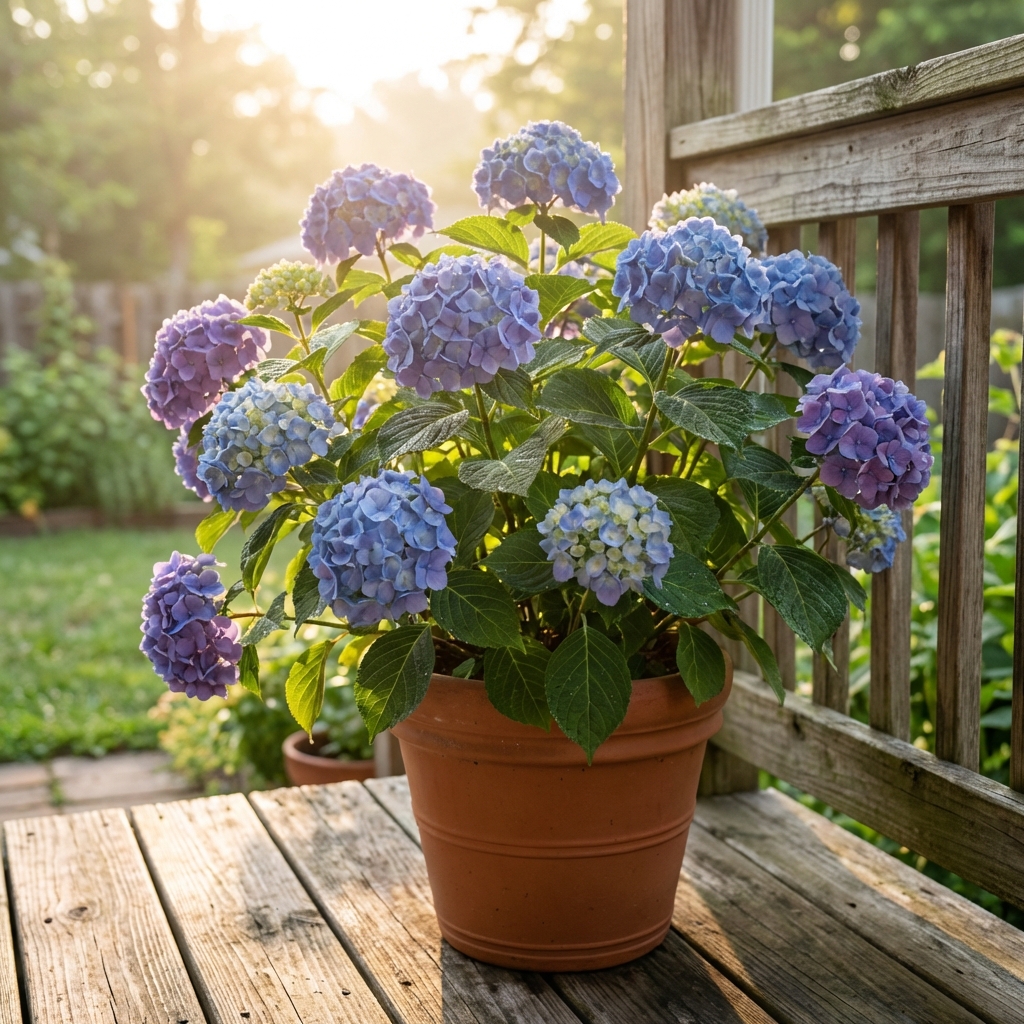
Planting hydrangeas in pots (quick but important tweaks)
Hydrangeas can do well in containers, but pots dry out fast and roots have less insulation in winter.
- Choose a large pot: Bigger is better. Aim for at least 16 to 20 inches wide for many varieties, and go larger for long-term success (especially bigleaf and larger panicles). Plan to up-pot as it grows.
- Use drainage holes: Non-negotiable.
- Soil mix: Quality potting mix, plus a little compost. Avoid heavy garden soil in containers.
- Watering: You will likely water more often than in-ground plants, especially in summer.
- Winter care: In cold zones, protect the pot (move to a sheltered spot, wrap the container, or overwinter in an unheated garage if needed).
Aftercare: the first month sets the tone
Watering schedule for new hydrangeas
There is no perfect calendar, but here is a solid baseline. Instead of watering on autopilot, check moisture about 2 inches down (under the mulch). Water when it feels dry at that depth.
- Week 1: Check daily. Water as needed to keep the root ball and surrounding soil evenly moist.
- Weeks 2 to 4: Deep water 1 to 2 times per week, more often in heat, wind, or sandy soil.
Water slowly at the base. Frequent light sprinkling encourages shallow roots. A soaker hose or drip line is a great low-effort shortcut for the first month.
Should you fertilize right away?
If you amended with compost and the plant looks fine, you can usually wait. In general, feed lightly in spring once you see new growth. Too much nitrogen can mean big leaves and fewer flowers.
Staking and pruning after planting
- Staking: Only if it is floppy from wind or a top-heavy bloom variety.
- Pruning: Avoid hard pruning at planting time. Remove only broken branches or damaged growth.
Two notes that prevent future frustration
Cold hardiness affects blooms
Some hydrangeas handle winter better than others. Bigleaf hydrangeas are famous for winter bud damage in colder zones, which can mean fewer blooms the next year even if the plant looks healthy. Panicle and smooth hydrangeas are generally more cold-hardy and reliable bloomers in many regions.
Old wood vs new wood (the quick version)
This matters later when you prune. Many bigleaf and oakleaf hydrangeas bloom on old wood (last year’s stems), so heavy pruning at the wrong time can remove flower buds. Panicle and smooth hydrangeas usually bloom on new wood (this year’s growth), so they are more forgiving.
Common planting mistakes (and easy fixes)
Planting too deep
What you see: Slow growth, yellowing, or general “stuck” look.
Fix: Lift and reset so the root ball top is level with soil. If already planted, gently pull back excess soil from the crown.
Too much hot sun
What you see: Leaf scorch, constant wilting even with water.
Fix: Provide afternoon shade (shade cloth, a nearby taller plant) or move the shrub in fall or early spring. In hot climates, prioritize protection from midday and late-day sun.
Watering on a schedule instead of checking soil
What you see: Wilting from underwatering or yellowing from soggy soil.
Fix: Feel the soil about 2 inches down. Adjust based on your yard’s reality, not the calendar.
Mulch piled against the stems
What you see: Stem rot risk, pests hiding, weak base growth.
Fix: Pull mulch back to create a small open ring around the plant base.
Surprise deer or rabbit damage
What you see: Fresh, cleanly nipped stems and leaves, especially on new plants.
Fix: Protect young shrubs with a temporary fence or cage, or use a repellent consistently until the plant is established.
FAQ
Do hydrangeas like sun or shade?
Many do best with morning sun and afternoon shade. Panicle hydrangeas handle more full sun than bigleaf types. In hot climates, more shade is usually better. In cool climates, more sun is often fine if moisture is steady.
How long does it take a hydrangea to establish?
Expect the first season to be about roots and steady growth. Many hydrangeas look noticeably more full in year two, once the root system is stronger.
Can I plant hydrangeas next to my house?
Yes, as long as the spot is not baking hot or bone-dry from reflected heat, and you leave enough space for mature size and airflow. Avoid planting where roof runoff will constantly hammer the soil.
Why is my newly planted hydrangea wilting?
Some wilting the first few days can be normal transplant stress, especially in warm weather. If it perks up in the evening, that is usually heat stress. Focus on deep watering, mulch, and afternoon shade while it adjusts.
Takeaway
If you do three things, do these: pick a good spot (not too hot, not too wet), plant at the right depth (root ball level with soil), and water consistently for the first month. That is the difference between a hydrangea that limps along and one that turns into the “wow” shrub you were picturing when you bought it.

Jose Brito
I’m Jose Britto, the writer behind The Country Store Farm Website. I share practical, down-to-earth gardening advice for home growers—whether you’re starting your first raised bed, troubleshooting pests, improving soil, or figuring out what to plant next. My focus is simple: clear tips you can actually use, realistic expectations, and methods that work in real backyards (not just in perfect conditions). If you like straightforward guidance and learning as you go, you’re in the right place.