Orchids get a reputation for being “don’t touch” plants, but pruning is part of keeping them healthy. The trick is knowing what you are looking at first. If you cut the wrong thing, you can lose a season of blooms. If you avoid cutting anything at all, you can leave rot, dead roots, or disease spreading in the pot.
This page walks you through identification first, then a step-by-step pruning plan, plus simple control measures for the most common problems.
Before You Cut: Identify the Parts
Most pruning mistakes happen because orchid parts look similar at a glance. Use this quick ID list to slow down and confirm what you have.
Quick mindset shift: monopodial orchids (like Phalaenopsis and Vanda) grow upward from one main stem, while sympodial orchids (like Cattleya and Oncidium types) creep along a rhizome with pseudobulbs. That’s why “cut it back” advice does not translate well across types.
Flower spike (Phalaenopsis and many common house orchids)
- What it looks like: A slender stem that grows up and out from between the leaves. Often green while active, then turns yellow or brown when done.
- What it does: Holds flowers and buds.
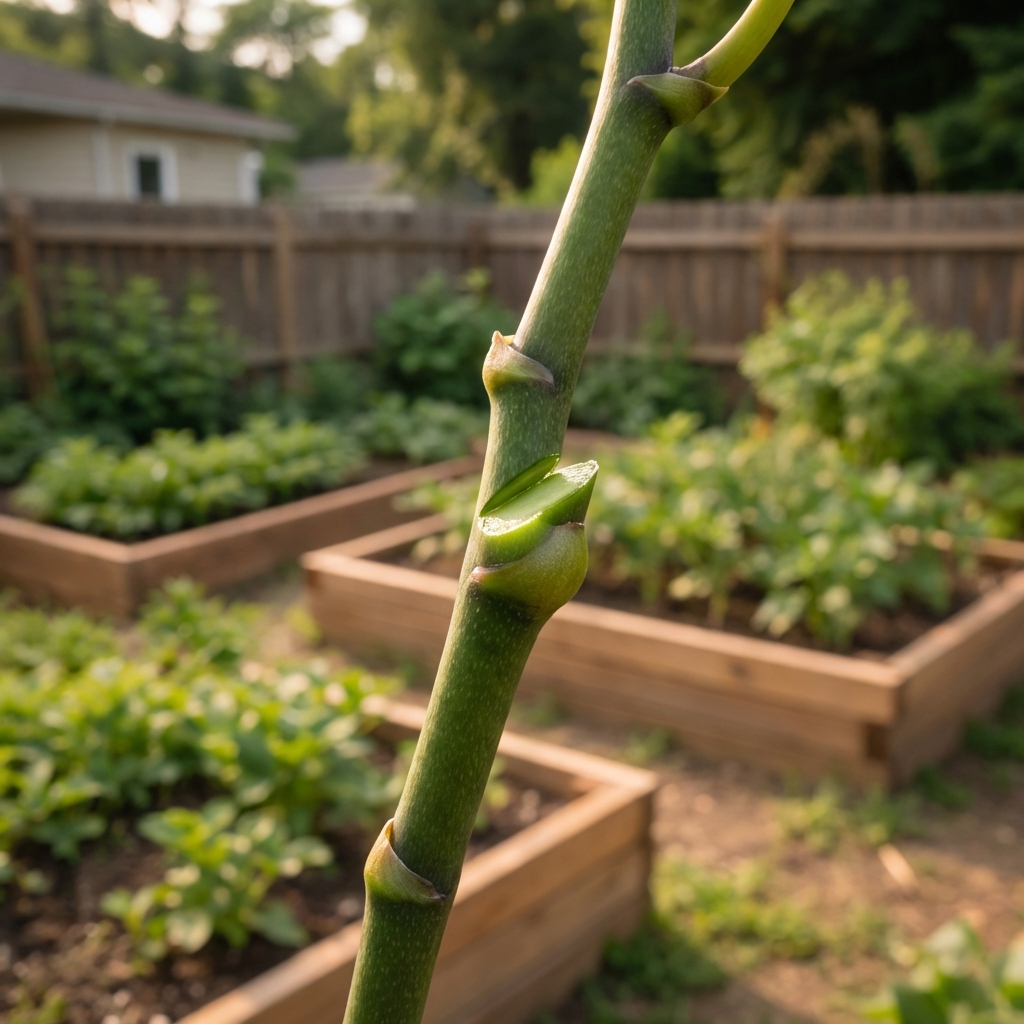
- Key clue: Spikes usually have little nodes along the length where side branches can form.
- What a node looks like: A small bump with a thin, papery “triangle” bract over it. Nodes are on spikes. Root nubs are rounder and usually emerge from the base, not along a skinny stem.
Stem or cane (Dendrobium, Oncidium relatives with canes)
- What it looks like: Thicker upright growths, often segmented. Leaves may grow along the cane.
- What it does: Stores water and energy. Even leafless canes can feed new growth.
- Key clue: Canes are not the same as flower spikes. Cutting healthy canes too early is a common setback.
- Note: If a cane is growing a keiki (a baby plant), do not cut that cane. Let the keiki develop roots first.
Pseudobulb (Oncidium, Cattleya, many sympodial orchids)
- What it looks like: A swollen “bulb” at the base with leaves on top in some types.
- What it does: Storage organ that supports new growth and blooming.
- Key clue: Old, wrinkly pseudobulbs can still help the plant. Remove only if they are fully dead and dry, or rotting.
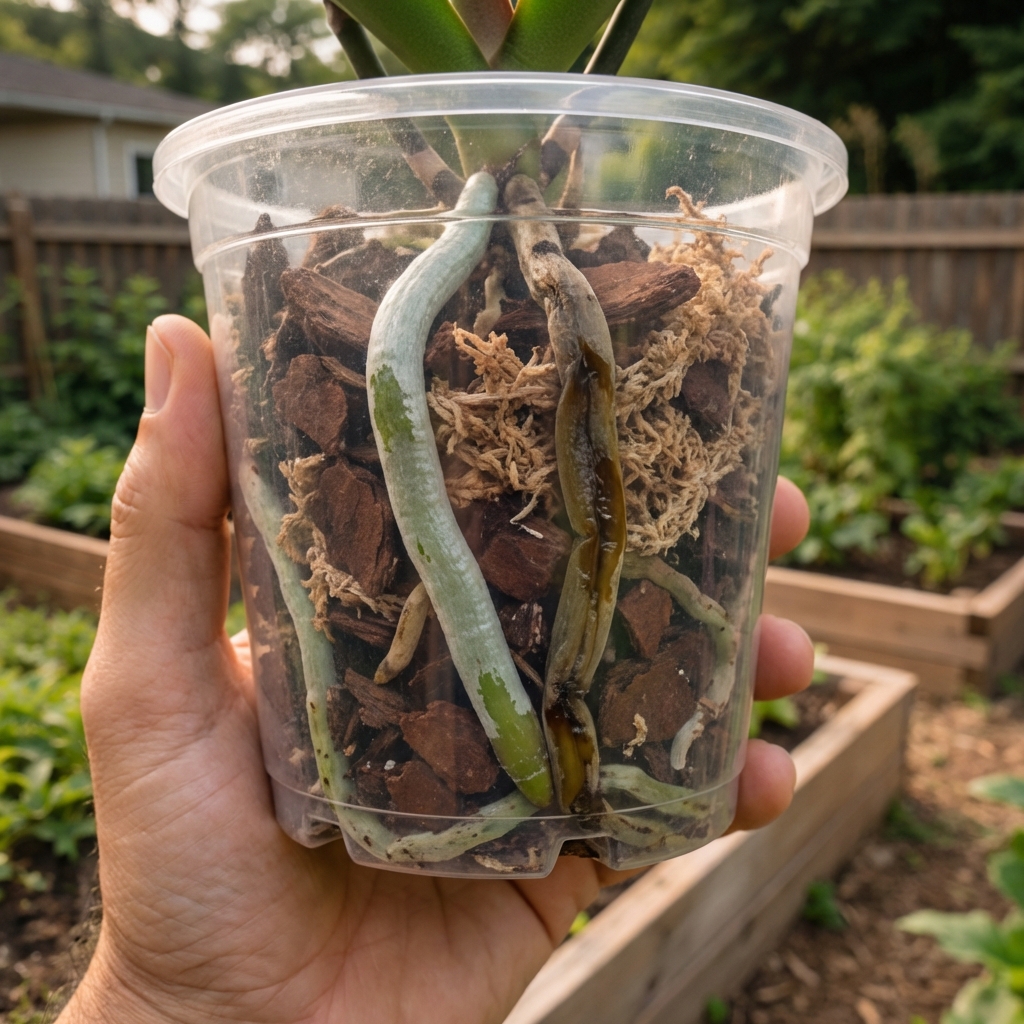
Roots: living vs dead
- Living roots: Firm. Often green when wet, silvery when dry (especially in Phalaenopsis).
- Dead roots: Mushy, hollow, papery, or the outer layer slides off leaving a thin string inside.
- Key clue: Do not judge color alone. Texture tells the truth.
- Velamen note: Some older roots look tan or stained but still feel firm. If it is firm, it stays.
Crown and base
- Crown: The center where new leaves emerge (Phalaenopsis). Crown rot is serious.
- Base: Where roots and older leaf bases meet. Rot here can spread quickly.
Tools and Safety
Orchid pruning is not just cutting. It is also controlling the spread of bacteria and fungi.
What you need
- Sharp scissors, snips, or pruners
- 70% isopropyl alcohol or a disinfectant wipe
- Paper towels
- Cinnamon powder (optional for small, dry cut surfaces, used sparingly)
- Fresh potting mix if you are repotting
- Disposable gloves if you are dealing with rot
How to sterilize correctly
Wipe blades with alcohol before you start, and again between plants. If you are cutting active rot or obvious infection, sterilize between each major cut. It feels excessive, but it prevents you from “painting” the problem across the whole orchid.
Flame sterilizing can be effective, but inside most homes it adds unnecessary risk. Alcohol wipes are safer and work well for routine pruning.
When to Prune Orchids
- Right after blooms fade: Best for spike decisions on Phalaenopsis.
- During repotting: Best time to prune dead roots because everything is visible.
- Any time you find rot: Rot does not wait for a season. Cut it out when you see it.
Try not to do heavy pruning right as the plant is pushing new roots or new growth unless you are dealing with disease. When in doubt, do the minimum that improves health.
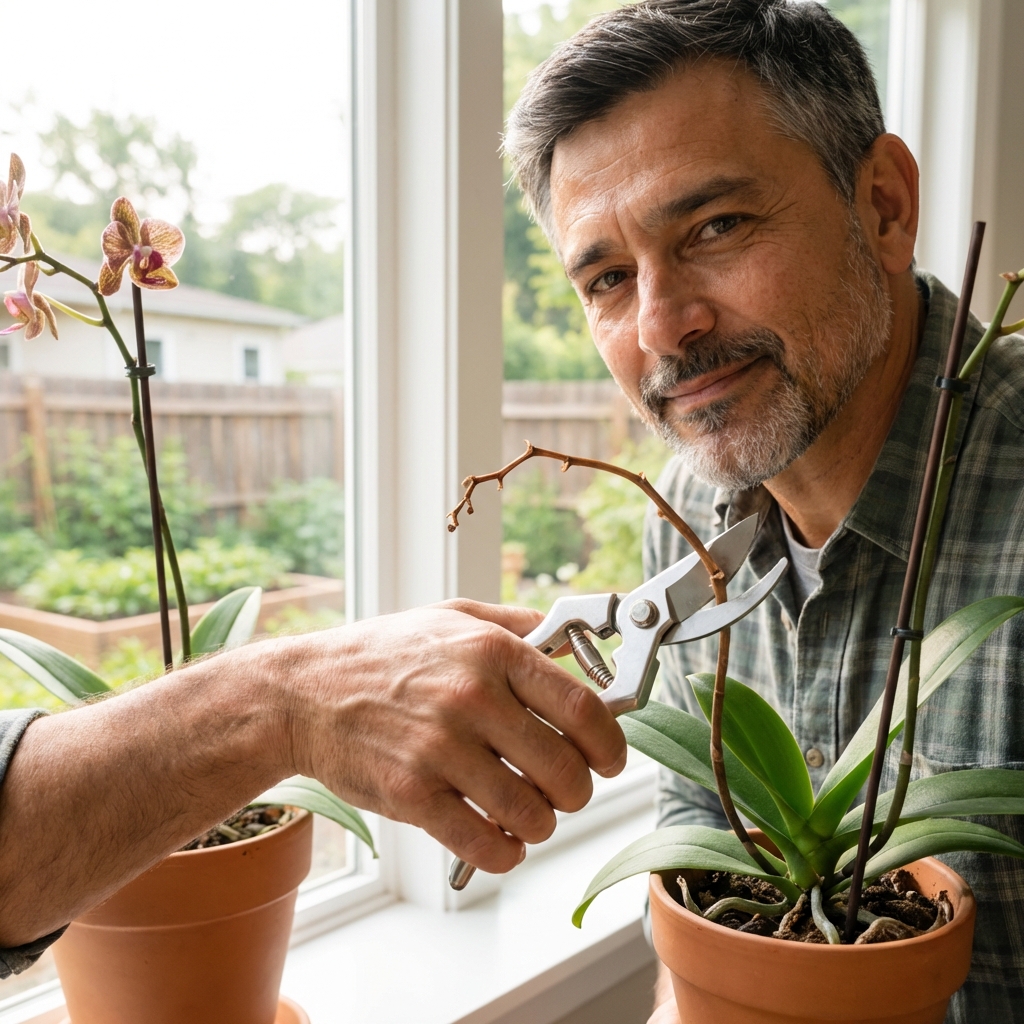
Phalaenopsis: Prune a Flower Spike
This is the most common “grocery store orchid” pruning question.
Step 1: Confirm the spike is done
If all flowers are gone, look at the spike color. Green means it still has potential. Yellowing or brown means it is shutting down.
If you see a keiki forming on the spike, do not cut that section. Let it develop.
Step 2: Decide your goal
- Goal: faster chance at a smaller rebloom. Keep a green spike and cut just above a node.
- Goal: stronger plant and better future spikes. Remove the spike lower, especially if the plant looks tired or root growth is poor.
Step 3: Where to cut
- If the spike is brown and dry: Cut it off near the base, leaving about 0.5 to 1 inch (1 to 2.5 cm) so you do not nick the plant tissue.
- If the spike is green: Find a node (a small bump with a thin bract). Cut about 1/4 inch (0.5 cm) above a node. Many growers choose the second or third node from the base, but any healthy node can work.
Step 4: Make a clean cut and leave it alone
Do not crush the spike. One decisive cut is better than multiple “nibbles.” For the next week, keep water out of the crown. Water at the media level, and if you splash the crown, dab it dry with a paper towel.
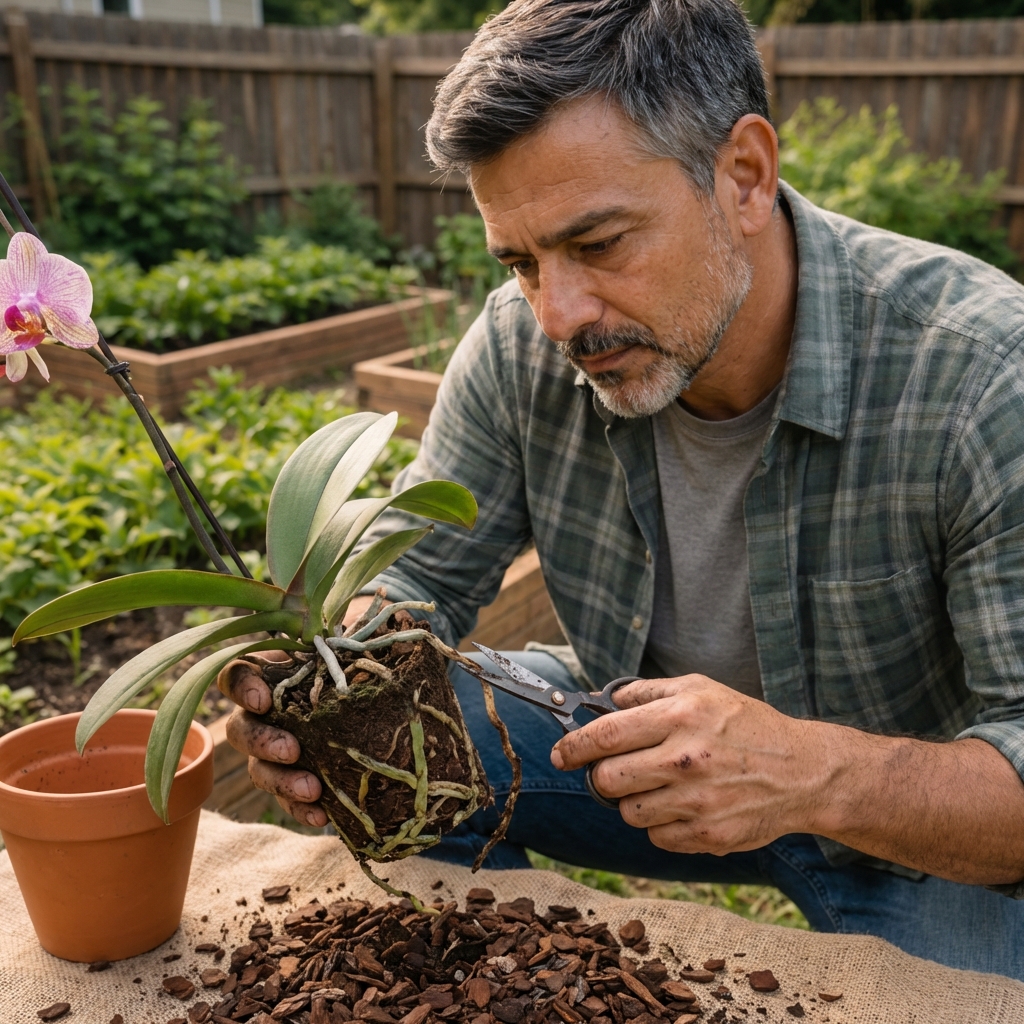
Prune Dead or Rotten Roots
If your orchid is struggling, root pruning is often more important than spike pruning.
Step 1: Slide the plant out and remove old media
Soak the pot for 10 to 15 minutes first if the roots are stuck. Gently tease out bark or moss so you can see what is actually alive.
Step 2: Identify roots by feel
- Firm roots stay, even if they look stained.
- Mushy, hollow, or foul-smelling roots go.
Step 3: Trim back to healthy tissue
Cut until you hit firm material. If the rot is moving up toward the base, slow down and sterilize blades between cuts.
Step 4: Let cuts air-dry briefly
Give the plant 15 to 30 minutes in a dry spot to let fresh cuts dry a bit before repotting. This reduces the chance of sealing in moisture against a wound.
Step 5: Repot into fresh mix and reset watering
Do not keep the plant soaking wet after root work. Water lightly, then let the mix approach dryness before watering again. New roots need air as much as they need moisture.
Aftercare (simple and realistic)
- Hold fertilizer: Skip fertilizer for about 2 to 4 weeks after heavy root pruning.
- Light: Bright, indirect light helps recovery.
- Moisture: Slightly drier is safer than constantly damp while wounds close.
- Watch for stress: A little limpness can happen short-term. If leaves keep collapsing, reassess roots and moisture.
Prune Canes and Pseudobulbs
For cane and pseudobulb orchids, the rule is simple: do not remove storage tissue unless it is clearly dead or causing a problem.
What to remove
- Fully dead canes or pseudobulbs: Crisp, dry, and brown throughout
- Rotting sections: Soft, wet, blackened tissue
- Old leaf sheaths that trap moisture: Only if they peel off easily and are holding wet debris
What to keep
- Green canes, even if leafless
- Wrinkled pseudobulbs that are still firm
- Canes supporting a keiki
How to cut safely
Cut dead tissue as close to the rhizome or base as you can without nicking live tissue. If you are unsure, leave it for now. You can always remove more later, but you cannot glue a cane back on.
Common Problems and Control
Root rot
Identification: Mushy roots, sour smell, media staying wet too long, leaves that look limp even after watering.
Control: Prune dead roots, repot into fresh airy mix, and fix the watering routine and pot ventilation. Rot usually starts as a growing-condition problem.
Crown rot (Phalaenopsis)
Identification: Black or mushy tissue in the crown, leaves that pull out easily, water trapped in the center.
Control: Keep the crown dry and improve airflow. If mushy tissue is easily accessible, you can remove only what is clearly rotten, but do not gouge into healthy crown tissue. Advanced crown rot may require a fungicide or bactericide and sometimes the plant cannot be saved. If rot is extensive, disposal may be the safest move to protect the rest of your collection.
Stem or base rot
Identification: Dark, soft tissue at the base, yellowing leaves starting low, instability in the pot.
Control: Prune away rotten tissue where possible, sterilize tools, repot into clean media, and reduce moisture. If rot has reached the main stem extensively, recovery is difficult.
Black spotting and leaf lesions
Identification: Spreading dark spots, sometimes with a yellow halo, especially in humid low-airflow areas.
Control: Remove badly affected leaves only if needed, isolate the plant, increase airflow, and keep water off leaves at night. Always sterilize tools after cutting spotted tissue.
Virus concerns
Identification: Patterns that are suggestive include irregular color break on flowers, streaking, distorted growth, and persistent mosaic patterns on leaves. (Color break can also be genetics in some hybrids, so do not assume.)
Control: There is no cure. Do not share tools between plants. If you strongly suspect virus, isolate the orchid and consider testing. Pruning does not fix virus and can spread it if tools are not disinfected.
Common Pruning Mistakes
- Cutting green roots because they look “messy” outside the pot: Aerial roots are normal, especially in Phalaenopsis.
- Cutting a Dendrobium cane after flowering: Many rebloom or support new growth from older canes.
- Leaving rotten roots because you are afraid to cut: Dead roots do not come back. They keep things wet and invite more rot.
- Using dull scissors: Crushing tissue slows healing and invites infection.
- Not sterilizing blades: This is how one problem becomes several.
Quick Spike Guide (Phalaenopsis)
- Spike is brown and dry: Cut near the base.
- Spike is green and plant is strong: Optional trim above a node for a quicker rebloom.
- Spike is green and plant is weak: Remove the spike so the plant can rebuild roots and leaves.
- Keiki present: Do not cut the section supporting it.
Quick Reference: Cut or Keep
- Brown, dry flower spike: Cut near base.
- Green flower spike (Phalaenopsis): Optional trim above a node, or remove if the plant needs recovery.
- Mushy or hollow roots: Cut back to firm tissue.
- Firm roots, even if silver, green, or tan: Keep.
- Dead, crisp canes or pseudobulbs: Remove.
- Firm older canes and pseudobulbs: Keep.
FAQ
Should I put cinnamon on orchid cuts?
Cinnamon can help dry a small surface wound, but it is also very drying and can damage living root tips. If you use it, use a tiny amount on a cut spike or a small cut on dry tissue. Avoid dusting the whole root system. Also, cinnamon is not a replacement for clean tools and fresh media.
Can I prune orchid leaves?
Only remove a leaf if it is mostly dead, rotting, or heavily diseased. Green leaves are energy. For minor cosmetic damage, leave the leaf alone.
My orchid spike is green but not blooming. Should I cut it?
If the orchid is otherwise healthy, you can leave it. If it is weak and root growth is poor, removing the spike can help the plant redirect energy into roots and leaves.
Prune With a Purpose
If you take one thing from this: prune orchids for health first, blooms second. Identify the part, make one clean cut, and control the conditions that caused the problem. Most orchids are tougher than they look once you stop guessing and start looking closely.
If you want, tell me what type of orchid you have (Phalaenopsis, Dendrobium, Cattleya, Oncidium, Vanda, or unknown) and what you are trying to fix. I can help you decide exactly what to cut and what to leave.

Jose Brito
I’m Jose Britto, the writer behind The Country Store Farm Website. I share practical, down-to-earth gardening advice for home growers—whether you’re starting your first raised bed, troubleshooting pests, improving soil, or figuring out what to plant next. My focus is simple: clear tips you can actually use, realistic expectations, and methods that work in real backyards (not just in perfect conditions). If you like straightforward guidance and learning as you go, you’re in the right place.