Rhododendrons are tough enough to handle real gardens, but they are also particular about a few basics: cool roots, steady moisture, and airy, acidic soil. Transplanting goes smoothly when you respect those needs and plan the move like a short, controlled “pit stop” rather than a long, root-drying project.
This guide walks you through timing, prep, digging, replanting, and aftercare. It is written for home growers who want a method that works even if your soil is not perfect and your schedule is not either.
When to transplant rhododendrons
Timing is the biggest factor you can control. Your goal is to move the shrub when the weather is mild and the plant can grow new roots without fighting heat or deep cold.
Best seasons
- Early fall (often the top choice): warm soil helps root growth, cooler air reduces stress. In colder climates, aim earlier so roots have time to settle before hard freezes.
- Early spring: transplant before strong new growth takes off, once the ground is workable.
Times to avoid
- Hot summer weeks, especially during bloom or right after: leaves lose water faster than damaged roots can replace it.
- Frozen ground or when a hard freeze is imminent: roots cannot settle in.
Quick rule: If you are comfortable working outside for an hour without wilting, your rhododendron will probably handle the move better too.
Before you dig: set yourself up for success
A clean, fast transplant is safer than a slow one. Do the prep first so the root ball is out of the ground for as little time as possible.
Pick the new spot carefully
Most rhododendrons prefer:
- Morning sun and afternoon shade, or dappled light.
- Protection from harsh wind that dries leaves in winter.
- Well-drained soil. They hate “wet feet” more than they hate slightly imperfect pH.
If your site holds water after rain, plan on a raised planting area or mound. A rhododendron in a slightly higher spot usually outlives one planted in a low, soggy area.
Water the plant the day before
Moist roots hold together better and experience less shock. Water slowly at the base until the soil is evenly moist, not muddy.
Pre-dig the new hole
Have the new planting hole ready before you lift the shrub. That is the easiest way to prevent roots from drying out.
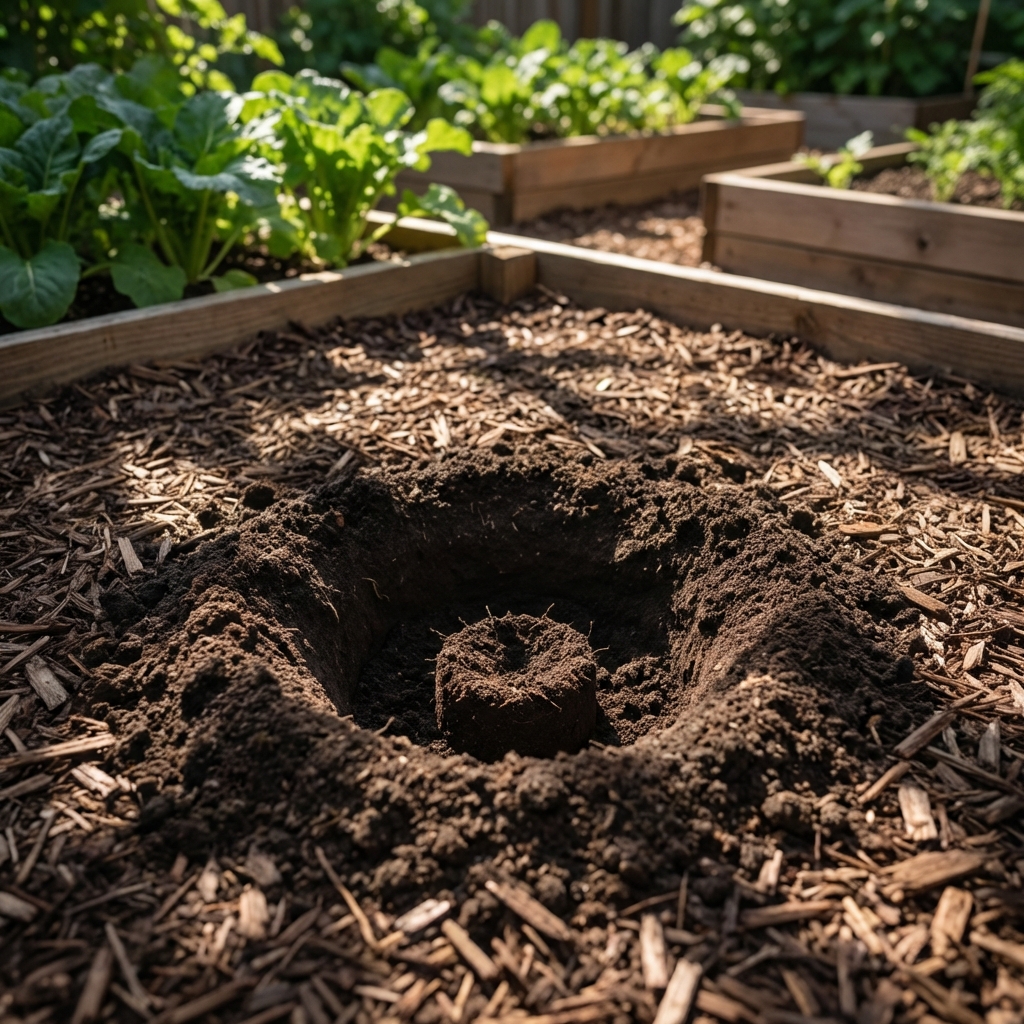
How big should the hole be?
Rhododendron roots grow shallow and wide. The hole should reflect that, and wider is usually better than deeper.
- Width (rule of thumb): 2 to 3 times as wide as the root ball, or as wide as you can reasonably loosen the surrounding soil. For very compacted sites, going extra wide helps more than piling on amendments.
- Depth: No deeper than the root ball. In many cases, slightly shallower is better.
Important: Plan to set the plant so the top of the root ball sits about 1 to 2 inches above the surrounding soil. After watering and settling, it will look closer to level. Planting too deep is one of the fastest ways to trigger decline.
Note: Backfill up to the sides of the root ball, but keep the crown (root flare) above grade. If any of the root ball shoulder ends up exposed, cover it with mulch, not soil, so it does not dry out.
Soil and amendments that actually help
Rhododendrons do best in loose, acidic, organic soil. But you do not need to rebuild your entire yard in one afternoon. Focus on structure and drainage first.
A reliable backfill mix
If your native soil is heavy clay or very sandy, blend what you removed with:
- Fine pine bark or aged bark fines (great for aeration)
- Leaf mold or well-finished compost (for moisture balance)
Aim for a mix that feels springy and crumbly, not sticky. Keep amendments moderate and make the hole wide so roots want to travel outward, not stay in a “pot” of rich soil.
About acidity (pH)
Many rhododendrons grow best around 4.5 to 5.5, and some will tolerate conditions up to about 6.0 depending on cultivar and local soil chemistry. If you suspect your soil is alkaline, the best move is to get a simple soil test, or check guidance from your local extension office. If you need to nudge pH down, use elemental sulfur according to label rates and soil test results. Avoid dumping in strong “quick fix” acids. They can burn roots and do not create stable long-term conditions.
Skip the fertilizer at planting
Right after transplanting, the plant needs roots more than it needs top growth. Strong fertilizer can push soft growth that stresses a reduced root system. If you want to feed, wait until you see signs of recovery and new growth, then use a gentle, acid-forming fertilizer at a light rate.
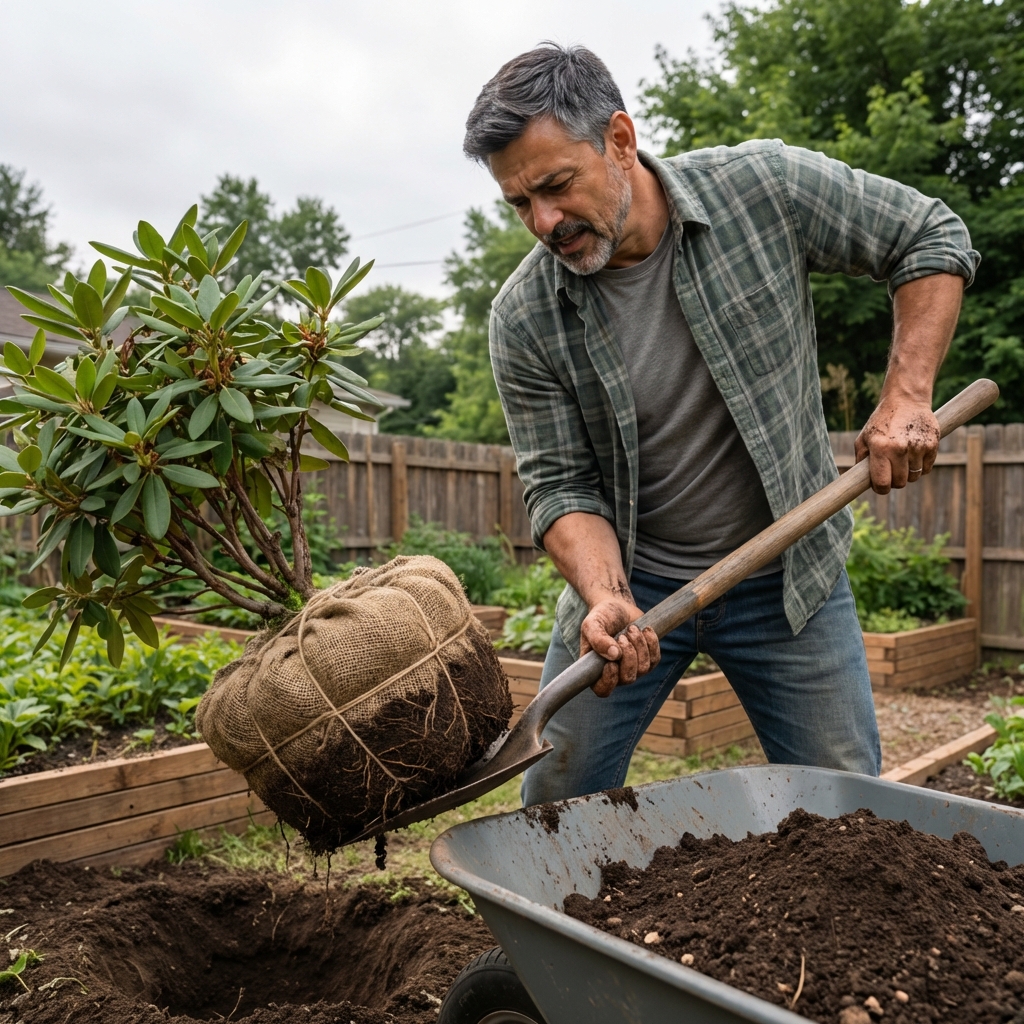
Digging up the rhododendron without wrecking roots
Step-by-step
- Mark the orientation (optional): tie a small ribbon on the north side so you can replant it facing the same direction.
- Choose a realistic digging line: aim to cut your circle at the drip line (the outer edge of the branches). For larger, established shrubs, you may need to dig slightly inside the drip line to keep the root ball manageable. For small shrubs, a practical starting point is often 12 to 18 inches out from the main stems. You are balancing root retention with what you can safely lift.
- Go shallow: most roots are in the top 6 to 12 inches.
- Undercut and lift: work the shovel underneath and gently lever up, moving around the circle.
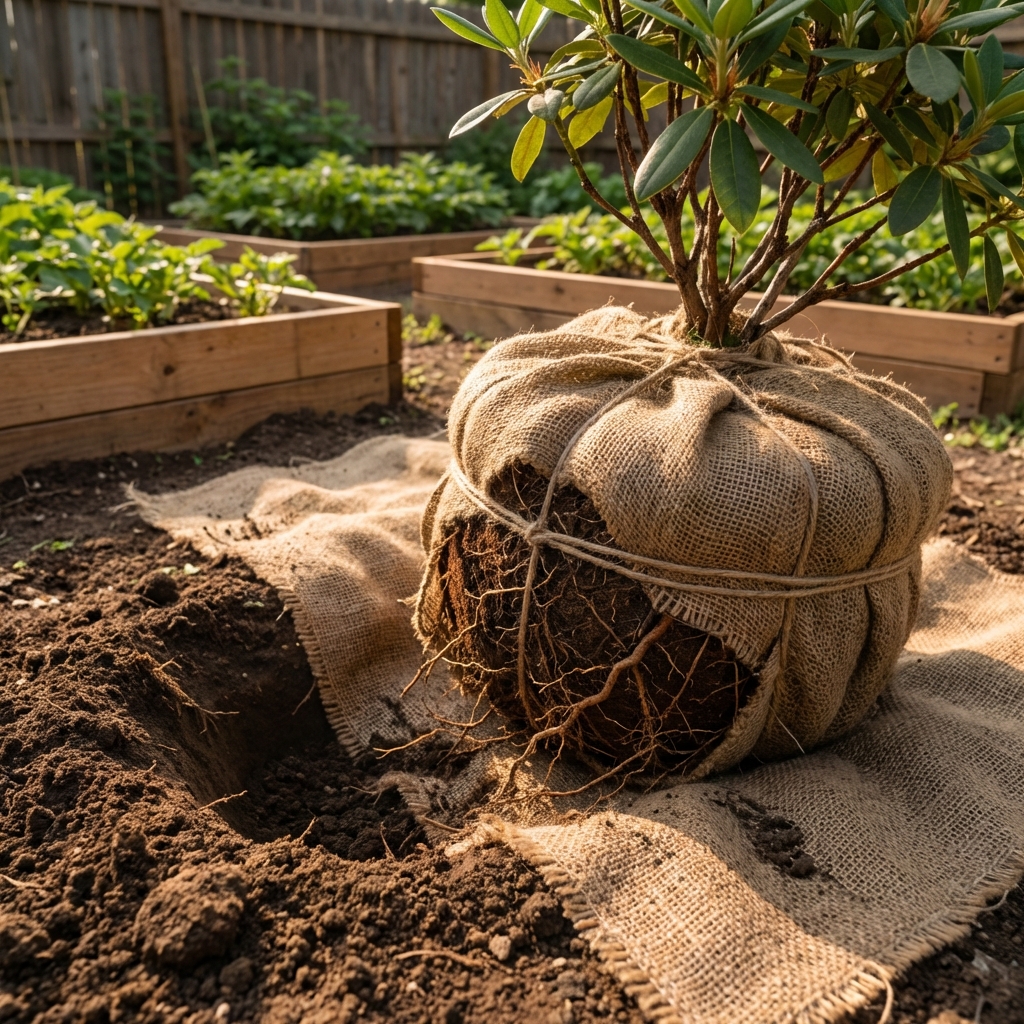
- Keep the root ball intact: slide it onto a tarp or burlap to drag it without crumbling.
If the shrub is large, do not be afraid to recruit help. A clean lift is safer for the plant and your back.
Replanting: the part that prevents transplant shock
Set the height and check drainage
Place the root ball in the hole and confirm it is slightly high. If water pools in the hole before planting, stop and address drainage. Planting into a bathtub of soil is a slow failure.
Backfill in layers, then water in
Backfill about halfway, water thoroughly to settle, then finish filling. Do not stomp hard. Firm gently with your hands to remove big air pockets.
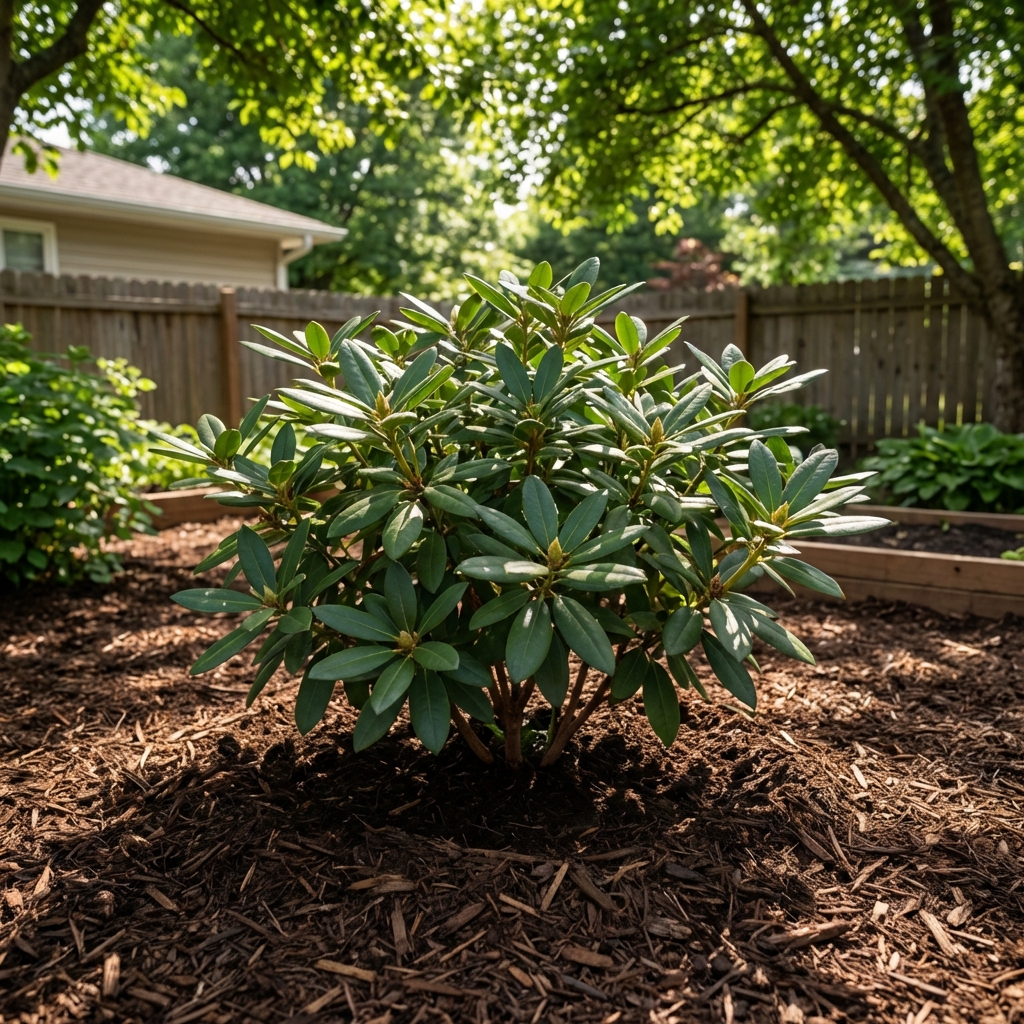
Mulch the right way
Mulch keeps roots cool and evenly moist, which is exactly what rhododendrons want.
- Use pine bark, pine needles, or shredded leaves.
- Apply 2 to 4 inches deep.
- Keep mulch 2 to 3 inches away from the main stems so the crown can breathe and you avoid rot.
If it is balled-and-burlapped
If your rhododendron was moved with burlap or twine around the root ball, set it in the hole first, then cut and fold burlap back from the top and sides. Remove any twine you can reach. The goal is to prevent girdling and let roots move into the surrounding soil.
Aftercare: what to do in the first 6 weeks
Most transplant problems are aftercare problems. The plant is not “done” when it is in the ground.
Watering schedule that works
- Week 1 to 2: water deeply every 2 to 3 days if there is no meaningful rain (about 1 inch total for the week).
- Week 3 to 6: water deeply about once a week, adjusting for weather and soil.
Moist is the goal. Soggy is not. Check the soil about 2 inches down. If it feels wet and sticky, wait. If it feels barely damp or dry, water.
Watch for stress signals
- Midday droop that recovers by evening can be normal early on.
- Droop that stays all day, crispy edges, or yellowing can mean underwatering, overwatering, or too much sun and wind in the new spot.
Provide temporary shade if needed
If you had to transplant in brighter conditions than the original site, a temporary shade cloth for a couple of weeks can reduce leaf stress while roots re-establish.
Should you prune after transplanting?
Light pruning is fine, heavy pruning is usually not necessary.
- Do remove broken branches and any dead wood.
- Do consider removing a small amount of top growth if the root ball was severely reduced.
- Do not shear the plant into a tight shape after transplanting. It needs leaves to fuel root recovery.
If it is right after blooming and you want next year’s flowers, you can deadhead spent blooms to save energy, but do not chase perfection.
Transplanting big, older rhododendrons
Older plants can be moved, but the margin for error gets smaller as size goes up.
What helps with large shrubs
- Root prune in advance if you can: about 3 to 12 months before moving (or one growing season for very large plants), cut a circle around the shrub to encourage compact feeder roots. This also makes it more realistic to dig a liftable root ball.
- Move on a cool day: overcast and calm is ideal.
- Use a tarp to protect the root ball and make transport easier.
If the shrub is truly oversized, it may be worth hiring help for the lifting alone. Saving the plant often costs less than replacing a mature specimen.
Nursery plant vs. in-ground shrub
If you are transplanting from a pot
- Slide the plant out and check for circling or matted roots.
- Loosen the outer roots with your fingers, or make a few shallow vertical slices with a clean knife to encourage outward growth.
- Plant it high the same way, then mulch to keep the root zone cool.
If you are moving an established plant
Your main job is to keep the root ball together, keep it shaded, and get it replanted quickly. Expect some root loss. Good aftercare is what makes the difference.
First winter tips (especially for evergreen types)
The first winter after transplanting is often when stress shows up, particularly in windy or sunny winter sites.
- Water well before the ground freezes if fall is dry, since evergreens still lose moisture through their leaves.
- Keep mulch in place to buffer temperature swings, but do not pile it against the stems.
- Block wind with burlap screening or a temporary windbreak if the site is exposed.
Common mistakes (and how to avoid them)
- Planting too deep: keep the root ball slightly high and mulch around, not over, the crown.
- Improving only the hole: overly rich backfill can act like a pot in the ground. Blend amendments with native soil and make the hole wide.
- Overwatering in heavy soil: yellow leaves and limp growth can be waterlogging, not thirst.
- Transplanting in summer sun: if you must, provide shade and be obsessive about moisture.
- Mulch touching the stems: leave breathing space to prevent rot.
Quick checklist for transplant day
- New hole dug and ready
- Soil mix staged nearby
- Tarp or burlap ready for the root ball
- Root ball out of ground for the shortest time possible
- Planted slightly high
- Watered in thoroughly
- Mulched properly
- Watering plan set for the next month
If you do those things, your rhododendron has a very good shot at settling in and returning to normal growth. Expect fewer blooms the next season sometimes, but strong leaf growth is a good sign that it is rebuilding roots and getting back on track.

Jose Brito
I’m Jose Britto, the writer behind The Country Store Farm Website. I share practical, down-to-earth gardening advice for home growers—whether you’re starting your first raised bed, troubleshooting pests, improving soil, or figuring out what to plant next. My focus is simple: clear tips you can actually use, realistic expectations, and methods that work in real backyards (not just in perfect conditions). If you like straightforward guidance and learning as you go, you’re in the right place.