Silverfish are one of those pests that feel mysterious until you understand what they need. They are not chasing you. They are chasing moisture, darkness, and starchy stuff to snack on. When you take those away and add a few well-placed treatments, the problem often collapses quickly.
This how-to guide walks you through identification, a quick inspection, the most effective control options, and a prevention routine you can actually keep up with.
Know your enemy
What silverfish look like
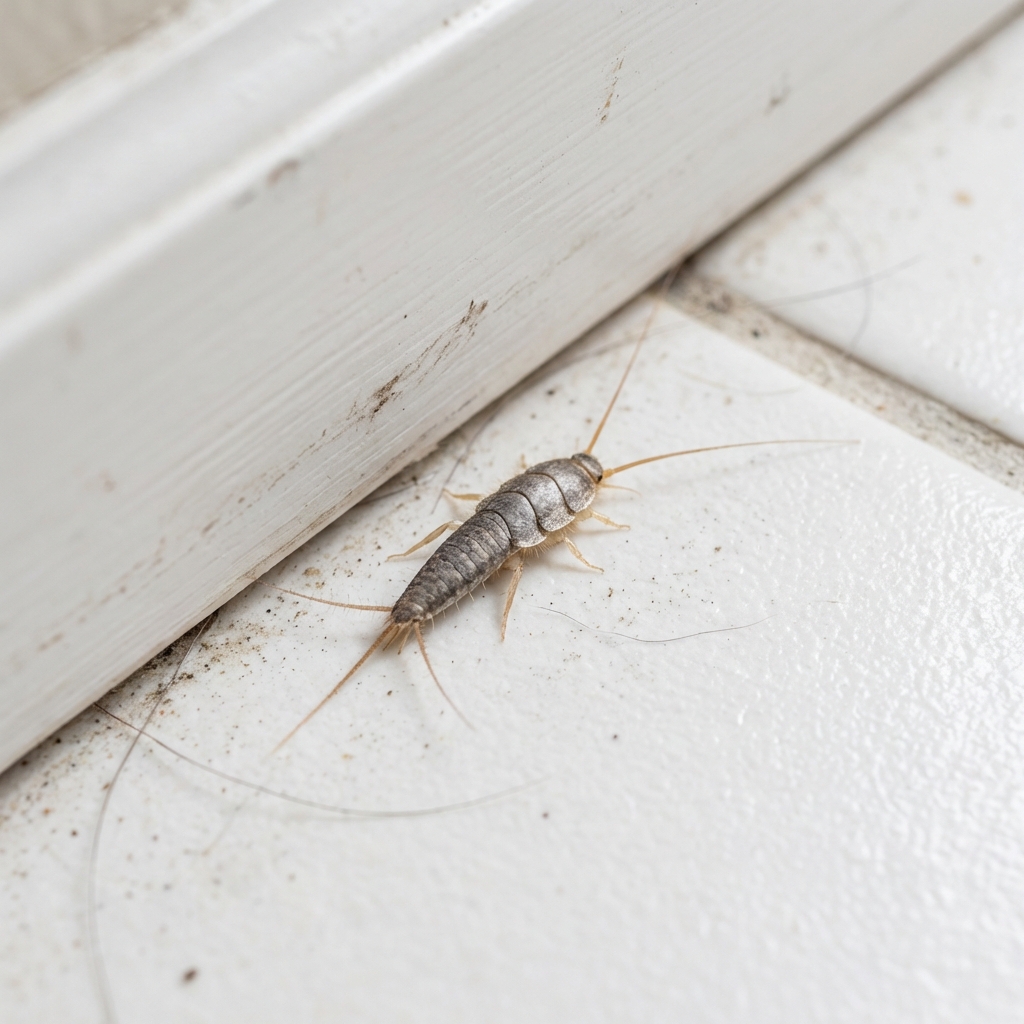
Silverfish are small, wingless insects with a teardrop-shaped body, long antennae, and three tail-like filaments. They move fast and often look shiny or metallic gray under a flashlight.
Common signs you have them
- Live sightings at night, especially in bathrooms, basements, laundry rooms, and kitchens
- Droppings (pepper-like specks) near baseboards, shelves, or stored paper
- Shed skins that look like tiny, translucent insect “shells”
- Small irregular holes or scraped patches in paper, book bindings, wallpaper, cardboard, or clothing
- Occasional staining on paper or fabric in damp storage areas (less consistent than the signs above, but it can happen)
Silverfish vs. firebrats
Firebrats look similar but prefer warmer areas, like around ovens, water heaters, and boiler rooms. The control plan is the same, but heat tells you where to focus your search.
Common lookalikes
- Carpet beetle larvae: slow-moving, fuzzy or bristly, and often found near natural fibers
- Cockroach nymphs: more oval, no three tail filaments, and they move differently
Why silverfish show up
Silverfish thrive when three things line up:
- Moisture: They do best in humid spaces and often cluster near leaks, drains, damp basements, and condensation.
- Food: They eat starches and proteins, including paper glue, cardboard, flour dust, cereal crumbs, pet food dust, and natural fibers or sizing (cotton, linen, rayon, and starched fabrics).
- Harborage: They love clutter, tight cracks, stacked boxes, and dark, undisturbed storage areas.
That is why you can have a clean home and still get silverfish if humidity and storage habits make a cozy setup.
Apartment note: In multi-unit buildings, silverfish can travel through shared walls and utility chases. If activity is widespread or keeps returning, coordinate with building management so adjacent units and common areas do not keep feeding the problem.
Step 1: Inspect like you mean it
Before you buy anything, do a quick, targeted inspection. You want to find where the moisture and hiding spots overlap.
Where to look
- Under sinks, behind toilets, around tubs and shower surrounds
- Basement rim joists, sump pump area, floor drains, utility rooms
- Laundry room corners, behind the washer, near dryer vents
- Pantry edges, under appliances, cabinet toe-kicks
- Closets with exterior walls, stored boxes, bookcases
- Wall void clues: gaps around pipes, loose trim, and baseboards where they can move in and out
Tools that help
- Flashlight for nighttime checks
- Sticky traps to map activity (more on this below)
- Humidity meter if you suspect damp air, especially in basements
Tip: Silverfish are most active at night. If you can, do a quick sweep 1 to 2 hours after dark with the lights off, then flip on a flashlight.
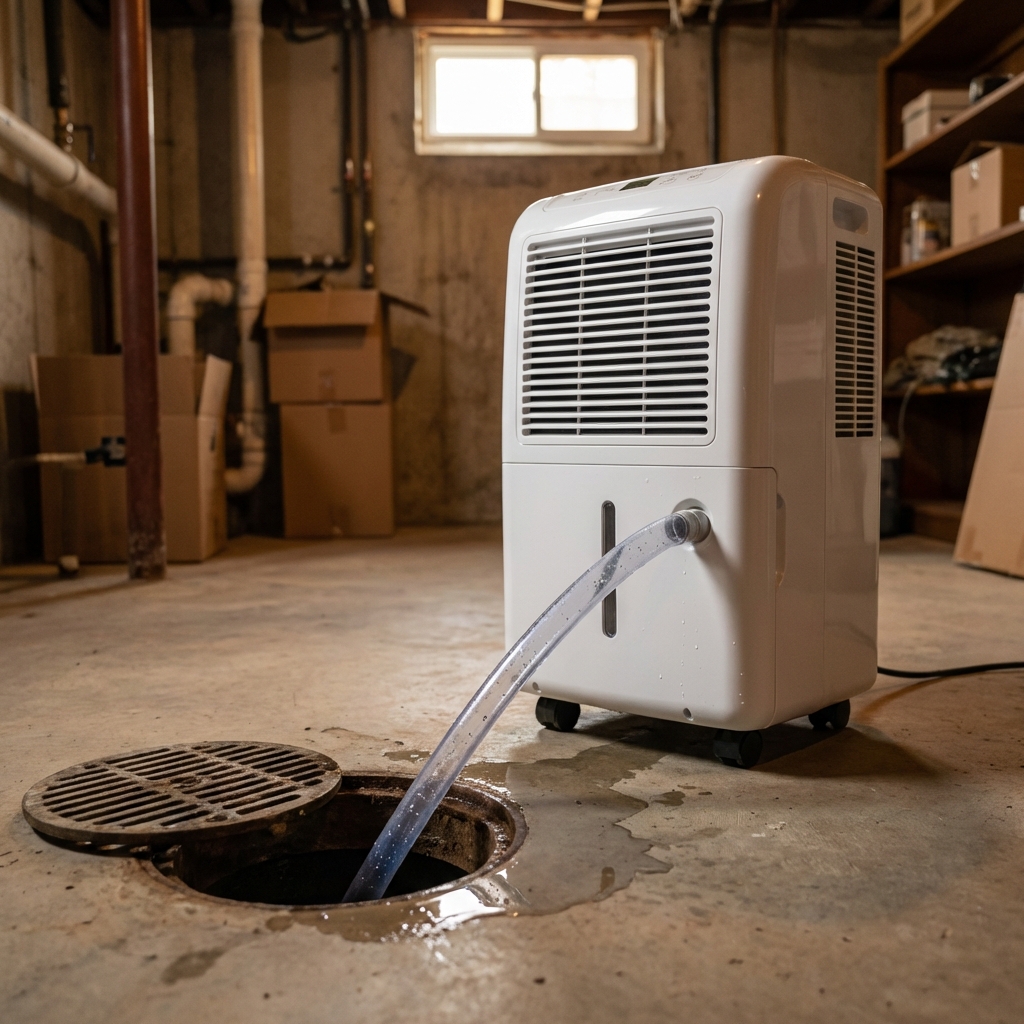
Step 2: Fix moisture first (do not skip this)
If you skip moisture control, you can still kill some silverfish, but the population often rebounds. Dry spaces make every other method work better.
Targets to aim for
- Indoor humidity: Try for 30% to 50% relative humidity.
- Basements: Keep them dry enough that cardboard stays crisp and walls do not feel clammy.
Moisture fixes that move the needle
- Repair leaks under sinks, around toilets, and at supply lines
- Use a dehumidifier in basements or damp rooms, and empty it consistently
- Improve ventilation with bathroom and kitchen exhaust fans
- Address condensation on pipes with insulation sleeves
- Clean and clear floor drains and make sure traps are not drying out
Quick win: Run your bathroom fan for 20 to 30 minutes after showers, or use a timer switch so it happens automatically.
Step 3: Remove food and hiding spots
This is where you make the environment less “edible” and less comfortable.
Kitchen and pantry
- Vacuum crumbs and flour dust along cabinet edges and behind appliances
- Store dry goods in sealed containers, not opened bags or thin boxes
- Do not keep cardboard long-term in the pantry
Bathrooms and laundry rooms
- Declutter under-sink storage and keep items off the floor
- Wash bath mats regularly and let them dry fully
- Fix caulk gaps where water seeps behind trim
Basement storage and closets
- Replace cardboard storage with plastic bins that seal
- Keep bins on shelves, not directly on the floor
- Reduce paper stacks, old magazines, and forgotten boxes
Protecting books and paper
- Move books and important papers out of damp rooms if you can
- Store in sealed bins and keep them off basement floors
- Add desiccant packs (silica gel) in bins to help keep things dry
What silverfish love most: undisturbed cardboard boxes, books stored in damp rooms, and clutter tucked against baseboards.
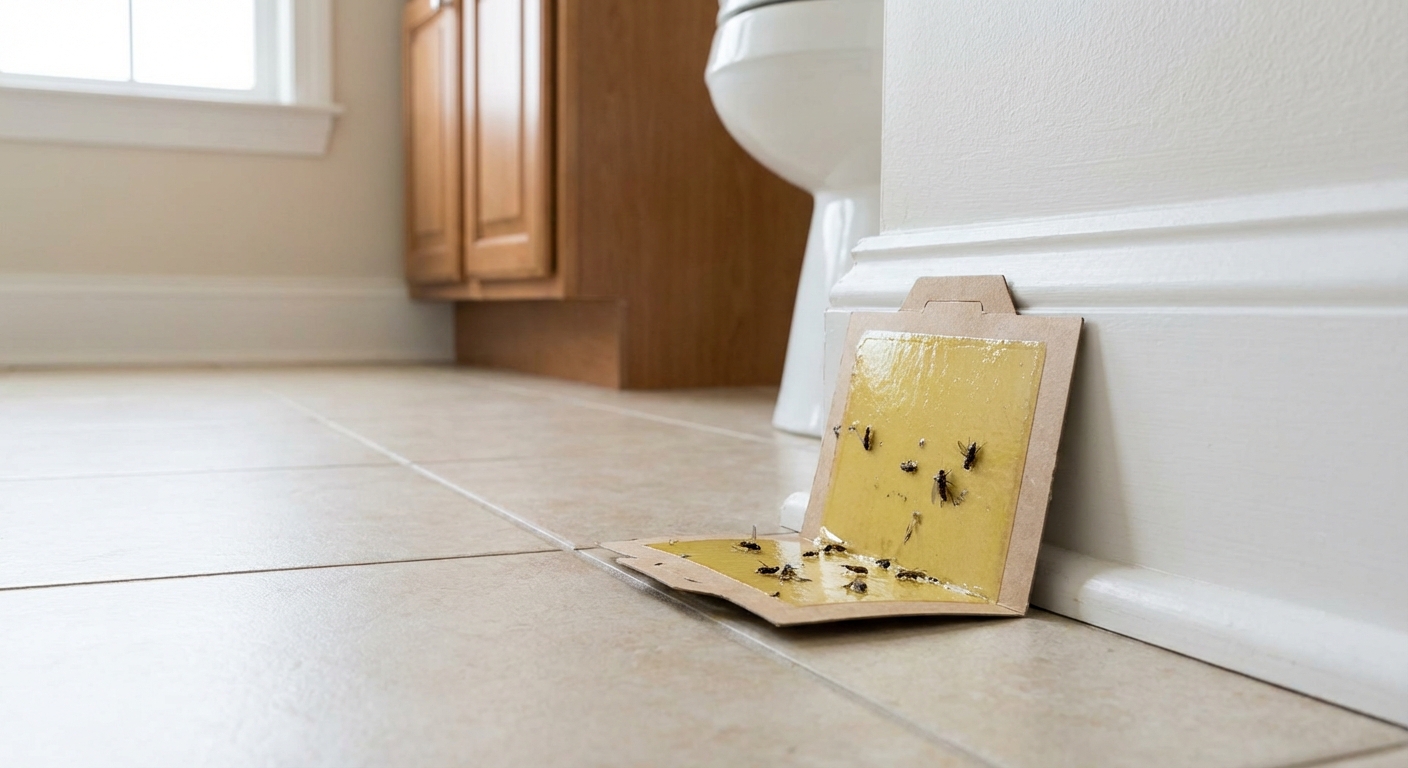
Step 4: Trap to confirm and to monitor
Sticky traps will not eliminate a heavy infestation alone, but they are excellent for (1) confirming you are dealing with silverfish and (2) showing where the activity is strongest.
Where to place traps
- Along baseboards behind toilets and under sinks
- Near floor drains and sump areas
- Behind the fridge and stove
- Inside closets along the wall, especially exterior walls
- Near stored books or paper
How to use trap data
- More catches in one area means that is where you focus your dust, bait, and sealing work.
- Check weekly at first, then monthly once activity drops.
Step 5: Choose the right treatment
There are a lot of products marketed for silverfish. The best results usually come from combining a bait or dust with crack-and-crevice work, while you keep drying and cleaning.
Option A: Boric acid dust (effective, but use carefully)
Boric acid works as a stomach poison and abrasive. It is effective in dry areas where it will stay put.
- Apply a thin layer into cracks, voids, and under appliances. Thick piles are less effective and easier for people and pets to contact.
- Do not apply where kids or pets can touch it, and avoid kitchen counters or food-prep surfaces.
- Keep it dry. Wet boric acid clumps and performs poorly.
Option B: Silica gel or diatomaceous earth (DE) dust (great for long-term)
These dusts damage the insect’s protective coating and cause dehydration. They can work very well in dry, undisturbed areas.
- Use food-grade DE if you choose DE.
- Apply lightly in wall voids, under sinks, behind baseboards, and around plumbing penetrations.
- Avoid breathing dust. Even food-grade products can irritate lungs. Apply gently and consider an N95 or similar mask.
- Avoid applying dust where air movement can blow it around, like near vents or fans.
Option C: Gel baits and bait stations (often the easiest)
Baits can be a strong choice when you do not want dust drifting. Use a bait specifically labeled for silverfish in your region. Active ingredients vary by country and product, and may include indoxacarb, fipronil, or abamectin.
- Place small dots of gel in hidden crevices, not in open areas where it can smear.
- Refresh as directed. Old bait dries out and stops working.
- Do not spray insecticide over bait. Sprays can repel insects and reduce bait feeding.
Option D: Targeted residual sprays (use as a supplement)
Residual sprays can help in cracks and along baseboards, but they are rarely the complete solution on their own because silverfish hide deep in voids and prefer humid zones.
- Use only products labeled for indoor use and for silverfish.
- Focus on baseboards, behind toilets, under sinks, and entry points.
- Keep sprays away from food surfaces and follow label directions exactly.
Safety quick check: Whatever you use, follow the label, keep products away from kids and pets, and treat cracks and voids instead of open floors and surfaces.
My simple recommendation: Start with moisture control plus traps. If you still see activity after a week or two, add a bait program. Use dust only in dry, hidden voids where it will stay effective.
What not to do
- Do not rely on foggers or bombs. They rarely reach wall voids and deep hiding spots where silverfish live.
- Do not overapply dust. Heavy piles are less effective and easier to disturb.
- Do not spray over baits. It can reduce feeding and make the bait program weaker.
- Do not ignore humidity. If the space stays damp, results are often temporary.
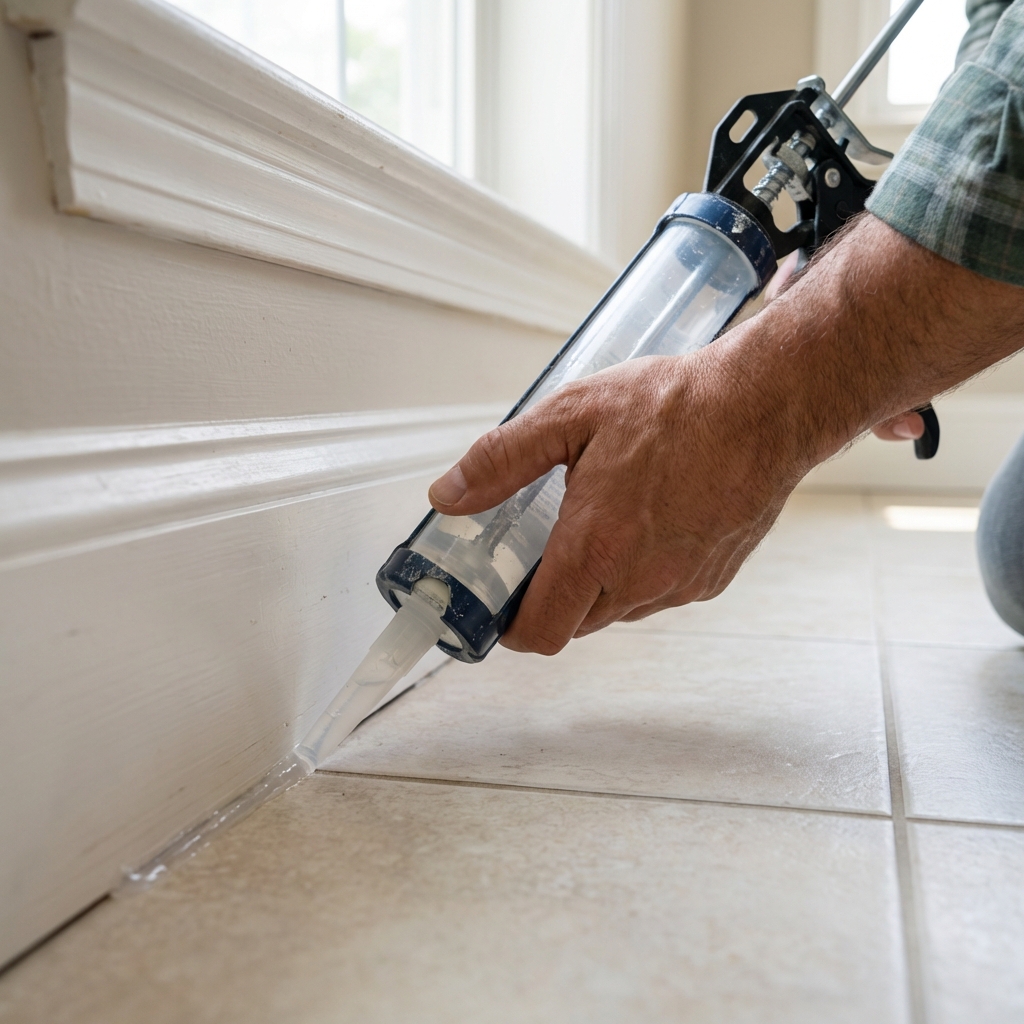
Step 6: Seal entry points and hiding cracks
Silverfish often move between wall voids, basements, and living spaces through tiny gaps. Sealing does two things: it blocks movement and removes hiding spaces.
Where sealing helps most
- Gaps around plumbing under sinks
- Baseboard cracks and gaps under trim
- Openings around vents and utility lines
- Cracks in basement walls and along sill plates
- Gaps around windows, especially in damp rooms
Materials to use
- Silicone caulk for bathrooms and kitchens
- Acrylic latex caulk for paintable baseboard gaps
- Foam sealant for larger plumbing penetrations (use carefully and trim after curing)
Step 7: Prevention routine
Once activity drops, prevention is mostly about staying a little drier and a little less cluttered in the places silverfish like best.
Weekly
- Run fans after showers and check for drips under sinks
- Quick vacuum along bathroom and pantry edges
Monthly
- Check sticky traps in your main problem spots
- Inspect stored items in basements and closets for dampness
Seasonal
- Deep clean behind appliances
- Swap cardboard storage for sealed bins if you still have any
- Check gutters and downspouts outside to reduce water near the foundation
How long does it take?
With moisture control and targeted treatment, you can often see a noticeable drop in 1 to 2 weeks. More established infestations can take 4 to 8 weeks or longer to fully collapse, especially if silverfish are living in wall voids, a damp basement area, or a multi-unit building where they can re-enter.
Good sign: traps go from multiple catches per week to none, and you stop seeing them when you flip on lights at night.
When to call a pro
Consider professional help if:
- You have persistent humidity or water intrusion you cannot fix
- Silverfish are widespread across multiple rooms despite 4 to 6 weeks of effort
- You suspect a hidden plumbing leak or mold issue
- You need treatment in complex areas like crawl spaces, wall voids, or shared building walls
A good pro will still talk moisture and exclusion first, not just spray and leave.
Quick checklist
- Confirm with night inspection and sticky traps
- Drop humidity to 30% to 50%
- Fix leaks, improve ventilation, and use a dehumidifier if needed
- Remove cardboard and paper clutter from damp zones
- Vacuum edges and crevices where food dust collects
- Use bait or light dusting in hidden, dry voids
- Seal gaps around plumbing and baseboards
- Monitor traps monthly to catch any rebound early
If you want the simplest path: dry it out, clean the edges, bait the hiding zones, and seal the cracks. That combination is what makes silverfish control stick.

Jose Brito
I’m Jose Britto, the writer behind The Country Store Farm Website. I share practical, down-to-earth gardening advice for home growers—whether you’re starting your first raised bed, troubleshooting pests, improving soil, or figuring out what to plant next. My focus is simple: clear tips you can actually use, realistic expectations, and methods that work in real backyards (not just in perfect conditions). If you like straightforward guidance and learning as you go, you’re in the right place.