Pruning roses can feel like a big deal because nobody wants to cut off “the good parts.” The truth is, a lot of rose problems start when bushes get crowded, shaded, and full of weak or dead wood. A good prune opens the plant up to light and airflow, pushes strong new canes, and makes blooms easier to manage.
This guide walks you through when to prune, how to identify your rose type, and a straightforward step-by-step method you can use in a normal backyard.

First: identify what kind of rose you have
Timing and how hard you prune depends on the type of rose. If you are unsure, watch how it blooms: once in spring, or repeatedly all season.
Quick ID list
- Hybrid tea and grandiflora: Tall upright canes, big single blooms on long stems. Usually repeat-bloom.
- Floribunda: Shorter, bushier, clusters of blooms. Repeat-bloom.
- Shrub roses (including many landscape roses): Fuller shape, lots of canes, generally tough and repeat-bloom.
- Climbing roses: Long canes trained on a fence, trellis, or arbor. Blooms on side shoots off main canes.
- Once-blooming old garden roses: Big flush of flowers in late spring or early summer, then mostly done for the year.
- Miniature roses: Small leaves and blooms, compact habit, usually repeat-bloom.

When to prune rose bushes
For most home gardens, the best main prune is done in late winter to early spring, right as buds begin to swell and you see new growth starting. You want the worst cold behind you, but you do not want the plant leafing out heavily yet.
Simple timing cues
- Watch the buds: When buds swell and show a hint of green, it is go time for most repeat bloomers.
- Local sign: In many areas, forsythia blooming lines up well with rose pruning season.
- Cold snap rule: If a hard freeze is coming, wait.
Best timing by rose type
- Hybrid tea, floribunda, grandiflora, shrub, miniature (repeat-blooming): Main prune in late winter or early spring.
- Climbing roses (repeat-blooming): Prune in late winter or early spring. Keep your main framework canes whenever possible, and focus on thinning plus shortening side shoots.
- Ramblers and once-blooming climbers: Prune right after flowering. If you prune these in early spring, you can remove the wood that would have produced this year’s flowers.
- Once-blooming bush roses: Also prune right after flowering.
In-season pruning that is always OK
- Deadheading: Removing spent blooms during the growing season helps repeat bloomers keep producing.
- Removing dead, damaged, or diseased wood: Any time you see it, prune it out.
- Light shaping: Small snips to keep a walkway clear are fine.
When not to prune
- Right before a hard freeze: Fresh cuts can be stressed by extreme cold.
- Late fall (hard pruning): This can encourage tender growth that gets damaged in winter. If you must tidy, keep it minimal.
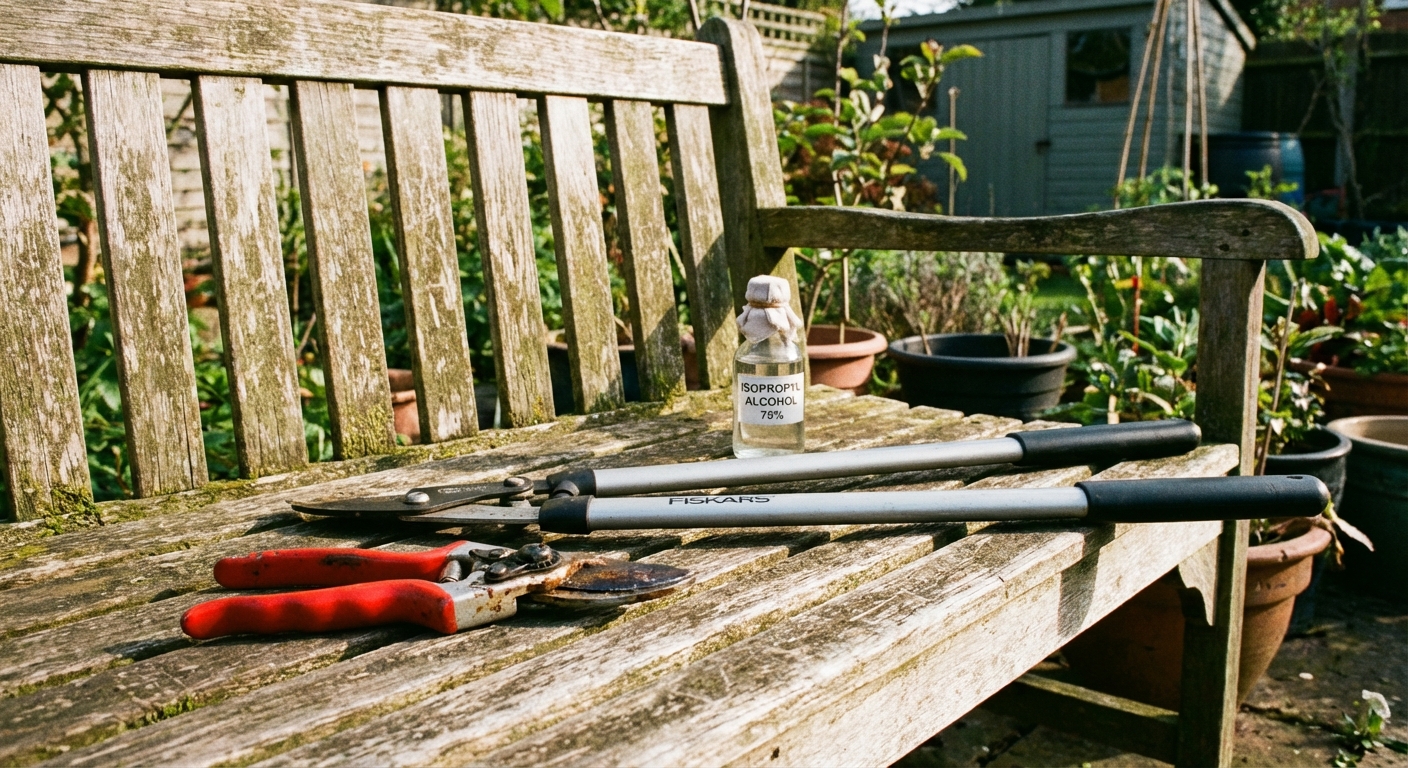
Tools and prep (do not skip this)
Clean tools make cleaner cuts and reduce disease spread. You do not need fancy gear, but you do need sharp blades.
- Bypass hand pruners: For most canes.
- Loppers: For thick, older canes.
- Pruning saw: For very old, woody bases.
- Thick gloves and long sleeves: Saves your hands and forearms.
- Eye protection: A small thing that can save you from a thorn to the face.
- Disinfectant: 70% isopropyl alcohol works well for wiping blades, especially if you are removing diseased wood.
Backyard rule: If you suspect disease, wipe blades between major cuts or between plants.
Cleanup tip: Rose canes are basically thorny spears. Bundle prunings as you go and dispose of them safely.
Step-by-step: how to prune rose bushes
Use this process for most repeat-blooming bush roses (hybrid tea, floribunda, many shrub roses). Adjust how hard you prune based on your rose type and how big you want it.
Step 1: Remove dead wood first
Dead rose wood is usually dark brown, brittle, and dry inside. Make a cut and look: healthy tissue is greenish-white inside.
- Prune dead canes down to healthy tissue, or all the way to the base if needed.
- If a cane is dead to the crown, remove it completely.
Step 2: Remove diseased and damaged canes
This is your “identify and control” moment. Common signs you should prune out include:
- Canker: Sunken or cracked areas on canes, often purple-brown. Prune several inches below the affected area into healthy tissue.
- Dieback: Cane tips turning black after winter or after flowering. Prune back to healthy tissue.
- Broken or split canes: Remove cleanly to prevent ongoing damage.
About black spot: It mostly hangs around on infected leaves and leaf litter. Pruning the whole plant down is not the fix. Focus on cleaning up fallen leaves, improving airflow, watering at the base, and choosing resistant varieties when you can. Only remove canes if you see true cane lesions or dieback that will not recover.
Bag and trash diseased material if possible. Do not compost it if your compost pile does not get hot.
Step 3: Remove weak, crossing, and inward-growing growth
Open growth dries faster after rain and irrigation, which helps with disease pressure.
- Remove thin, spindly canes that will never hold good blooms.
- Remove crossing canes that rub and create wounds.
- Remove canes growing toward the center. Aim for an open, vase-like shape.
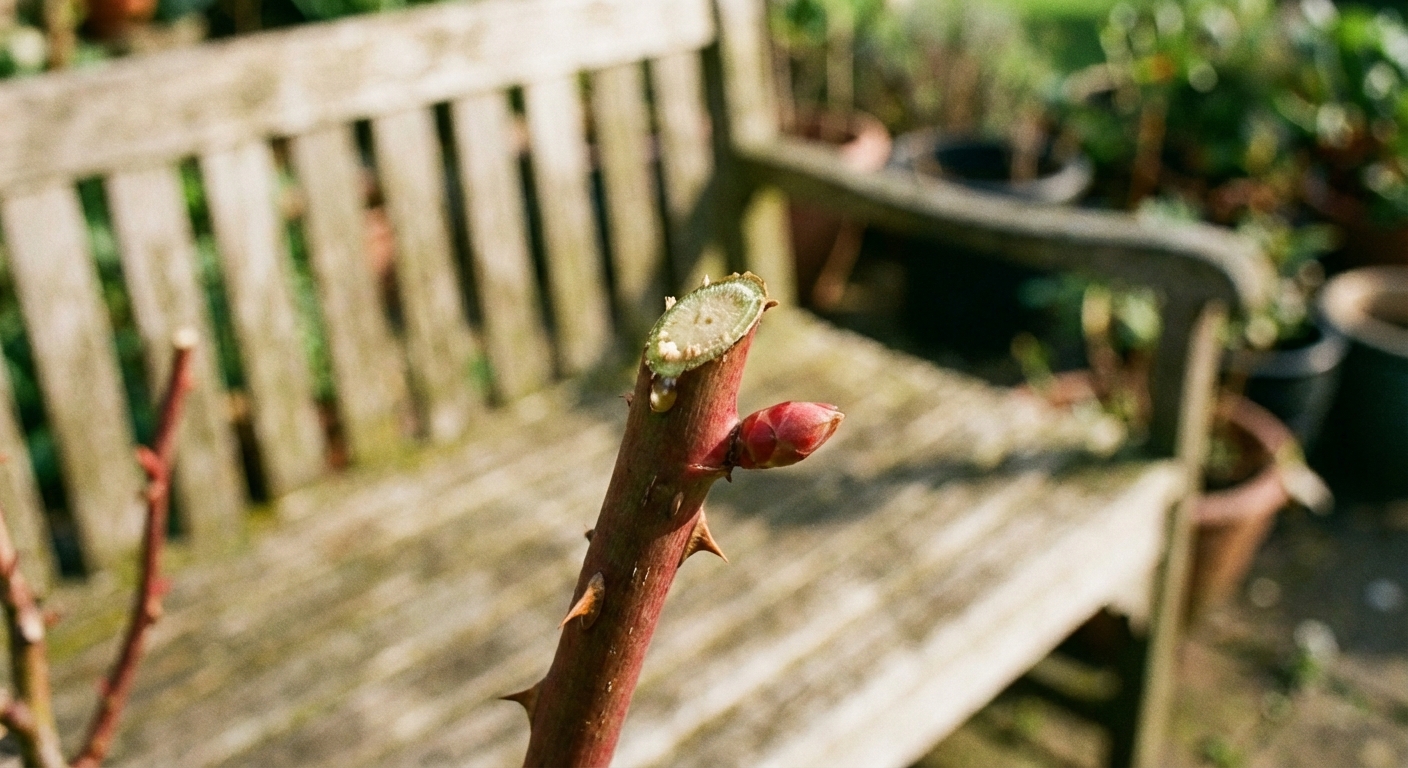
Step 4: Make your shaping cuts the right way
Good pruning cuts heal better and direct growth where you want it.
- Where to cut: About 1/4 inch above an outward-facing bud or leaf node.
- Angle: Slight angle so water does not sit on the cut surface.
- How much to remove: For many repeat bloomers, pruning back about one-third is a safe, practical target. Strong plants can take more. Weak plants should take less.
- Landscape roses note: Many tough landscape types (like Knock Out style shrubs) handle a lighter prune, and they also tolerate a more “hedge-style” reduction if you just need them smaller. If in doubt, start with one-third.
Step 5: Clean up the base and watch for suckers
Many roses are grafted. You may see shoots coming from below the graft union (often a knobby swelling near the base). These are suckers and they can take over.
- Trace the sucker to where it starts and remove it as close to the origin as you can.
- If it has different leaves (often smaller, more numerous leaflets), that is another clue it is a sucker.
Step 6: Finish with a quick “stand back” check
- Can you see some daylight through the center of the plant?
- Do the remaining canes have room to grow without rubbing?
- Is the bush balanced, not lopsided?
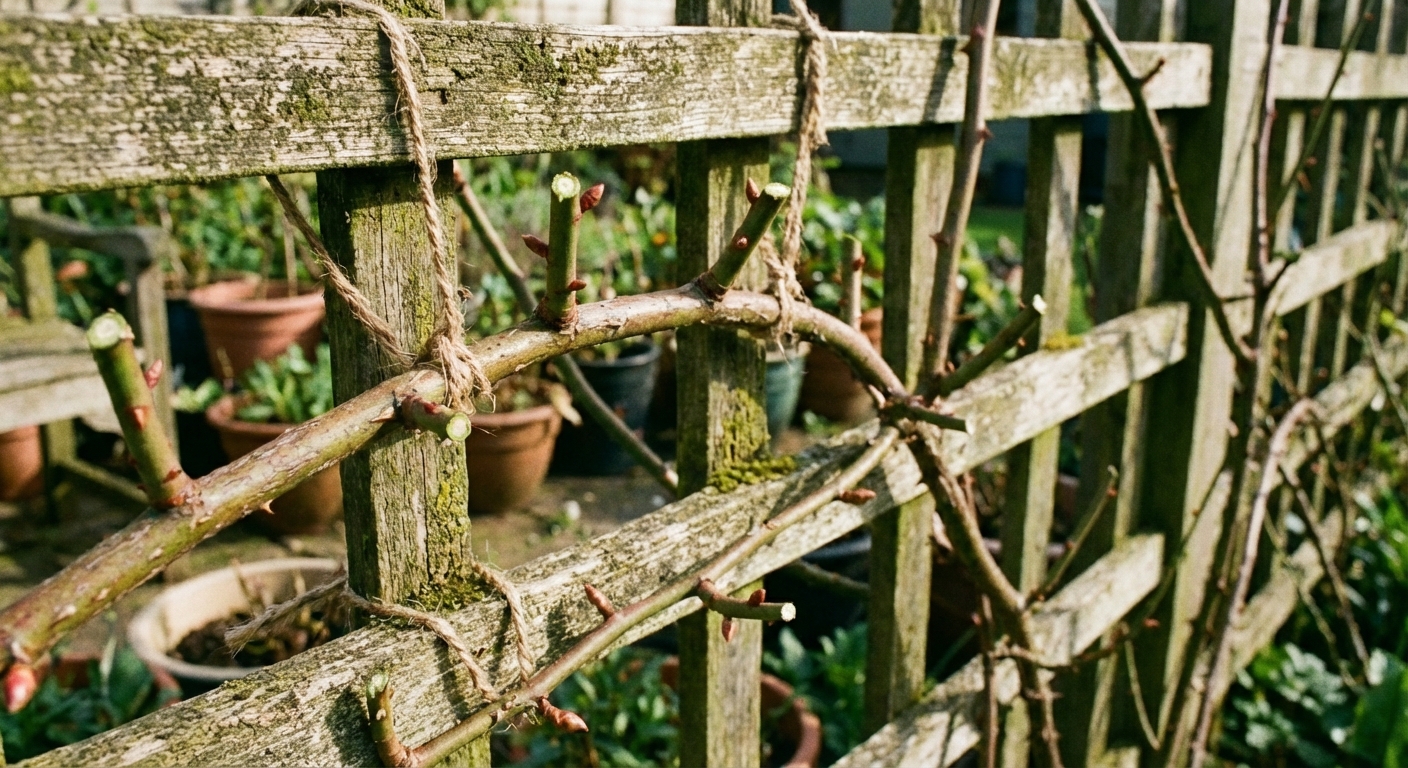
How to prune climbing roses
Climbers are different because the long canes are your structure. If you cut those back hard every year, you can reduce flowering and spend the season regrowing length instead of making blooms.
Simple method for repeat-blooming climbers
- Keep 3 to 6 main canes as your framework. Remove one or two of the oldest canes at the base when they get unproductive.
- Tie main canes more horizontally along a trellis or fence. This encourages more flowering side shoots.
- Shorten side shoots (laterals) to 2 to 4 buds in late winter or early spring.
- Remove dead and crossing growth as needed.
If your climber blooms once
Many once-blooming climbers and ramblers flower on older wood. Prune them right after they finish blooming, then train new long canes for next year.
Deadheading: the easiest prune that improves blooms
If your rose repeats, deadheading is the low-effort move that keeps flowers coming.
- For quick tidying, snip the spent bloom off just above the first set of healthy leaves.
- For longer stems on many types, cut back to a leaf with 5 leaflets. This is traditional advice and it can help, but it is not required for rebloom.
- If you want hips for fall color or wildlife, stop deadheading late in the season.
Backyard rule: Any clean cut to an outward-facing leaf or node is fine. Do not overthink it.
Identify and control: common post-prune problems
Pruning helps prevent issues, but fresh growth can attract pests. Here is what to look for and what to do in a practical home garden way.
Aphids
- Identify: Clusters of soft green, black, or brown insects on new shoots and buds.
- Control: Blast them off with water, repeat as needed. If pressure is heavy, use insecticidal soap in the evening and follow label directions.
Powdery mildew
- Identify: White powdery coating on leaves and young growth, worse in humid conditions.
- Control: Prune for better airflow, water at soil level, avoid overhead watering late in the day, remove badly affected leaves.
Black spot
- Identify: Black circular spots with yellowing leaves, leaves may drop.
- Control: Clean up fallen leaves, avoid splashing water onto foliage, thin crowded growth, and consider a labeled fungicide if it is a yearly severe issue in your yard. If you can, plant resistant varieties.
Cane borers (after pruning)
- Identify: A cane tip that suddenly wilts and dies back; sometimes a small hole at the cut end.
- Control: Prune back to healthy tissue. In areas where borers are common, some gardeners seal fresh cuts with white glue, but results vary and it is optional. The main thing is clean cuts and removing the damaged section.
Aftercare: what to do right after pruning
- Clean up debris: Especially old leaves and diseased material.
- Mulch: Add 2 to 3 inches of mulch, keeping it a couple inches away from the canes.
- Water deeply: If the soil is dry and your ground is not frozen.
- Feed when growth starts: A balanced rose fertilizer or compost is usually enough. Avoid heavy nitrogen too early if frost is still likely.
If you prune hard and your rose looks “too bare,” do not panic. Strong roses respond fast once the weather warms.
Common pruning mistakes (and easy fixes)
- Pruning too timidly: If a bush stays crowded, it will keep performing poorly. Next season, remove a few more canes at the base and open the center.
- Leaving stubs: Long stubs can die back and invite canker. Re-cut just above a bud or node.
- Not removing old canes: Mature roses often benefit from taking out 1 to 2 oldest canes each year to keep new growth coming.
- Pruning once-bloomers in early spring: If your rose blooms once and you prune early, you may remove the flower wood. Switch to pruning right after bloom.
- Thinking you must seal cuts: In most home gardens, you do not need to seal pruning cuts. Focus on clean cuts, good timing, and sanitation.
- Ignoring sanitation: If disease is present, clean tools and remove leaf litter. This one step often makes a bigger difference than any spray.
Quick checklist you can follow each year
- Identify your rose type and prune at the right time.
- Sharpen and disinfect tools.
- Prune out dead, diseased, damaged wood first.
- Thin crossing and inward growth for better airflow.
- Shape by cutting above outward-facing buds.
- Clean up debris, mulch, and water.
- Watch new growth for aphids and mildew early.

Jose Brito
I’m Jose Britto, the writer behind The Country Store Farm Website. I share practical, down-to-earth gardening advice for home growers—whether you’re starting your first raised bed, troubleshooting pests, improving soil, or figuring out what to plant next. My focus is simple: clear tips you can actually use, realistic expectations, and methods that work in real backyards (not just in perfect conditions). If you like straightforward guidance and learning as you go, you’re in the right place.