Yellow leaves are one of the most common plant problems and one of the most misunderstood. Sometimes it is totally normal (an older leaf aging out). Other times it is your plant waving a flag that something is off with water, nutrients, roots, light, pests, chemical exposure, or disease.
The trick is to identify which yellowing pattern you are seeing and then confirm it with a couple quick checks. Use the steps below like a simple diagnosis flow.

Step 1: Confirm it is not normal leaf aging
Before you change anything, check whether the yellow leaf is simply old. Many plants shed older leaves as they grow.
- Normal: 1 to 3 older leaves near the bottom yellowing slowly while new growth looks healthy.
- Not normal: lots of leaves yellowing at once, new leaves yellowing, or yellowing that spreads fast.
What to do: If it is just a couple older leaves, remove them (or leave them until they dry) and keep your routine steady.
Step 2: Look at the yellowing pattern (this points to the cause)
Different causes leave different clues. Use these common patterns to narrow things down, then use the quick confirms to avoid guessing.
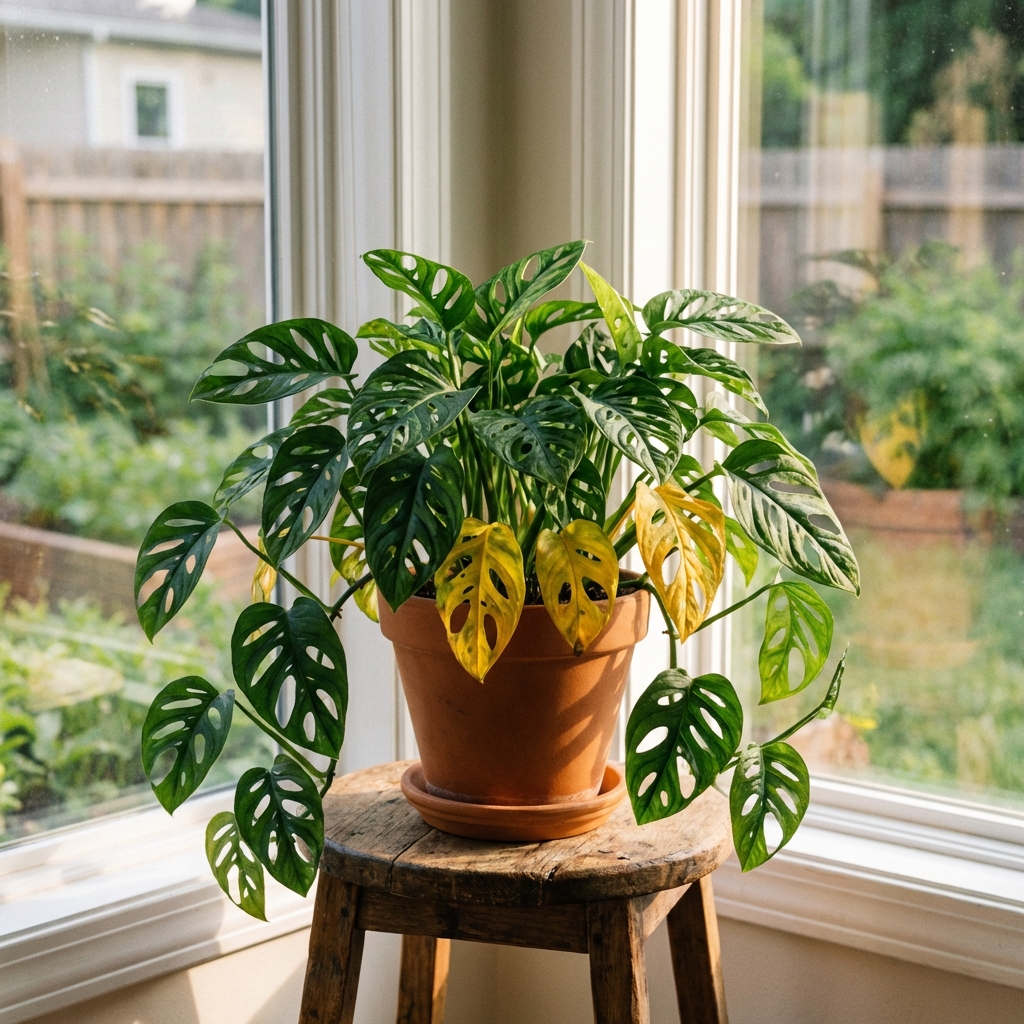
Pattern A: Whole leaf turns pale yellow
This often points to watering problems, root stress, low nitrogen, or low light.
Quick confirms: Check soil moisture first (Step 3). If older leaves are paling first and growth is slow, think nitrogen. If the whole plant is stretching toward light, think low light.
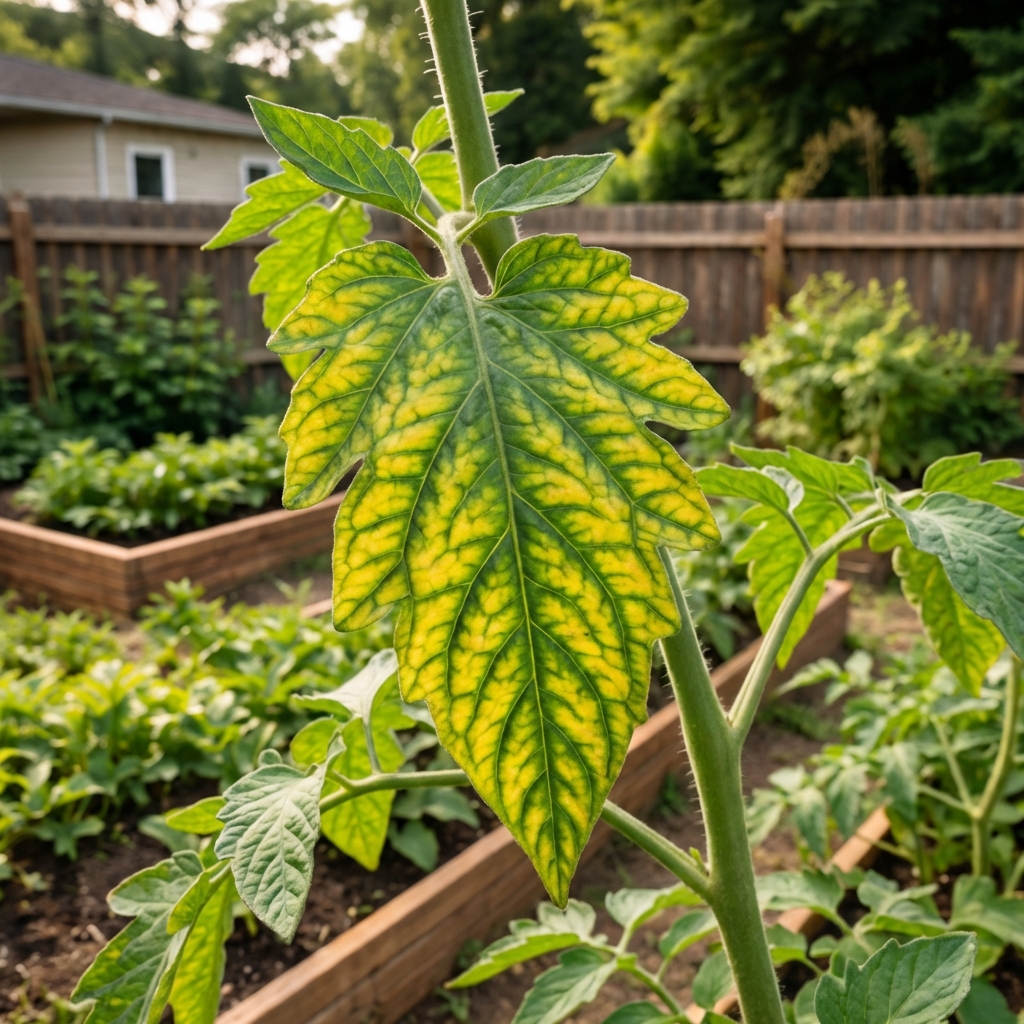
Pattern B: Yellow between veins, veins stay greener
This is classic interveinal chlorosis. It often indicates iron or magnesium issues, but it can also be manganese or zinc deficiency, high pH blocking uptake, hard water alkalinity in containers, or root stress that prevents nutrient uptake.
Quick confirms: New leaves first often points to iron or manganese (immobile nutrients). Older leaves first
Pattern C: Yellow edges (margins), sometimes with brown crispy tips
This can mean potassium deficiency, salt buildup, heat stress, inconsistent watering, or root restriction in pots.
Quick confirms: If you fertilize often or use hard water, suspect salt buildup. If it shows up during hot, windy weather, suspect heat plus dry cycles.
Pattern D: Yellow spots, mottling, or patchy blotches
Often linked to pests (like spider mites), leaf spot diseases, herbicide drift, or virus issues.
Quick confirms: Look under leaves for stippling, webbing, or insects (Step 7). If new growth is twisted or distorted and you recently sprayed lawn products nearby, suspect chemical drift.
Pattern E: Yellowing plus sudden wilt, even when soil is wet
Think root rot, poor drainage, or root damage.
Quick confirms: Soil stays wet for days, the root zone smells sour, or stems near the soil line darken.
Step 3: Check watering and drainage first (most common cause)
Overwatering and underwatering can look similar because both stress roots and reduce nutrient uptake. The soil check is what separates them. If this step does not point to a clear issue, move on to Step 4 and Step 5.
Do the 10-second soil test
- Stick a finger 2 to 3 inches into the soil (or deeper for large pots).
- Small pots: 2 to 3 inches may be the whole pot. In that case, use a skewer to check near the bottom, or lift the pot (light usually means dry).
- Soil soggy or cool and wet: likely overwatering or poor drainage.
- Soil dry and dusty: likely underwatering.
- Soil slightly damp: watering is probably not the main problem.
If it is overwatering
- Pause watering until the top few inches dry.
- Make sure pots have drainage holes and saucers are emptied.
- In garden beds, check for compacted soil. Loosen gently around the plant, but do not tear roots.
- Improve soil structure over time with compost and mulch.
- Reality check for heavy clay: Compost helps, but very heavy clay often needs a bigger fix, like raised beds, planting on a mound, improving grading, or moving the plant to a better-drained spot.
If it is underwatering
- Water slowly and deeply so moisture reaches the root zone.
- Add mulch (2 to 3 inches) to reduce evaporation.
- For containers, water until you see steady drainage from the bottom.
Reality check: A fully yellow leaf typically will not turn green again. Mild, early chlorosis can sometimes re-green after correction, but your main goal is to stop the yellowing from spreading and get new growth coming in healthy.
Step 4: Inspect light and temperature stress
Plants can yellow when they are in the wrong light level or when weather swings hit.
Too little light
- Leaves go pale yellow and growth gets leggy.
- Often affects indoor plants in winter or sun-loving veggies planted in shade.
Fix: Move houseplants closer to a bright window or add a grow light. For garden plants, consider pruning nearby shade or replanting next season.
Too much sun or heat
- Yellowing can appear with scorched patches, especially on tender leaves.
- Common after transplanting or during heat waves.
Fix: Water early, add temporary shade cloth, and avoid fertilizing during extreme heat.
Step 5: Rule out nutrient problems (and avoid the common fertilizer mistake)
Yellow leaves often trigger people to fertilize right away. That can help, but only if nutrients are actually the issue. If roots are stressed from overwatering, poor drainage, or being rootbound, fertilizer can make things worse.
Quick nutrient cheat sheet
- Nitrogen deficiency: older leaves yellow first, overall plant looks pale, slow growth. Common in fast-growing veggies.
- Iron deficiency: newest leaves yellow between veins. Common in high pH soils and containers watered with hard water.
- Magnesium deficiency: older leaves show yellowing between veins, sometimes with reddish tones. Common in tomatoes and peppers mid-season.
- Manganese or zinc deficiency: newer leaves show interveinal chlorosis, sometimes with small leaves or weak growth. Often tied to high pH or uptake problems.
- Potassium deficiency: yellow edges that turn brown and crispy, weak stems, poor flowering or fruiting.
How to fix nutrient issues safely
- Start mild: use a balanced fertilizer at label rate, not extra.
- For nitrogen: compost, fish emulsion, or a nitrogen-forward fertilizer can help.
- For iron chlorosis: apply chelated iron and consider checking soil pH.
- For magnesium: magnesium sulfate can help if you confirm magnesium is the likely issue.
- For suspected manganese or zinc: a complete micronutrient fertilizer is often a safer first move than guessing one element, especially if pH is high.
- For containers: flush the pot with clean water to remove salt buildup, then fertilize lightly.
- Water quality note: Avoid softened water for salt-sensitive plants because it can add sodium. If you have very hard water, occasional flushing and using rainwater when possible can reduce buildup.
Best practice: If yellowing keeps returning, a simple soil test can save you weeks of guessing, especially for pH-related lockout.
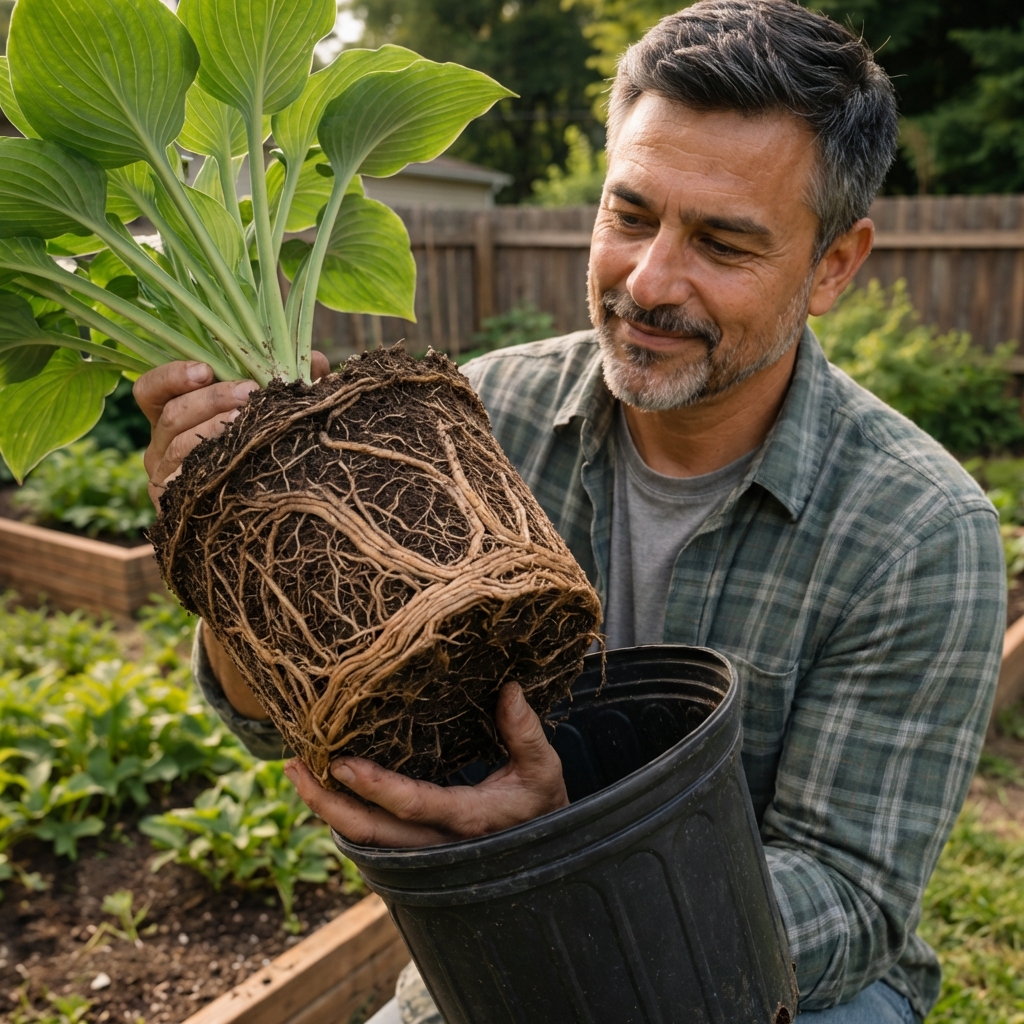
Step 6: Check roots and pot size (especially for containers)
Root problems can cause yellowing even when everything above ground looks normal.
Signs of root stress
- Water runs straight through the pot.
- Plant dries out quickly after watering.
- Yellowing plus stunted growth.
- Roots circling the inside of the pot or coming out drainage holes.
Fix
- Up-pot 1 to 2 sizes, not a huge jump.
- Use fresh potting mix, not garden soil in containers.
- If root rot is present (mushy, dark, bad smell), trim damaged roots and repot into dry, airy mix. Reduce watering after.
- Sanitation matters: Discard heavily infected soil, wash the pot, and sanitize tools. If most roots are gone, recovery may be unlikely, so consider taking cuttings if the plant allows it.
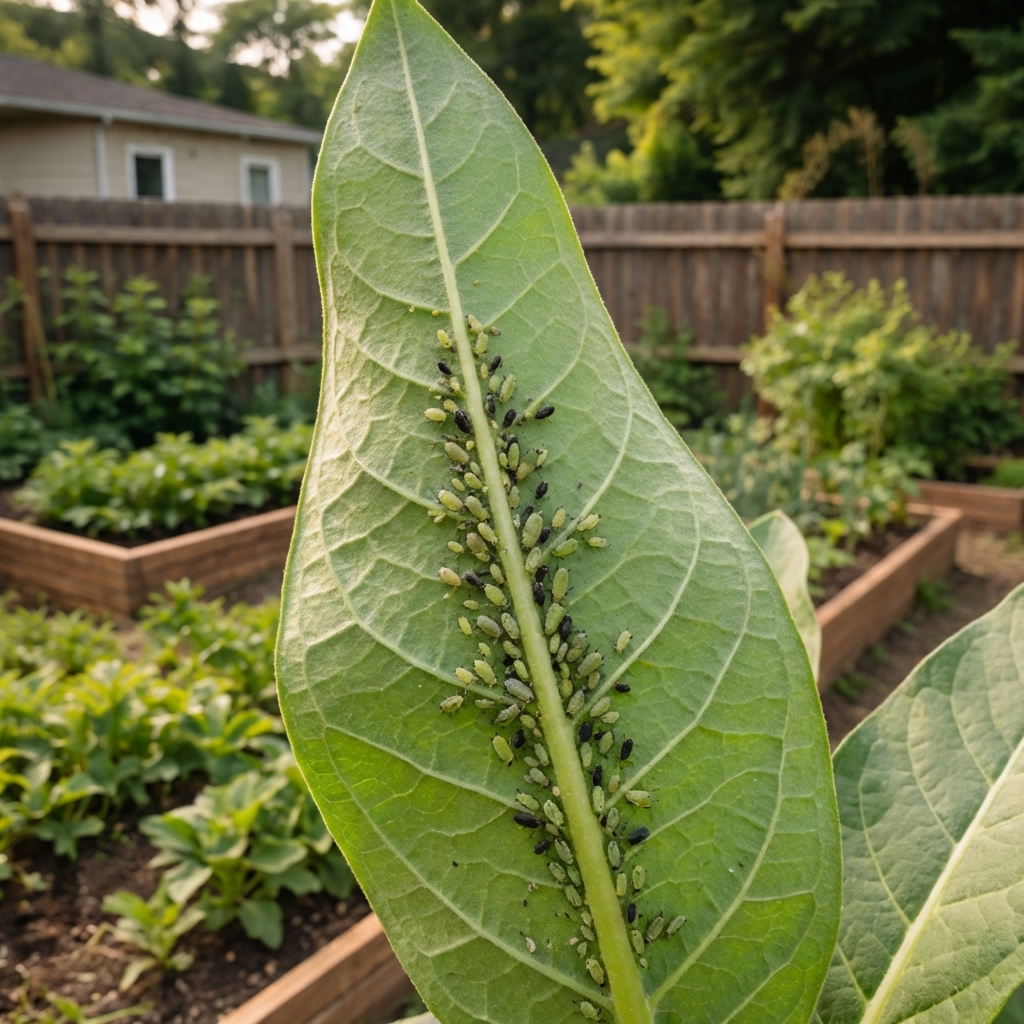
Step 7: Inspect for pests (look under leaves)
Pests often cause yellowing in patches, stippling, or a general washed-out look. Always check the undersides of leaves and along stems.
Common culprits
- Spider mites: tiny dots, fine webbing, leaf looks speckled then yellow.
- Aphids: clusters on new growth, sticky residue (honeydew).
- Whiteflies: tiny white insects that flutter when you shake the plant.
- Thrips: silvery streaks, distorted new growth, black specks of frass.
Control options that work
- Spray strong water to knock pests off (best first step outdoors).
- Use insecticidal soap, coating tops and undersides of leaves. Repeat every 5 to 7 days for a few rounds.
- For heavy infestations, prune the worst leaves and dispose of them in the trash.
Tip: Spray in the early morning or evening to reduce leaf burn and to avoid spraying when pollinators are active.
Step 8: Consider disease or chemical injury
When yellowing comes with spots, rings, fuzzy patches, rapid decline, or distorted new growth, think disease or chemical injury. Many leaf diseases start as yellow areas before turning brown.
Common disease signs
- Leaf spot: yellow halos around brown or black spots.
- Powdery mildew: white powdery coating, leaves may yellow and curl.
- Downy mildew: yellow patches on top, gray or purple fuzz underneath.
- Root rot: yellowing plus wilt, soil stays wet, roots are dark and soft.
Common chemical signs
- Herbicide drift: twisted, cupped, or narrow new growth, odd mottling, and sudden decline after nearby spraying.
- Fertilizer burn: leaf tip burn and edge browning shortly after feeding, especially in containers.
Control and prevention
- Remove infected leaves (do not compost if disease is active).
- Water at soil level, not overhead.
- Increase airflow by spacing plants and pruning crowded growth.
- If needed, use an appropriate fungicide labeled for your plant and problem, and follow directions carefully.
- For edible plants: only use products labeled for edibles and follow the label for pre-harvest intervals.
- For suspected virus: viruses are not treatable. Remove the plant to limit spread and consider getting a local ID through an extension office.
Step 9: Use this quick decision checklist
- Only a couple old bottom leaves yellow: normal aging.
- Soil is wet and plant is yellowing: overwatering, drainage, or root rot.
- Soil is dry and plant is yellowing: underwatering or heat stress.
- New leaves yellow between veins: iron or manganese issue, or high pH lockout.
- Older leaves yellow first, plant looks pale: nitrogen deficiency.
- Older leaves yellow between veins: magnesium issue.
- Yellow edges with browning: potassium issue, salt buildup, or inconsistent watering.
- Yellow patches plus tiny insects or webbing: pests.
- Yellow halos, spots, fuzzy growth: disease.
- Sudden mottling and distorted new growth outdoors: herbicide drift or chemical injury.
What to do with yellow leaves
If a leaf is mostly yellow, it is not doing much for the plant anymore. You can remove it to improve airflow and reduce disease risk.
- Use clean snips or pinch off gently at the stem.
- Generally avoid removing more than about one-third of the plant’s leaves at once (less for slow growers or stressed plants).
- Dispose of diseased leaves in the trash.
When yellow leaves mean trouble right now
Act quickly if you see any of the following:
- Yellowing plus sudden wilt in wet soil.
- Black, mushy stems near the soil line.
- Fast spread of spots across many leaves.
- Heavy pest infestation on new growth.
In these cases, focus on damage control: correct watering, isolate houseplants, remove the worst leaves, and treat the likely culprit right away.
Frequently asked questions
Will Epsom salt fix yellow leaves?
Only if the problem is actually magnesium deficiency. If you apply it when magnesium is not the issue, it can throw off nutrient balance. Confirm the pattern first (older leaves yellowing between veins) and use it sparingly.
Can yellow leaves turn green again?
Usually not, especially once a leaf is fully yellow. If you catch a mild nutrient issue early (often on newer leaves), the leaf may partially re-green after correction. Watch new growth to judge whether your fix worked.
Why are my plant’s leaves yellow but the veins stay green?
That pattern is interveinal chlorosis. It is commonly iron-related on newest leaves and magnesium-related on older leaves, but manganese, zinc, high pH, hard water, and root stress can cause a similar look.
Should I fertilize when I see yellow leaves?
Not automatically. Check moisture and drainage first. If roots are stressed, fertilizer can cause more damage. If watering looks right and growth is pale, then a light, balanced feeding is a reasonable next step.

Jose Brito
I’m Jose Britto, the writer behind The Country Store Farm Website. I share practical, down-to-earth gardening advice for home growers—whether you’re starting your first raised bed, troubleshooting pests, improving soil, or figuring out what to plant next. My focus is simple: clear tips you can actually use, realistic expectations, and methods that work in real backyards (not just in perfect conditions). If you like straightforward guidance and learning as you go, you’re in the right place.