Yellow leaves on tomato plants can look alarming, but not every yellow leaf is a crisis. Tomatoes are fast growers, heavy feeders, and they will shed some older leaves as the plant puts energy into new growth and fruit. The key is figuring out whether you are seeing normal aging or a problem like watering stress, nutrient issues, pests, or disease.
Use this page as a practical checklist. You do not need fancy tools. Just a close look at the plant, the soil, and where the yellowing starts.
When yellow leaves are normal
These situations are usually safe and common, especially in home gardens.
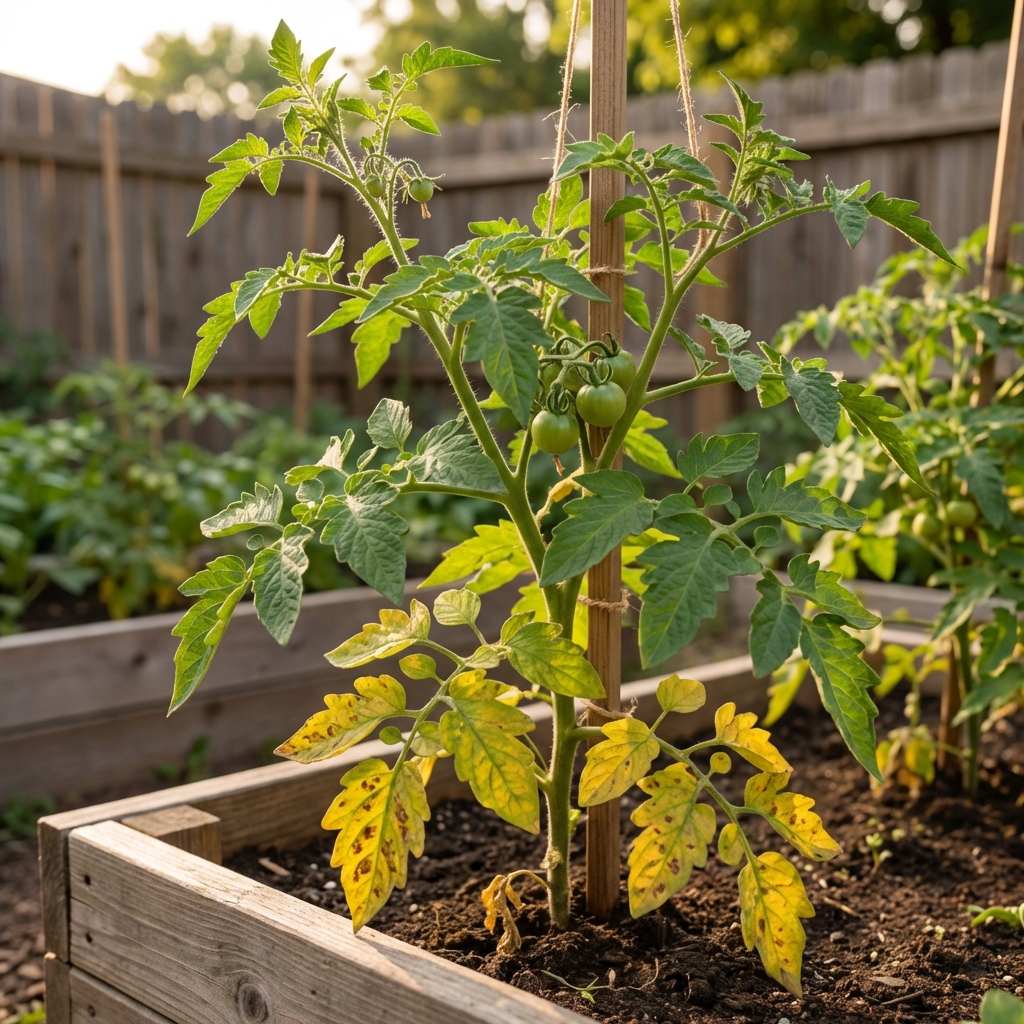
1) Older bottom leaves yellowing first
If the lowest leaves (closest to the soil) turn pale yellow and the top of the plant is pushing healthy green growth, that is often simple aging. Tomatoes naturally shed some older leaves as they grow taller and shade the lower canopy.
- Typical look: one or a few lower leaves yellow evenly, then brown and dry out.
- What to do: prune those leaves off with clean snips once they are fully yellow, especially if they are near the soil line.
2) Yellowing after transplant shock
After transplanting, tomatoes sometimes pause and show a little yellowing while roots re-establish. This is common if nights are cool, the plant got wind-whipped, or the root ball dried out once or twice.
- Typical look: slight overall paleness or a couple of older leaves yellowing within 7 to 14 days of planting.
- What to do: keep moisture steady, protect from cold nights if possible, and watch new growth. New leaves tell the real story.
3) A few shaded leaves inside a dense plant
As tomatoes get bushy, interior leaves may yellow because they are not getting enough light and airflow.
- What to do: lightly prune for airflow, especially below the first fruit cluster. Avoid stripping the plant bare.
Quick diagnosis: where it starts
Before you change anything, answer these two questions:
- Is yellowing starting on older leaves (bottom) or new leaves (top)?
- Is the yellowing even, between veins, spotty, or combined with curling?
In general:
- Bottom-up yellowing often points to watering stress, nitrogen or magnesium deficiency, potassium deficiency, or normal aging.
- Top-down yellowing more often points to iron deficiency, herbicide drift, certain virus issues, or root problems affecting uptake.
Fast visual key
Use this as a quick starting point, then confirm with the detailed sections below.
- Old leaves yellow evenly → normal aging or nitrogen shortage → remove fully yellow leaves, feed lightly if growth is pale.
- Old leaves yellow between green veins → magnesium shortage → consider Mg in fertilizer, use Epsom salt only with caution.
- New leaves yellow with green veins → iron uptake issue → check pH, consider chelated iron, fix root stress.
- Yellowing + spots + halos → leaf spot diseases → remove affected leaves, keep foliage dry, consider labeled sprays for suppression.
- Yellowing + limp plant + wet soil → overwatering or poor drainage → let soil breathe, adjust watering and drainage.
- Yellowing + curl + dry soil → underwatering → deep water, mulch, stabilize schedule.
- Twisted new growth → herbicide exposure → stop contaminated inputs, protect plants, expect slow recovery.
Most common causes and fixes
Watering problems (too much or too little)
Inconsistent moisture is one of the most common reasons homegrown tomatoes yellow. Roots need air as much as they need water.
- Overwatering signs: yellowing plus a limp look, soil stays wet for days, slower growth, sometimes fungus gnats (mostly in containers or very rich, constantly damp soil).
- Underwatering signs: yellowing plus leaf curl, crispy edges, soil pulls away from the pot, afternoon wilting that improves at night.
Fix:
- Containers: water deeply when the top 1 inch is dry and the pot feels lighter.
- In-ground and raised beds: check moisture 2 to 4 inches down. Water when it is drying at that depth, especially during heat, wind, and heavy fruiting.
- Mulch with 2 to 3 inches of straw, shredded leaves, or untreated grass clippings to stabilize moisture.
- Make sure containers have drainage holes and are not sitting in a saucer of water.
Nitrogen deficiency (older leaves yellow first)
Nitrogen is mobile in the plant. When tomatoes run short, they pull nitrogen out of older leaves to feed new growth. That makes bottom leaves go yellow first.
- Clue: overall paler plant, slower growth, yellowing starts low.
Fix: feed lightly and consistently.
- Use a balanced vegetable fertilizer or tomato fertilizer at label rates.
- If you prefer organic, fish emulsion or a blood meal based product can help, but avoid overdoing it. Too much nitrogen can delay fruiting and cause lots of leafy growth.
- Top-dress with compost as a gentle, steady option.
Magnesium deficiency (yellow between veins on older leaves)
This often shows up as interveinal chlorosis, which means the leaf turns yellow between greener veins. It typically starts on older leaves.
Fix:
- First, use a fertilizer that includes magnesium, especially if you have been using a high-potassium fertilizer that can compete with magnesium uptake.
- Epsom salt: use only if magnesium deficiency is likely (or confirmed by a soil test) and go light. A common home-garden approach is 1 tablespoon per gallon as a foliar spray or soil drench, applied once, then reassess in 7 to 10 days. Avoid repeated applications because excess salts can build up and it can mask other issues.
Iron deficiency (yellow new growth with green veins)
When the newest leaves turn yellow first and veins stay greener, iron is a common culprit, especially in high pH soils or when roots are stressed.
Fix:
- Check soil pH if you can. Tomatoes prefer roughly 6.0 to 6.8.
- Use a chelated iron product for quicker results, especially in containers.
- Avoid overwatering and fix compaction so roots can actually take nutrients up.
Potassium issues (older leaves, edge yellowing or scorch)
Potassium problems often show up on older leaves first as yellowing along the edges, sometimes followed by browning or a scorched look. Heavy fruiting can make potassium demand spike.
- Fix: use a tomato fertilizer that includes potassium (K) and keep watering steady. Avoid extreme swings, since stressed roots struggle to take potassium up.
Cold soil and phosphorus stress (purpling and slow growth)
In cool conditions, tomatoes can struggle to take up phosphorus. Leaves may look dull, and stems or leaf undersides may turn purple, often with slow growth.
- Fix: wait for soil to warm, mulch lightly, and avoid overwatering cold soil. Phosphorus often becomes available again once temperatures rise.
Heat, cold nights, and sudden swings
Tomatoes can yellow when nights drop cold or when daytime heat spikes. The plant is stressed and nutrient uptake slows.
- Fix: keep soil evenly moist, mulch, and use frost cloth on unexpectedly cool nights. Once conditions settle, new growth should look better.
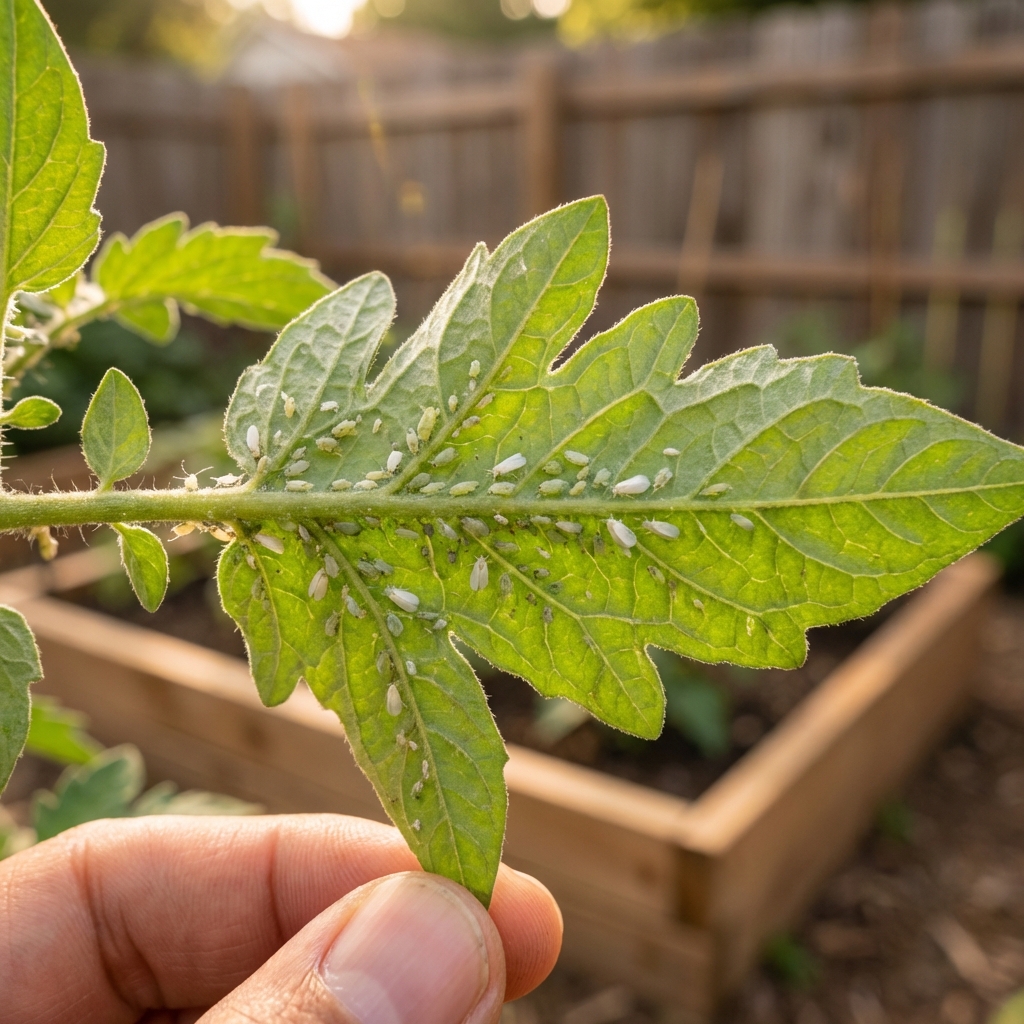
Pests that trigger yellowing
Some pests cause stippling, yellow speckling, distorted growth, or general decline.
- Spider mites: tiny yellow specks, fine webbing, worse in hot and dry weather.
- Aphids: curled or distorted leaves, sticky honeydew, clusters on new growth.
- Whiteflies: tiny white insects that flutter up when you shake the plant, yellowing and weakening over time.
Fix:
- Start with a strong spray of water on leaf undersides.
- Follow with insecticidal soap or horticultural oil in the early morning or evening (avoid spraying in high heat).
- Spray safety: follow label directions, cover leaf undersides, test on a small section first, and avoid spraying open blooms when bees are active.
- Remove the worst leaves if heavily infested, and improve airflow.
Root-knot nematodes (stunting plus yellowing)
In warmer regions, root-knot nematodes can cause a slow decline: stunting, yellowing, and poor production even with decent watering and fertilizer.
- Clue: when you pull the plant, roots may have swollen galls or knots.
- Fix: rotate crops, plant resistant varieties when available, add organic matter, and consider solarizing heavily infested beds in hot climates.
Yellow leaves that are red flags
These signs mean you should act quickly, because the issue can spread or permanently reduce yield.
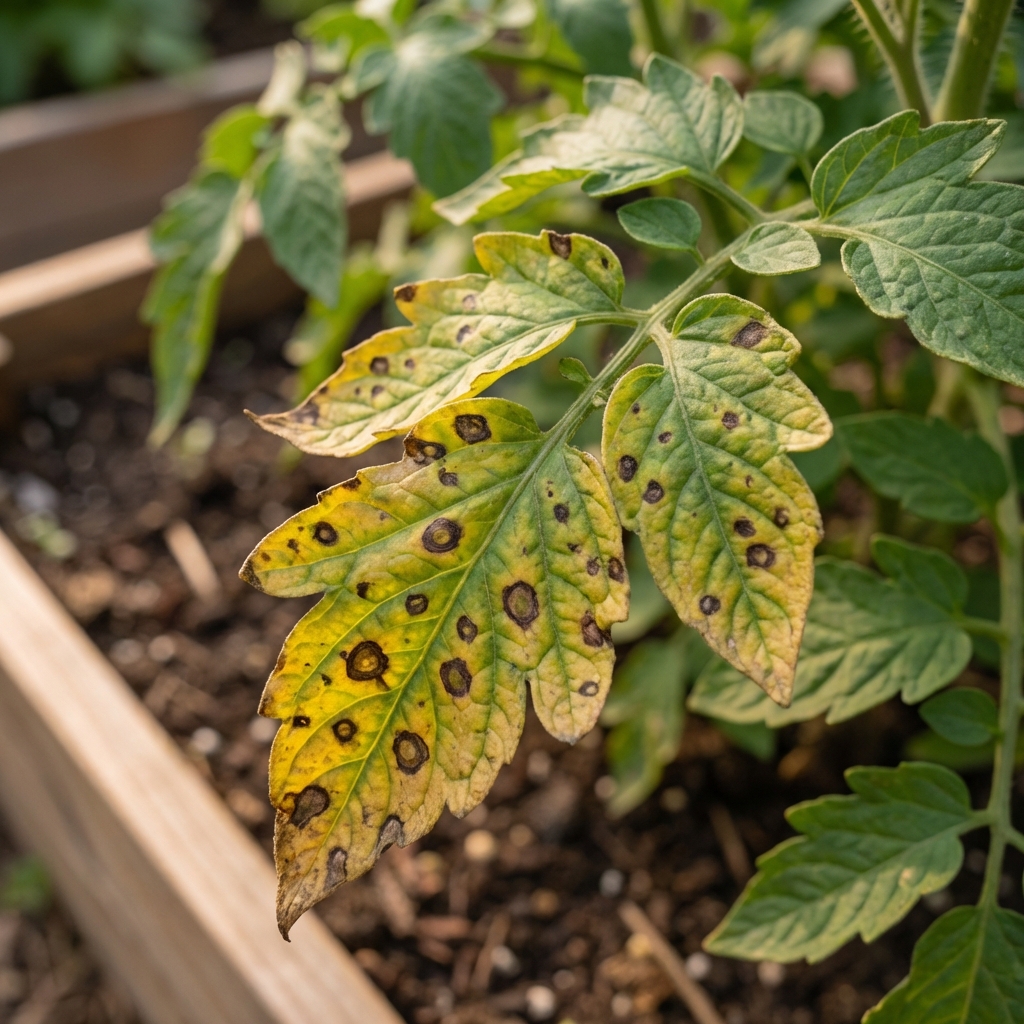
Leaf spots plus yellow halos
Yellowing with brown or black spots can indicate disease such as early blight or septoria leaf spot (fungal) or bacterial speck (bacterial). These often start on lower leaves and move up after rain, overhead watering, or heavy dew.
- What to do now: remove affected leaves, do not compost them if disease is active, and avoid wetting foliage when watering.
- Next step: consider a labeled product for suppression, not a cure. Copper is commonly used and may help slow both fungal and some bacterial issues. Bio-fungicides can also help in some gardens. Follow label directions carefully.
Sudden wilt plus yellowing
If a tomato yellows and wilts rapidly and does not recover overnight, suspect root damage, severe watering issues, or wilt diseases like fusarium or verticillium (soilborne). Diagnosis is not always obvious, so avoid guessing if you can.
- What to check: soil moisture first, then look for one-sided wilting, persistent decline, and brown discoloration inside the stem when cut lengthwise (vascular browning can be a clue).
- What to do: if moisture is normal and the plant keeps declining, isolate the issue by improving sanitation and avoiding splash. If you strongly suspect a soilborne wilt and the plant is failing, removing it can reduce stress and mess, but the bigger long-term fix is rotation and planting resistant varieties (often labeled V and F).
Twisted new growth or tight cupping
New leaves that twist, cup tightly, or look fern-like can be caused by herbicide drift or contamination (even from grass clippings, compost, or manure made from treated lawns or hay).
- What to do: stop using any unknown mulch or manure sources, and consider moving to clean potting mix if this is in a container. Damage may not fully reverse, but plants sometimes outgrow mild exposure.
Mosaic patterns or ring spots
Viruses are less common than watering or nutrition problems, but they do happen. Look for mottled light and dark green patterns (mosaic), ring spots, distorted growth, and overall stunting that does not respond to normal care.
- What to do: remove severely affected plants, control sap-sucking pests (aphids, whiteflies), and sanitize hands and tools. Do not smoke around tomatoes since tobacco mosaic virus can spread mechanically.
What to prune and what to leave
Pruning can help, but over-pruning can stress the plant and expose fruit to sunscald.
- Remove fully yellow leaves, especially those touching the soil.
- Remove leaves with active spotting if disease is present.
- Keep plenty of healthy foliage above fruit clusters so the plant can photosynthesize and shade fruit.
How much at once: avoid removing more than about 10 to 20% of foliage in a single session.
Determinate vs indeterminate: determinates (bush types) should be pruned lightly because they set fruit over a shorter window. Indeterminates (vining types) can handle more selective pruning for airflow.
Tip: use clean snips and do not prune when leaves are wet if you suspect disease.
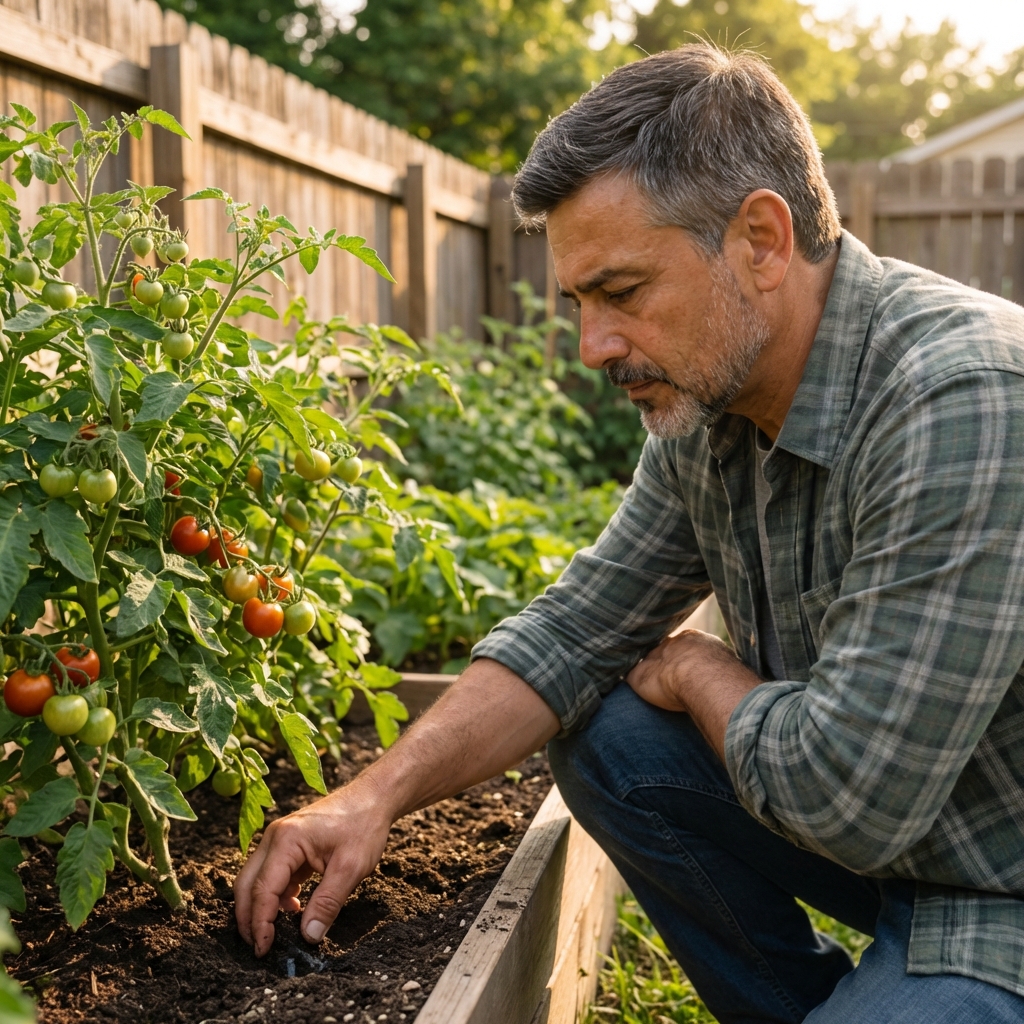
Simple step-by-step plan
- Look at the pattern: bottom leaves or new growth?
- Check soil moisture: finger test 2 inches down in containers, 2 to 4 inches down in beds.
- Inspect leaf undersides: mites, aphids, or whiteflies.
- Remove the worst leaves: especially low and yellow, or spotted.
- Stabilize care: deep watering, mulch, and consistent feeding.
- Watch new growth: improvement shows there first.
When to soil test
A soil test is worth it if yellowing keeps spreading even after you fix watering and do a reasonable feed, if you suspect high pH (iron issues), or if you are tempted to repeat treatments like Epsom salt or iron without clear improvement. Testing helps you avoid chasing the wrong deficiency.
FAQs
Should I remove yellow leaves from tomato plants?
Yes. Once a leaf is fully yellow it is contributing very little. Removing it improves airflow and reduces disease risk, especially near the soil line.
Can yellow leaves turn green again?
Slightly pale leaves can sometimes improve, but fully yellow leaves usually do not return to healthy green. Focus on getting new leaves to grow in healthy.
Is it okay if only the bottom leaves are yellow?
Often, yes. If the plant is otherwise vigorous and the yellowing is limited to older, shaded leaves, it is typically normal aging. Keep an eye out for spots, rapid spread, or wilting.
Is this blossom end rot?
Blossom end rot is mostly a fruit problem (dark, sunken spot on the bottom of the tomato), not a leaf-yellowing diagnosis. It is usually tied to inconsistent watering and calcium uptake. The fix is steady moisture and healthy roots, not heavy calcium dumping.
Bottom line
A few yellow leaves on a tomato plant can be perfectly safe, especially when they are older bottom leaves. The real goal is not a flawless plant. It is steady new growth, good airflow, and consistent care. If you correct moisture swings, feed reasonably, and stay ahead of pests and leaf spot, most tomatoes bounce back quickly.

Jose Brito
I’m Jose Britto, the writer behind The Country Store Farm Website. I share practical, down-to-earth gardening advice for home growers—whether you’re starting your first raised bed, troubleshooting pests, improving soil, or figuring out what to plant next. My focus is simple: clear tips you can actually use, realistic expectations, and methods that work in real backyards (not just in perfect conditions). If you like straightforward guidance and learning as you go, you’re in the right place.